Using Word's Automatic Outline Numbering
Have you ever had to number multilevel headings in a document?and then change the numbering every time you add or move one of them? In this section, you'll learn how to let Word insert and manage all your multilevel outline numbering for you.
Word includes seven built-in multilevel outline numbering schemes that can handle many of the documents or Web pages you're likely to create. To use one of them, first select the paragraphs you want to number. If you want to add numbering throughout the document, press Ctrl+A to select the entire document. Right-click in the editing window and choose Bullets and Numbering from the shortcut menu; then click the Outline Numbered tab (see Figure 18.15).
Figure 18.15. The Outline Numbered tab gives you seven choices from which to select; or select one and click Customize to adapt it to your needs.
NOTE
In addition to the Outline Numbering procedures discussed in this section, Word offers an alternative approach to creating both numbered and unnumbered lists, called List Styles.
If you need to create complex list formats and then reuse them in new documents, you might find List Styles more convenient than Outline Numbering. To learn more about List Styles, see "Using List Styles," later in this chapter.
CAUTION
If you want to number only headings, not paragraphs of body text, be sure to use one of the numbering schemes in the bottom row of the Outline Numbered tab. The schemes in the top row number both headings and body text.
For detailed guidance on avoiding problems with outline numbering, and troubleshooting problems that already exist, see "How to Troubleshoot Outline Numbering in Your Documents," in the "Troubleshooting" section of this chapter. |
Choose the scheme you want; then click OK. Figure 18.16 shows outline numbering applied to a sample document.
Figure 18.16. Outline numbering based on the second numbering scheme in the bottom row of the Outline Numbered tab.
Creating Customized Outline Numbering
If you're in a position to decide how you want your outline numbering to appear, try to use one of Word's defaults; it saves you some trouble. However, your document may require a numbering scheme that isn't one of Word's default settings. That's where Word's extensive Outline Numbering customization capabilities come in handy.
To customize outline numbering, right-click in the editing window and choose Bullets and Numbering from the shortcut menu; then click the Outline Numbered tab.
Select the numbering scheme closest to the one you want and click Customize. The Customize Outline Numbered List dialog box opens (see Figure 18.17). In the Preview box, you can see how the entire outline numbering scheme behaves; any changes you make are shown there immediately.
Figure 18.17. In the Customize Outline Numbered List dialog box, you can change and preview virtually any aspect of a numbered list.
Choosing the Outline Level You Want to Customize
You can customize each of Word's nine levels of outline numbering separately. Choose the level you want from the Level drop-down list box at the upper left. Word displays the current settings for the level you've selected. These settings vary not just based on outline level, but also based on the scheme from which you chose to start.
TIP
It's easy to forget in which level you're working. While you're customizing your outline numbering, glance at the Level drop-down list box every now and then to make sure that you're customizing what you think you're customizing. Or if you prefer, check in the Preview box; the currently selected level is displayed in black while others are displayed in light gray.
Choosing Text to Accompany Your Lettering or Numbering
In the Number Format text box, you can specify the text or symbols you want to appear before or after the number or letter Word inserts next to your heading or paragraph. You do this by editing the text surrounding the grayed-out number or letter.
For instance, in the example shown in Figure 18.17, Word adds a closed parenthesis mark. You might, for example, want to place an open parenthesis mark before the number as well so that Word inserts numbers as (1) rather than 1).
Choosing a Pattern for Your Numbering or Lettering
You can't use the Number Format text box to control the automatic lettering or numbering that Word adds to your document. Rather, you select the lettering or numbering pattern you want Word to choose from the Number Style scroll box. Word's lettering and numbering schemes include these and other options:
1, 2, 3,…
I, II, III,…
i, ii, iii,…
A, B, C,…
a, b, c,…
1st, 2nd, 3rd,…
One, Two, Three,…
First, Second, Third,…
01, 02, 03,…
Word also includes several bullet or symbol styles from which you can choose. If you prefer to choose your own bullet, you can choose New Bullet to select a different bullet character from the Symbol dialog box. Word also offers the option New Picture, which allows you to select a picture of your choice.
CAUTION
Although Word will insert any picture you like, pictures with complex detail (such as photographs of people) will not work well as small bullets.
TIP
You can also choose no lettering and numbering at all. If you choose (none) in the Number Style drop-down list, Word inserts only the text you enter in the Number Format text box. Imagine that you're writing the feature description of a product and you want to add the word "NEW!" before every second-level heading in your document. You could use this feature to do so.
Choosing a Number or Letter from Which to Start
By default, Word assumes that you want your numbering to start at 1 and your lettering to start at A. But that won't always be the case. For example, if you're contributing the fourth chapter of a book, you might want your first-level heading to start with the number 4. In the Start At scroll box located to the right of Number Style, choose the number you want to appear next to the first heading of the current level.
Including a Previous Outline Level with Your Numbering
It's common to see documents that include multilevel numbering like that shown in the following examples:
1.A.
4.4.2.
II.C.
You can instruct Word to insert numbering such as this. To do so, in the Previous Level Number drop-down list box (located under Number Style), choose the level of outline numbering that you want to appear next to your lower-level headings or paragraphs. For example, if your first-level headings are numbered (1), (2), (3), and you want your second-level headings to be numbered (1A), (1B), (1C), and so on, select Level 1 in the Previous Level Number box.
Notice that Word doesn't add the surrounding text you included in the Number Format text box for the preceding heading level?just the letter or number itself. Otherwise, you could easily wind up with ((1)A) or something equally unattractive.
NOTE
Because there is no level prior to Level 1, the Previous Level Number drop-down list box is grayed out when you're customizing Level 1 headings.
Customizing Font Formatting
You can spice up your outline numbers with almost any character formatting you want. From the Customize Outline Numbered List dialog box, click Font. The Font dialog box opens. You can choose any character formatting, spacing, or animation.
NOTE
Every font formatting option you normally have is available for numbered headings with two exceptions: You cannot use the Outline or Small Caps text effects.
Customizing the Position and Alignment of Outline Numbers
Some of Word's built-in schemes left-align all outline numbers, regardless of levels. Other schemes indent outline numbers; the deeper the outline level, the greater the indent. You might want to change these built-in settings. For example, you might like everything about a scheme except the way it indents paragraphs.
Outline numbering alignment is controlled from the Number Position drop-down list box in the Customize Outline Numbered List dialog box. You can choose to left-align, center, or right-align outline numbers. You can also specify against what the outline numbering is aligned. The Aligned At scroll box specifies how far from the left margin the alignment point is. For example, if you choose Centered as the number position and 1" as the Aligned At location, your outline number is centered over a point 1 inch from the left margin.
NOTE
The Aligned At setting doesn't control whether the entire line is left-aligned, centered, or right-aligned. It only controls how the outline numbering within the line is aligned.
Remember, you have to change the number position separately for each outline level you expect to use.
To see the effect of these changes in your document, switch to Normal or Print Layout view; changes are not accurately reflected in Outline view.
Customizing the Position and Alignment of Text Near Outline Numbers
You can also control the distance between the end of Word's automatic outline number and the start of the paragraph's text. To do so, enter a setting in the Indent At scroll box, in the Text Position area of the Customize Outline Numbered List dialog box.
The Indent At setting is measured from the left margin. If the Indent At setting is very small, it may have no effect on the first line of a paragraph because the outline number itself already extends beyond the indent. (Word doesn't overlap an outline number on top of paragraph text.)
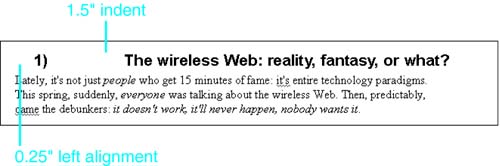
Indent At behaves as a hanging indent. In Figure 18.18, you can see first-level headings that are left-aligned at 0.25" with text indented at 1.5".
Figure 18.18. The first-level headings in this sample are left-aligned at 0.25" with text indented at 1.5".
Advanced Outline Numbering Options
Some outline numbering customizations are rarely used, but when they're needed, they're needed badly. You can control these by clicking More in the Customize Outline Numbered List dialog box. More options appear (see Figure 18.19).
Figure 18.19. You can control more advanced aspects of outline numbering from the "expanded" version of the Customize Outline Numbered List dialog box.
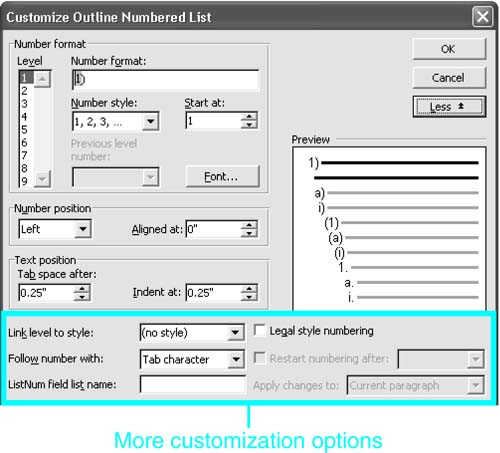
Linking an Outline Level to a Style
The Link Level to Style drop-down list box in the Customize Outline Numbered List dialog box enables you to attach any style to an outline numbering level. That way, whenever you enter or format a paragraph using that style, Word automatically includes numbering, just as it includes all the other formatting associated with the style.
Choosing a Spacer Character
The Follow Number With drop-down list box in the Customize Outline Numbered List dialog box enables you to choose the non-editable character that Word places between your outline number and your paragraph text. By default, Word uses a tab, but you can change this to a space, or instruct Word not to insert a character at all.
Placing Two Outline Numbers on the Same Line
In some documents, notably contracts, you may be required to include two outline numbers on the same line, as in the following example:
Article I. | |
Section 1.01 (i) | |
(ii) | |
Word lets you do this. But to do so, you must work with a little-known field, { LISTNUM }. First, set up your headings as you normally would. Then place your insertion point where you want the first extra heading to appear, and do the following:
Choose Insert, Field.
Select ListNum from the Field Names box (see Figure 18.20).
Figure 18.20. Setting up a { LISTNUM } field in the Field dialog box.
In the List Name scroll box, choose the name of the list you want to use. Word provides three built-in lists: LegalDefault, NumberDefault, and OutlineDefault. The numbering schemes associated with each of these are shown in Table 18.2.
Table 18.2. Numbering Schemes Associated with Word's ListNum Lists
Level
NumberDefault
OutlineDefault
LegalDefault
1
1)
I.
1.
2
a)
A.
1.1.
3
i)
1.
1.1.1.
4
(1)
a)
1.1.1.1.
5
(a)
(1)
1.1.1.1.1.
6
(i)
(a)
1.1.1.1.1.1.
7
1.
(i)
1.1.1.1.1.1.1.
8
a.
(a)
1.1.1.1.1.1.1.1.
9
i.
(i)
1.1.1.1.1.1.1.1.1.
If you don't choose a list name, Word uses NumberDefault, unless you have specified other lists elsewhere in your document, in which case Word uses the last list you specified.
Choose which, if any, field options you want to include with your { LISTNUM } field. The first allows you to specify the Level in the List, overriding Word's default settings. The second allows you to set a Start-At Value?a number that Word will use for the first heading that reflects the { LISTNUM } field. If you don't choose a Start-At Value, Word uses 1.
Select the entire field and copy it to every other location where you want a heading just like it.
If you view the field results, you can see that you've now added a basic heading, such as
a)
Follow these steps to attach all the headings in the same sequence to a level in your outline numbering scheme so that they look exactly as you want them to:
Choose Format, Bullets and Numbering, Outline Numbered.
Extra headings are most commonly used with the Section and Article scheme (the scheme on the bottom row at the left). Select this scheme and click Customize.
Click More to display the advanced options.
Make sure that you're working at the level you want and that the Number Format settings are the way you want them.
In the ListNum Field List Name drop-down list box, enter the same word you used in your ListNum field, such as LegalDefault or NumberDefault.
Click OK.
You now have normal outline numbering as well as an extra outline number that uses the number format of the level immediately under the first outline number. In other words, if the outline number you applied through Format, Bullets and Numbering is formatted as Level 1, the outline number you applied through Insert, Field is Level 2.
 To learn more about working with fields, see Chapter 23, "Automating Your Documents with Field Codes," p. 771.
Applying Legal Style Numbering
Some legal documents must use Arabic numbering (1, 2, 3…) throughout. For example, even though Word's numbering scheme for legal documents may specify that Articles use Roman numerals in some levels (for example, Article I, II, and so on), this may not be appropriate for your document. You could change every level's number style to Roman numerals individually. However, Word provides a shortcut; you can simply check Legal Style Numbering in the Customize Outline Numbered List dialog box, and Word does it for you.
Incrementing List Numbers in a Specific Level
By default, Word restarts numbering whenever an item in a list follows an item one level above it. You can see this behavior in Figure 18.21.
Figure 18.21. By default, Word restarts numbering whenever a lower list level follows a higher list level.
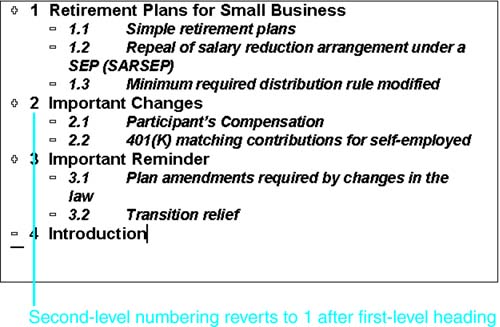
However, if you clear the Restart Numbering After check box near the bottom of the expanded Customize Outline Numbered List dialog box, Word continues to increment the numbers from where they left off (see Figure 18.22).
Figure 18.22. Clearing the Restart Numbering After check box instructs Word to keep incrementing lower-level headings rather than restarting them at 1.

In Word, you can also choose which level of heading you want to trigger the restarting of numbering. This choice can be different for each outline level. To change the outline level that triggers renumbering, follow these steps:
Make sure that you're working in the outline level you want to change. (This feature is unavailable if you're working in Outline Level 1.)
Make sure that the Restart Numbering After check box is checked.
Choose the level you want from the Restart Numbering After drop-down box.
Click OK.
Specifying Where Your Changes Should Apply
By default, if you make changes anywhere in the Customize Outline Numbered List dialog box, they apply globally to the entire document as soon as you click OK to exit. However, you might have a portion of a document that you want to treat differently. You have more options available through the Apply Changes To drop-down list box:
Choosing Current Paragraph tells Word to apply changes only to the paragraph where your insertion point is currently located.
Choosing This Point Forward tells Word to apply your changes to the rest of your document, starting at the insertion point.
Choosing Whole List tells Word to apply your changes to the entire outline.


