Introducing Tables of Figures and Captions
Often, you want other tables in your document besides a table of contents. For example, you may want a table that compiles all the figures in your document, or all the equations, or, for that matter, all the Word tables. You can build tables such as these in much the same way you've just learned how to build tables of contents.
However, Word contains a few extra tricks that might make your life even easier. For example, it can automatically insert captions for you?and then build your table of figures from the captions it has inserted. The next sections review Word's powerful captioning features. After you understand captioning, you'll learn how to compile your captions into tables of figures?or any tables you want.
Using Word's Caption Feature
You can't have a table of figures if you don't have any figure captions to compile into your table. So your first step is to get some figure captions into your document and let Word know that they're figures. There are three ways to do that.
You can insert your figure captions manually, using a style that you won't use for anything except captions. Word has a built-in style, Caption, that's perfectly suited for this purpose. You also can use Word's Caption feature. Or, best of all, you can tell Word to automatically insert a caption whenever it sees you inserting something that ought to be captioned.
To use Word's Caption feature to streamline captioning, first click where you want a caption to appear. Then, choose Insert, Reference, Caption to display the Caption dialog box, as shown in Figure 20.10. Word displays its default caption, Figure 1, in the Caption text box. If you want to add a description of the figure, you can type it after the figure number and click OK, and Word inserts the entire caption at your insertion point.
Figure 20.10. The Caption dialog box enables you to enter specific caption information while Word handles boilerplate text and automatic caption numbering.
Click OK to return to the Captions dialog box; then click Numbering, clear the Include Chapter Number check box from the Caption Numbering dialog box, and click OK twice.
TIP
If you insert new captions or move existing ones, Word automatically renumbers all the captions for you whenever you display the document in Print Preview, print the document, or update your fields. To see the new numbering right away, choose Edit, Select All (or press Ctrl+A) to select the entire document.
If you already have a table of contents, you'll be asked whether you want to update the entire table or only page numbers. Remember to choose Update Page Numbers Only if you've added custom formatting to your table of contents that you don't want to lose.
Creating Captions for Other Document Elements
What if you aren't creating captions for figures? If you're creating captions for equations or tables instead, choose Equation or Table in the Label drop-down list box of the Caption dialog box. If you're creating another element, such as a photo or map, you can create a special label by clicking New Label. The New Label dialog box opens (see Figure 20.11). Type your label and click OK.
Figure 20.11. If you're creating captions for something other than a figure, table, or equation, enter your custom label in the New Label dialog box.
The new label now appears in the Caption text box, and it is added to the list of available labels for future use within the current document. If you decide you no longer need it at some point, choose Insert, Caption; then display the label in the Label drop-down box, and click Delete Label.
Changing the Sequence Word Uses to Number Captions
By default, Word numbers captions with Arabic numbers (1, 2, 3,…). However, you can change this. In the Caption dialog box, click Numbering; the Caption Numbering dialog box opens (see Figure 20.12). In the Format drop-down list box, choose a new sequence, such as capital letters or lowercase Roman numerals. Click OK.
Figure 20.12. The Caption Numbering dialog box enables you to change the sequence Word uses to number captions, or to add a chapter number to your caption numbers.
Adding Chapter Numbers to Your Captions
Often, you want your captions to include chapter numbers as well as sequence numbers, as is the case with the captions in this book. Word's "official" approach to inserting chapter numbers is surprisingly complex, and it makes sense only if you have multiple chapters in your document. If you are editing a document that contains only one or a few chapters (even if it's part of a larger book), skip to the "Easier Ways to Add Chapter Numbers" section for some quicker ways to accomplish this.
Word connects chapter numbering in captions with the Outline Numbering feature. That means you have to insert outline numbers in your document before you can get chapter numbers in your captions. If you request chapter numbers by checking the Include Chapter Number check box in the Caption Numbering dialog box, you're likely to encounter the bewildering message box shown in Figure 20.13.
Figure 20.13. Word doesn't want to insert chapter numbers in your captions because you haven't inserted outline numbers throughout your document.
 See "Using Word's Automatic Outline Numbering," p. 636.
By connecting captions to chapter numbers, Word can use { STYLEREF } fields that look for the most recent example of a style and borrow the text they need from there. This way, Word knows when a caption should read Figure 1.1 and when it should read Figure 2.1.
This is a hassle, especially if you weren't intending to use outline numbering, but go along with it?for now.
Set Up Your Document for Outline Numbering
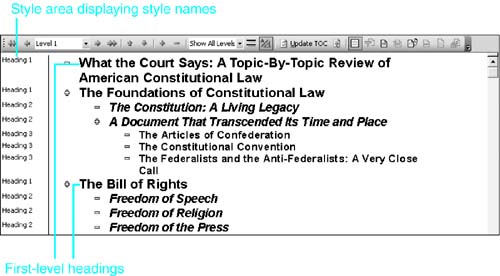
Start by using Word's outlining tools to make sure you used heading styles throughout your document. This procedure won't work if you simply use outline levels. You must use the heading styles Heading 1, Heading 2, Heading 3, and so on. Set aside one heading level?typically Heading 1?specifically for your chapter names. Figure 20.14 shows how your first-level headings should look in Outline view.
Figure 20.14. Make sure you use Heading 1 only for chapter names and you include nothing but chapter names in your Heading 1s.
TIP
To display the styles used in a document (as shown in Figure 20.14), choose Tools, Options, View; and set the Style Area Width to a width wide enough for all your styles to be visible, such as 0.8" .
Insert Your Outline Numbering
Next, insert your outline numbering, as shown here:
Select the entire document (or at least all sections where you want to add captions).
Choose Format, Bullets and Numbering.
Choose the Outline Numbered tab.
Select a heading numbering scheme from the bottom row of four options. (If you choose from the top row, Word numbers all your paragraphs, not just headings, so your figure numbers won't match your chapter numbers.)
Click Customize to make any changes to your outline numbering scheme, or just click OK to insert the outline numbers.
Insert Your Captions
Now that you have outline numbers in your document, follow these steps to insert your captions:
Place the insertion point where you want your first caption.
Choose Insert, Reference, Caption.
In the Caption dialog box, add any information you want to your caption. If necessary, add a new label.
Click Numbering. The Caption Numbering dialog box opens.
Check the Include Chapter Number check box, if it is not already checked.
Choose Heading 1 in the Chapter Starts with Style drop-down list box. (This example assumes that chapter numbers are formatted with Heading 1 style?and, as already discussed, they are the only text formatted with that style.)
In the Use Separator drop-down list box, choose the separator character you want from the following selection: hyphen, period, colon, em dash, en dash. Separator characters appear between the chapter number and figure number, as in the following examples: 1.1, 1-1, 1:1.
Click OK twice.
The caption appears in your document, containing the number of the current chapter. Underneath the hood, here's what's happened. Word has inserted a { STYLEREF } field that searches toward the beginning of the document for the first Heading 1 style. When a Heading 1 style is found, the text formatted in that style is displayed as the field result.
TIP
If you've gone through all this, and then decide you don't want outline numbers after all, there is a possible solution. When the document is absolutely finished, select it all (Ctrl+A). Then follow these steps:
Press Ctrl+Shift+F9 to unlink all the fields in your document so that none of them will update ever again. (This affects all fields, including the fields that track caption numbering within the chapter?so be careful!)
With the entire document selected, choose Format, Bullets and Numbering, Outline Numbered.
In the Outline Numbered tab choose None and click OK. The outline numbers disappear, but the captions stay the way they were.
Easier Ways to Add Chapter Numbers
Boy, that was hard work. Isn't there an easier way? You'd better believe it. You really don't have to include outline numbering to get chapter numbers in your captions.
Adding Chapter Numbers to Captions in One-Chapter Documents
Consider the easiest case: a document containing only one chapter. Maybe you've been asked to write Chapter 12 of a book. You're not working from within someone else's master document (or, if you are, they aren't requiring you to use Word's outline numbering approach to captions).
Follow these steps to insert chapter numbers:
Use Word's Insert, Reference, Caption feature to insert captions without chapter numbers.
Choose Edit, Replace and then use Word's Find and Replace feature to search for all references to the word "figure" that are styled using the Caption style. Replace them with "figure" followed by your chapter number and whatever separator character you want to use. You can search for a style by clicking the Format button in the Replace tab, clicking Style, and choosing the style for which you want to search.
See "Creating Styles," p. 339.
Creating Custom Caption Numbering for All Your Documents
You can go a step further and create a chapter numbering solution you can reuse in all your documents, no matter how many chapters they contain?without ever using outline numbering unless you want to. Follow these steps:
Select the chapter number anywhere in your document and format it with a new character style through the New Style dialog box (see Figure 20.15), accessible through Format, Styles and Numbering, New Style. For this example, name the character style chapnum.
Figure 20.15. Creating a character style named chapnum in the New Style dialog box.
 See "Understanding Character Styles," p. 332.
Use Insert, Reference, Caption (refer to Figure 20.10) to insert a caption that doesn't contain a chapter number. (If the chapter number appears in the Caption text box, click Numbering and clear the Include Chapter Number check box from the Caption Numbering dialog box.)
If you want, reformat the caption to your tastes and update the caption style to reflect your changes. After you reformat the caption, click in the Style drop-down box on the Formatting toolbar, press Enter, and click OK in the Modify Style dialog box that appears.
Click where you want the chapter number to appear within your caption.
Press Ctrl+F9 to insert field brackets.
Type the following within the field brackets (see Figure 20.16): styleref chapnum. This inserts a STYLEREF field that looks for text you formatted in the chapnum character style.
Figure 20.16. How the field looks when placed in your document (and toggled to display field codes rather than results).
Press F9 to update the field. It should now display the chapter number to which you applied the character style (see Figure 20.17). After you update the STYLEREF field, it should display the chapter number.
Figure 20.17. How the same field looks when updated to show results.
Manually enter any separator characters you need (see Figure 20.18). In this example, a period is added to separate the chapter number and figure number.
Figure 20.18. The same field, manually adjusted to include separator characters.
Create an AutoText entry based on your caption. To do so, select the caption, choose Insert, AutoText, New; type an entry name such as figr (see Figure 20.19); and click OK. Finally, make the entire caption an AutoText entry so that it's easy to reuse.
Figure 20.19. Creating an AutoText entry that makes this customized caption easy to reuse.
Now, whenever you start a new document that you want to contain automatically numbered captions, do this: First, type the chapter number and mark it as a bookmark named chapnum. Then, wherever you want to insert a caption, type the AutoText entry and press F3 to turn it into a complete caption.
Automating Captions
You can take Word's captioning feature one giant step further. Word can automatically add captions any time you add specific graphics or other elements to your document. To use Word's AutoCaption feature, choose Insert, Reference, Caption to display the Caption dialog box. Then, click AutoCaption. The AutoCaption dialog box opens (see Figure 20.20).
Figure 20.20. From the AutoCaption dialog box, you can tell Word which document elements to caption automatically, which label to use, and where those captions should appear.
In the Add Caption When Inserting scroll box, you see a list of document elements. This list varies depending on the software installed on your computer. It can include elements created by other Microsoft Office programs; for example, PowerPoint slides or Excel worksheets. It can also include a wide range of elements that can be created by Microsoft Office's common tools, including charts, graphics, and drawings, as well as equations built with Microsoft Equation 3.0. It can also include files generated with a wide range of third-party programs, such as Adobe Acrobat, Adobe Photoshop, and Macromedia Fireworks.
Check the box next to every item you want Word to caption. Then, specify the label you want to use (or create a new label, if you want). In the Position drop-down list box, choose whether you want your caption to automatically appear below or above the item you insert. If you want to change automatic caption numbering, click Numbering and make your changes in the Caption Numbering dialog box you learned about earlier.
If you choose, whenever you check a box to automatically caption another type of document element, you can also click New Label to customize the text of the caption that will accompany that specific element. These customized labels are attached to the document's current template, which means that you can associate different caption text with the same file types if you work with a document attached to a different template.
When you finish, click OK in the AutoCaption dialog box. Word begins adding captions automatically whenever you insert a document element you told it to caption. Existing elements already in the document are not automatically captioned, however.
Building Tables of Figures
Now that you understand captions, it's time to discuss ways you can compile those captions into tables of figures. First, choose Insert, Reference, Index and Tables, and click the Table of Figures tab (see Figure 20.21).
Figure 20.21. The Table of Figures tab offers many of the same options as the Table of Contents tab.
NOTE
Tables of "figures" can list a range of document elements: images, equations, row-and-column tables, and many others.
The Table of Figures tab looks similar to the Table of Contents tab you learned about earlier in this chapter. For example, you can choose whether page numbers should appear in your table, and if so, whether they should be right-aligned or appear next to the caption text. If you right-align your figure listings, you can choose a tab leader. You can also choose from five formats: Classic, Distinctive, Centered, Formal, and Simple.
You can see the effects of any change you make in two separate preview boxes: Print Preview shows how your table of figures will appear in a printed document, and Web Preview shows how it will appear if saved as a Web page and displayed through a Web browser.
NOTE
These formats are designed to complement the table of contents formats, and they use the same names as Word's table of contents formats. However, they are not identical to the table of contents formats. As with tables of contents, you can see what a format will look like in the Preview box.
When you choose a Table of Figures format and click OK, Word inserts the table in your document. Word applies its built-in Table of Figures style, after changing the style to reflect the format you chose.
Each table of figures Word compiles is based on one set of captions in your document. In other words, if you created some captions using the Table label, and others using the Figure label, each set has to be compiled separately into its own table of figures?but then, that's probably what you want.
In the Caption Label drop-down list box, choose the type of captions you want to compile. If you want to include the labels and numbers as well as the caption text, check the Include Label and Number check box; otherwise, clear it. If you're now satisfied with your table, click OK, and Word inserts it in your document. Figure 20.22 shows a default table of figures using the built-in styles in the Normal template.
Figure 20.22. The default table of figures.
Building Tables of Figures from a Different Style
Until now, you've learned how to build tables of figures by telling Word to collect the contents of every figure formatted with the Caption style. Because Word automatically uses the Caption style for all the captions it creates, you're in good shape as long as you use Word's automatic captioning feature. But what if you want to compile a table from text formatted in a different style?
Choose Insert, Reference, Index and Tables; then choose the Table of Figures tab; and click Options. The Table of Figures Options dialog box opens (see Figure 20.23).
Figure 20.23. In the Table of Figures Options dialog box, you can choose another style from which to build your table?or, as you'll see later, you can choose a set of table entry fields.
To choose another style, check the Style check box and select the style from the drop-down box next to it. Click OK to return to the Table of Figures tab, and click OK again to insert the table in your document.
Building Tables from Figures with Different Styles
Occasionally, you might want to create a table of figures based on document elements that don't share a common style. For example, you might want a table of figures that contains all the quotations in your document. Because those quotations appear within paragraphs of various types scattered throughout your document, you can't compile them into a single figure table based on one style.
Earlier in this chapter, you learned about TC fields, which Word can use to build tables of contents without using styles. TC fields come to your rescue again now. Follow this procedure:
Select the text you want to incorporate into your table of contents.
Choose Insert, Field.
Choose TC from the Field Names scroll box.
Click Field Codes.
Click Options.
In the Description text box, enter the text you want to appear for this reference when the table of figures is compiled. Be sure to place the text within quotation marks.
After the close quotation mark, enter \f followed by a letter of the alphabet that will identify all entries for this table of figures.
Click OK.
Continuing with the quotation example, imagine that your document has a quotation by Alvin Toffler. You might enter the TC field:
{ TC "Toffler" \f q }
Then, later, you come across a quotation by Tom Peters you want to flag:
{ TC "Peters" \f q }
Because they both use the \f q switch, you can compile them by following these steps:
Choose Insert, Reference, Index and Tables, Table of Figures to display the Table of Figures tab.
Click Options to display the Table of Figures Options dialog box.
Check the Table Entry Fields check box.
Choose Q (or whatever letter you've inserted after \f in your TC fields) in the Table Identifier drop-down list box.
Click OK twice.
Word builds a table of figures that contains the names of all the people you've quoted and the page numbers where the quotes may be found.


