COMPILING YOUR INDEX
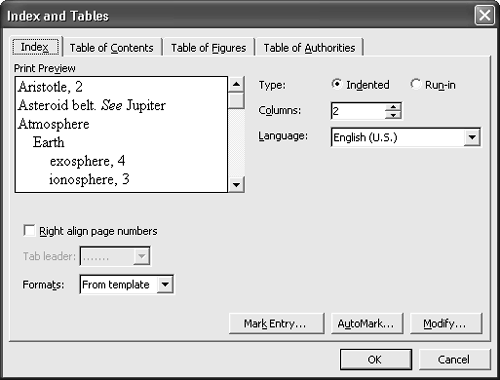
Now that you've learned how to create index entries, you can move on to compiling them. To prepare your index for compilation, place your insertion point where you want the index (typically at the end of the document). Then, choose Insert, Reference, Index and Tables, and click the Index tab (see Figure 21.3).
Figure 21.3. You can control nearly all aspects of compiling an index through the Index tab of the Index and Tables dialog box.
If you've read the coverage of tables of contents in Chapter 20, "Tables of Contents, Figures, Authorities, and Captions," you will see some familiar elements in this dialog box. For instance, as with tables of contents, Word's default format for indexes is From Template, which means that it uses the Index styles built into whichever template you're using.
Word also provides several more formats: Classic, Fancy, Modern, Bulleted, Formal, and Simple. If you've chosen one of these formats for your table of contents, you should probably choose the same format for your index for a consistent look. When you change a format (or make most other changes), Word shows what you can expect in the Print Preview box.
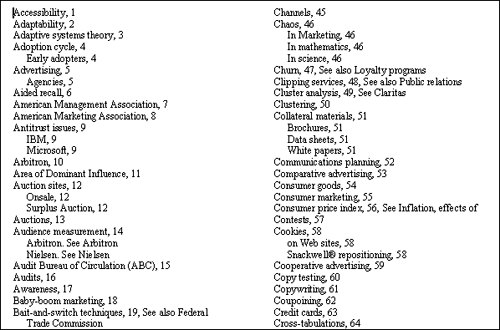
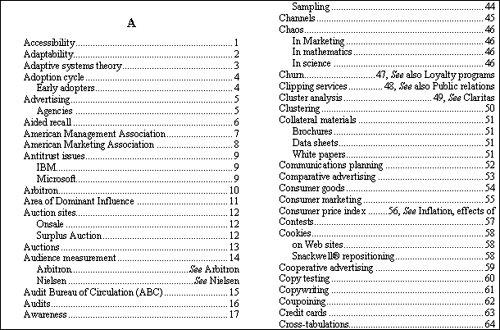
After you've finished making changes throughout the Index tab of the Index and Tables dialog box, click OK. Word inserts an index in your document. Notice that the index appears in a section of its own. Word places the index in its own section because most indexes use a different number of columns than the surrounding text. Figure 21.4 shows an excerpt from an index built with Word's default settings.
Figure 21.4. An excerpt from an index built using Word's default settings.
TIP
Because the index is contained in its own section, you can create a separate header or footer for it, or customize its page numbering.
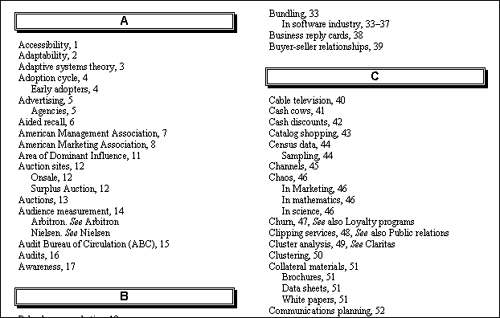
Unlike the From Template format, all of Word's alternative index formats, with the exception of the Simple format, also add headings for each letter of the alphabet. Figure 21.5 shows a sample index formatted with the Fancy format. If you want headings like these, use any of the alternative formats except Simple.
Figure 21.5. In this index, built with Word's Fancy format, each letter that contains an index entry has its own heading. Word skips letters without index entries.
Changing Index Formatting
The Normal template contains nine index levels, all formatted as 12-point Times New Roman, with each level indented 0.17 inches more than the level before it. If you want to change these formats manually, follow these steps:
Insert an index in your document.
Select an entry that uses the index heading style you want to change. (Be sure to include the paragraph mark at the end of the entry.) Reformat the entry. Word immediately reformats all entries that use the same index heading style.
Repeat step 2 for any other index heading styles you want to modify.
If you reformat an index entry, but Word doesn't reformat the others consistently, see "What to Do If Word Doesn't Reformat All Index Entries Consistently," in the "Troubleshooting" section of this chapter. |
Applying Index Formatting Changes to a Template
If you want, you can make formatting changes used in an existing index apply to all future indexes created through the template used to create the original index.
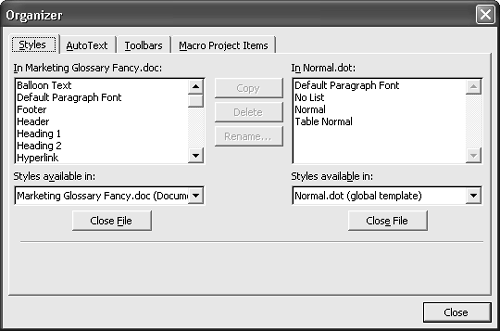
To copy formatting changes into a template?such as the Normal template, which defines styles for most Word documents?use the Organizer:
Choose Tools, Templates and Add-Ins.
Click the Organizer button (see Figure 21.6).
Figure 21.6. Displaying the Organizer in order to apply index formatting changes to your template.
In the left window (the window with your filename), select the styles you want to copy.
Look at the right window to make sure that it displays the styles in the template you want to use. If it does, click Copy. You may be asked to confirm that you want Word to overwrite existing styles in the target template; choose Yes.
NOTE
If you want to store your index styles in a different template than the one Word displays, click Close File in the right window; then click Open File, browse to the template you want, and choose Open.
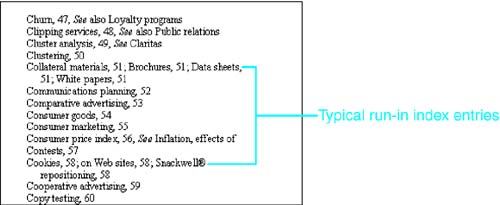
Controlling Space with Run-In Indexes and Columns
If you're short on space, you may want to create a run-in index, such as the one shown in Figure 21.7. A run-in index places subentries on the same line as the main entry. Often, using the Run-In option can shorten your index by as much as 30% to 40%. The more subentries you use, the more space you save. To create a run-in index, use the radio buttons in the Type section of the Index and Tables dialog box to change from Indented to Run-In.
Figure 21.7. Using the Run-In option can substantially reduce the number of pages required for your index.
Another way to conserve the amount of space an index takes up is to alter the number of columns used on each page. By default, Word creates two-column indexes. Most books use two-column indexes, and in most cases, so should you. However, you may occasionally want to change this setting, especially if
You're using a relatively wide page size
You're using relatively small type for your index entries
Word builds indexes of up to four columns. Enter the number of columns you want in the Columns list box of the Index tab.
Creating Indexes in Different Languages
You may need to index a document written entirely, or in part, in a language that uses letters not in the English alphabet, such as Å (Swedish), Ö (German), or CH and LL in Spanish. These letters generally require custom alphabetization according to the rules of the language; if you simply work in English, they will be alphabetized incorrectly.
To do so, choose Insert, Reference, Index and Tables and choose the Index tab. Then select a language from the Language drop-down box, make any other setting changes you need, and click OK to compile your index. Word alphabetizes the index based on the alphabetization conventions of the language you selected.
Right-Aligning Page Numbers in an Index
Except for Word's Formal index style, all Word's built-in index styles place the page number next to the end of the index entry text. If you prefer to right-align the page numbers (see Figure 21.8), check the Right Align Page Numbers check box in the Index tab.
Figure 21.8. This index is styled in the Classic format and uses right-aligned page numbers with a dot leader.
If you choose to right-align page numbers, Word also lets you select the Tab Leader that Word is to use between the entry text and the page numbers: a dotted, dashed, or solid line.
Adding Chapter Numbering to Your Index
If your document has multiple chapters, each renumbered from the first page of the chapter, you probably want an index that includes chapter numbers prior to the page number of each listing, as in the following example:
Van Diemen's Land (Tasmania), 4-2, 12-29, 14-10
Word automatically includes chapter numbering in your document if you have used Word's page numbering feature (Insert, Page Numbers) to insert chapter numbers in your header or footer. In the preceding example, the separator character that separates the chapter number from the page number is a hyphen. However, when you establish your page numbers, you can choose a period, a colon, an em dash, or an en dash instead, and the separator character you choose will apply in your index as well.
CAUTION
To use Word's page numbering feature to insert chapter numbers, you have to first use Outline Numbering. This feature is discussed at length in Chapter 18, "Outlining: Practical Techniques for Organizing Any Document."


