Working with Cross-References
Cross-referencing is a great way to help readers find relevant material scattered throughout a long document. However, many writers avoid manual cross-referencing because it is difficult to manage and update. Every time you edit your document and change its page numbering, who will go through the entire document and fix every cross-reference?
Word will. Word 2003 automates cross-references, making them exceptionally convenient and flexible. And if there's a cross-referencing task Word won't handle by itself, chances are you can still make it happen with field codes.
 For more information on working with field codes, see Chapter 23, "Automating Your Documents with Field Codes," p. 771.
You insert nearly all your cross-references through the Cross-reference dialog box. To display it, choose Insert, Reference, Cross-reference. (If Cross-reference does not appear in the Insert menu, use the double-down arrow to make Word display its full menus.) Figure 22.14 shows the Cross-reference dialog box.
Figure 22.14. The Cross-reference dialog box can insert virtually all your cross-references.
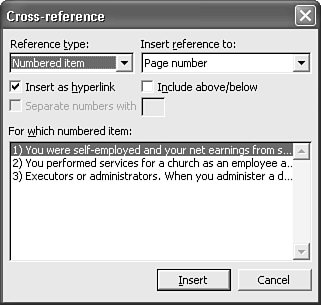
This deceptively bare-looking dialog box packs quite a wallop: You can create cross-references to nine different elements of your document and customize the contents of any of them. More specifically, you can create cross-references to the following document elements.
NOTE
In these examples, the text in the monospaced font represents examples of text Word can insert as a cross-reference.
Headings you formatted using one of Word's built-in heading styles. (Example: "For more information about Honus Wagner, see Baseball in the 1920s.") Headings are natural reference points within a document. They stand out due to size and formatting, so they're easy for your reader to find. Moreover, they define important topics in your document that are often worth referencing.
Numbered items (paragraphs and/or headings) you numbered using Word's Outline Numbering feature. (Example: "See Section I.2.a.")
Bookmarks. (Example: "See coverage on page 133.") Occasionally, you'll want to cross-reference a block of text that doesn't correspond neatly to a document heading. For example, you might want to refer to an anecdote that was covered elsewhere in a different context; the anecdote may not have been important enough to warrant its own heading. Cross-referencing a block of text that is not a heading requires an extra step before proceeding. You must first select the text you want to cross-reference and use Insert, Bookmark to create a bookmark. Creating bookmarks is covered in more detail earlier in this chapter.
Footnotes or endnotes. (Example: "See Footnote 7.")
Equations, figures, and tables for which you created captions using Word's Caption feature. (Example: "See Table 3.2: 1999 Quarterly Results.") If you captioned the equation, figure, or table using Word's Caption or AutoCaption feature, you can easily insert an automated cross-reference.
TIP
If you use heading styles and AutoCaptions, you make it much easier to create cross-references based on headings and captions.
To understand cross-referencing, it helps to first understand the steps involved in creating any cross-reference. After that, we'll take a closer look at the cross-references you're most likely to create: headings, bookmarks, footnotes, and figures.
Creating a Cross-Reference
Whenever you create a cross-reference from the Cross-reference dialog box, you follow the same general steps:
Click the insertion point at the location in your document where you want your new cross-reference to appear.
CAUTION
In other words, don't click in the location containing the original text you are cross-referencing.
Add any text you want to appear next to your cross-reference. For example, if you plan to tell readers "see page 32," enter the words
see page
Choose the specific element you want to reference from the Reference Type drop-down list box. For example, if you chose Footnote as your reference type, you now choose the specific footnote you want to use from a list of all footnotes you have already added to the document.
From the Insert Reference To drop-down box, choose which aspect of the document element you want to reference. For example, if you're referencing a footnote, do you want your reference to include the footnote number, the page number on which the footnote appears, or something else? The options available to you will vary, based on the reference type you choose. These are covered in greater detail in the following sections.
If you want your cross-reference to appear as a hyperlink that readers can jump to by pressing Ctrl and clicking on the cross-reference, check the Insert as Hyperlink check box.
Word can insert the word "above" or "below" in your cross-reference, depending on whether you're placing your cross-reference before or after the text you're referencing. Later, if you move either the cross-reference or the reference text, Word automatically adjusts?switching "above" to "below," or vice versa, if needed. If you want your cross-reference to have these capabilities, check the Include Above/Below check box.
TIP
If you are referencing a numbered item or bookmark, you also have the option of inserting a cross-reference to the complete paragraph number associated with the numbered item or bookmark. This is known as the full context paragraph number. For instance, a reference to paragraph 3.(b)(iv) from anywhere in the document would be displayed as "3.(b)(iv)".
To do so, choose Paragraph Number (Full Context) in the Insert Reference To drop-down box. When you select this option, the Separate Numbers With check box is activated. This allows you to enter a separator character (such as a period or dash) to appear between each component of the full context paragraph number.
Click Insert to place the cross-reference in your document.
The steps just listed may be slightly modified depending on the type of element you are cross-referencing.
The following sections review some of these differences more closely.
Cross-Referencing a Heading
To cross-reference a heading or bookmark, choose Heading or Bookmark from the Reference Type drop-down box in the Cross-reference dialog box. Then, in the Insert Reference To drop-down box, choose the aspect of the heading or bookmark you want to reference. The following options are available:
If you choose Heading Text or Bookmark Text, Word inserts the entire text of the heading or bookmark.
If you choose Page Number, Word inserts the page number on which the heading appears.
If you choose Heading Number, Word inserts the heading number that appears in your document, but only if you already inserted heading numbers with Word's Outline Numbering feature (see Chapter 18, "Outlining: Practical Techniques for Organizing Any Document").
If you choose Heading Number (No Context), Word inserts an abbreviated heading number (you must be in the same section as the text you're referencing). For example, if you're in section 6.F and you insert a cross-reference to heading 6.C, Word inserts the reference C rather than 6.C. You might use (No Context) if you think it would be redundant to include the section number. This setting has no effect if you cross-reference a document element elsewhere in your document. For example, if you're in section 6.F and you insert a cross-reference to heading 3.L, Word inserts 3.L no matter what?never just L.
If you choose Heading Number (Full Context), Word inserts a full heading number, even if you're in the same section as the heading you're referencing.
If you choose Include Above/Below, Word inserts the word "above" or "below" in your cross-reference, depending on whether you're placing your cross-reference before or after the text you're referencing. If you move either the cross-reference or the reference text, Word can automatically adjust?switching "above" to "below," or vice versa, if needed.
After you've selected the aspect of the heading you want to bookmark, you must establish any other dialog box settings you need. For example, if you want the reference to be inserted as a hyperlink, make sure that the Insert as Hyperlink check box is enabled. When you are finished, click Insert.
TIP
To really help readers find their way to your cross-reference, consider using two cross-references near each other: one that references the heading text, and another that references the page number. You can see how this works in the following example (both references are monospaced):
For more information, see The Retreat at Dunkirk, page 146.
TIP
You may sometimes create a complex cross-reference that you expect to reuse throughout your document. In other words, you expect to repeatedly reference the same text in the same way. If so, insert the cross-reference, select it, and create an AutoText entry based on it. Then you can simply insert the AutoText entry wherever you need the cross-reference.
For more information on creating AutoText entries, see "AutoText: The Complete Boilerplate Resource," p. 301.
Cross-Referencing a Footnote or an Endnote
You may at times want to cross-reference a footnote or an endnote. To do so, display the Cross-reference dialog box, and choose Footnote or Endnote as the Reference Type. Establish your other settings; then, in the Insert Reference To drop-down box, choose the aspect of the footnote or endnote you want to reference:
If you choose Footnote Number (or Endnote Number), Word inserts the number of the footnote or endnote.
If you choose Page Number, Word inserts the page number where the footnote began.
If you choose Above/Below, Word inserts the word "above" or "below" in your cross-reference, depending on where the referenced text appears.
If you choose Footnote Number (Formatted) or Endnote Number (Formatted), Word inserts the number, formatted as if it were another footnote (or endnote) in your document. This enables you to create multiple footnotes or endnotes that refer to the same footnote text and use the same footnote or endnote number, as is often required by scientific journals. Because you're actually inserting a cross-reference that resembles a footnote, not a "true" footnote or endnote, the numbering of the other footnotes and endnotes in your document isn't affected.
When you're finished, click Insert to add the cross-reference in your document.
Cross-Referencing a Figure (or Another Captioned Item)
To cross-reference a figure, a table, or an equation you've already captioned, display the Cross-reference dialog box, and choose Figure, Table, or Equation as the Reference Type. Establish your other settings; then, in the Insert Reference To drop-down box, choose the aspect of this document element you want to reference:
If you choose Entire Caption, Word inserts the entire text of the caption, including its label and figure number.
If you choose Only Label or Number, Word inserts the label and figure number, for example, Figure 1.1.
If you choose Only Caption Text, Word inserts the text of the caption, excluding label and figure number.
If you choose Page Number, Word inserts the number of the page where the figure, equation, or table appears.
If you choose Above/Below, Word inserts only the word "above" or "below," depending on the figure's location relative to the cross-reference.
When you're finished, click Insert to add the cross-reference in your document.
Linking Cross-References to the Content They Reference
By default, Word inserts cross-references into your document as links, which means that if you press Ctrl while clicking on a cross-reference, Word jumps to the spot in the document you cross-referenced.
NOTE
If Ctrl+click doesn't work, choose Tools, Options, Edit; then check the Use CTRL + Click to Follow Hyperlink check box.
If you do not want to insert a cross-reference as a link, clear the Insert as Hyperlink check box in the Cross-reference dialog box. Note that Word doesn't format linked cross-references any differently than the surrounding text; they are not blue and underlined, like true hyperlinks. This is true even if you display your document in Web Layout view?and even if you resave the document as a Web page. In fact, the only difference between a linked cross-reference and one that isn't is the presence of an \h switch in the underlying field code.
TIP
If you do want to insert a blue underlined hyperlink that will be visible to people reading your document in electronic formats, choose Insert, Hyperlink. Hyperlinks are covered in detail in Chapter 24.
You can add hyperlinking to a cross-reference by manually adding the \h switch, or checking the Hyperlink check box in the Cross-reference dialog box. You can remove a hyperlink from a cross-reference by deleting the \h switch, or clearing the Hyperlink check box.
Because hyperlinks look like ordinary text, there's rarely a reason not to format cross-references as hyperlinks. Even if you're creating a document for print, leaving Insert as Hyperlink checked makes it easier for you to move to the text you're referencing, making sure that your references are accurate and read as they should.
CAUTION
If you are exporting your Word documents to other programs, such as desktop publishing programs, embedded hyperlinks could cause problems for those programs' import filters or converters.
Automating Cross-References with { ASK } Fields
You've learned that you can create a bookmark and use it to create a cross-reference. After you do this, Word can place the text you bookmarked in many locations throughout your document, wherever you insert a cross-reference to that bookmark.
Sometimes, however, you'll want to repeat text throughout your document, but you don't have an existing bookmark to work with. In fact, you don't know what text you want to repeat yet. What then?
Using the { ASK } Field to Create References That Reflect User Input
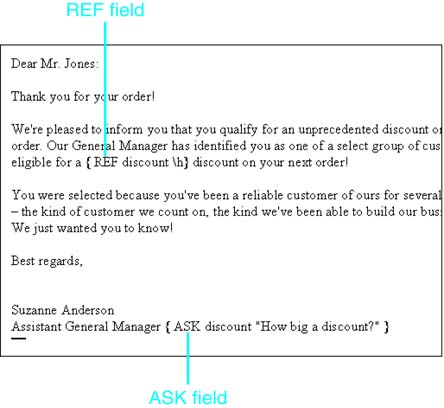
Imagine the following scenario: You have a standard boilerplate letter, as shown in Figure 22.15. As you can see, this letter offers a discount to a specific customer. What if you want to offer an extra-large discount to a specific customer? You can set up the letter to request input from whoever is preparing the letter. Word stores that information as if it were a bookmark and then inserts it anywhere your cross-reference looks for that bookmark.
Figure 22.15. A sample letter that can be customized to specify the size of a customer discount.
To create a reference that reflects user input, follow these steps:
Choose Insert, Field.
Click on Ask in the Field Names scroll box, to create an { ASK } field that requests input and stores it in a bookmark.
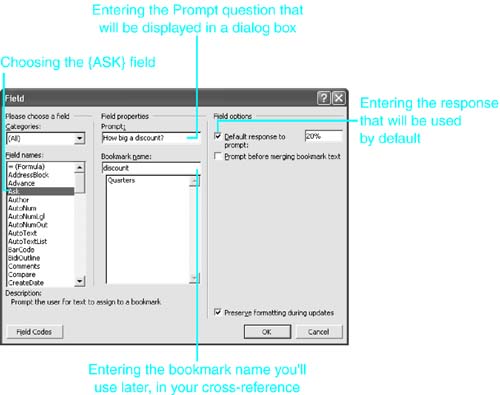
In the Prompt: text box, enter the question you want the user to answer; for example, How big a discount?
In the Bookmark Name text box, enter the name of the bookmark you want Word to assign to the answer a user will enter later; in our example, we'll use discount.
If you want, you can enter a Default Response to Prompt. This is an answer that already appears in the dialog box that displays your question to a user. If the user clicks OK without editing the answer, Word uses the default response. In our example, we'll enter 20% as a default response. Figure 22.16 shows how the Field dialog box would look in our example.
Figure 22.16. The Field dialog box, displaying the { ASK } field options shown in this example.
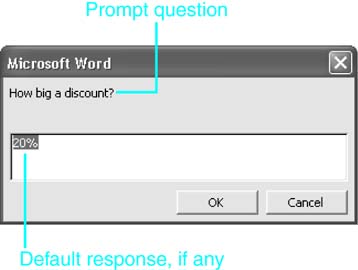
Click OK. Figure 22.17 shows the Prompt dialog box that appears, based on the example in the preceding steps.
Figure 22.17. The { ASK } dialog box displays the question you included in your { ASK } field.
Click OK. (You must do this because the { ASK } field doesn't create the bookmark until you provide input.)
Now that you've created the { ASK } field and provided it with sample input, you can create your cross-reference.
Choose Insert, Reference, Cross-reference, and follow the steps described earlier to create a reference to a bookmark. Use the bookmark name you specified in the { ASK } field. Next, click Insert to place the cross-reference in your document. Repeat steps 1?3 to insert another identical cross-reference anywhere you want the same information to appear.
You're done?except for one thing. Like most fields, { ASK } must be updated in order to change its value. Unless a user presses F9, the Prompt dialog box will not display, and the user will not be given an opportunity to enter a new value.
Fortunately, there's a way to make sure that the dialog box displays when the file opens. You can record a simple macro that consists of the two commands needed to do this. Follow these steps:
Choose Tools, Macro, Record New Macro.
Enter the name AutoOpen in the Macro name box. This is a special macro name Word recognizes: it means Word should always run the macro when the document opens.
NOTE
If you plan to save the document as a template, and create new documents based on it, name the macro AutoNew and store it with your new template. The macro then runs every time you create a new document based on that template.
Click OK to begin recording the macro.
Press Ctrl+A (or choose Edit, Select All) to select the entire document.
Press F9 to update all fields in the document.
Click OK.
Click the Stop Recording button on the Stop Recording Toolbar.
For more information on recording macros, see Chapter 32, "Recording and Running Visual Basic Macros," p. 1069.
Using Fields to Create More Intelligent Cross-References
Until now, you've been using { ASK } and { REF } fields to enable users to customize letters one at a time. What if you could set up a cross-reference that would automatically know for what discount each customer was eligible, based on some other piece of information you provide, such as the size of the order the customer placed? You can, though it takes a little doing.
In this example, assume that customers who place orders larger than $10,000 are eligible for a discount of 10% on their next orders. Customers with smaller orders aren't eligible yet, but they will be if they reach the $10,000 threshold?and you'd like to encourage them to do so.
First, create an { ASK } field, as covered in the preceding section. This { ASK } field asks a user to specify the dollar value of a customer's orders to date. After the user responds, the information is stored in a bookmark named dollarvalue:
{ ASK dollarvalue "Value of customer's orders to date?" }
TIP
As discussed earlier, you can write a quick and easy macro that updates fields automatically when you open this document so that the dialog box requesting user input appears automatically.
Now that you've captured the value of a customer's order in a bookmark, you can use an { IF } field to show Word what decisions you want it to make?and what text you want it to place in your letter as a result. A generic { IF } field uses the following syntax:
{ IF test "DoIfTrue" "ElseDoThis" }
At the heart of an { IF } field is a test. You specify a condition, and Word sees whether that condition has been met. For example, the test might include a formula that asks, "Has the customer ordered at least $10,000 worth of merchandise?"
To create a formula such as this, first create a bookmark for the location in your document that contains the value you want to test. Often, you'll want to bookmark a table cell. In the following example, you create a bookmark named dollarvalue and use it in a formula that serves as the test:
IF dollarvalue >=10000
Next, the { IF } field specifies the text you want Word to insert if the condition has been met. In this example, you use the following text, surrounded by quotation marks:
"You've just qualified for a 10% discount on your next order!
Thanks for being such a great customer!"
Finally, the { IF } field specifies the text you want Word to insert if the condition has not been met. Again, this text should appear in quotation marks:
"Qualify for a 10% discount when you place $10,000 in orders!
You're well on your way!"
Now build the { IF } field by putting all three components together: the test, the text that should appear if the test comes back "true," and the text that should appear otherwise:
{ IF dollarvalue >=10000 "You've just qualified for a 10% discount on your
next order! Thanks for being such a great customer!"  "Qualify for a 10%
discount when you place $10,000 in orders! You're well on your way!"  }
After Word knows the size of the order, it also knows what text to add to the letter.
You might want to place the same text in several locations throughout your document, or perhaps on an accompanying envelope stored as page 0 of the same file. That's the easy part. Select the entire field (or field result) and mark it as a bookmark. In this example, the bookmark is named discount. Insert a cross-reference to the bookmark anywhere you want the text to appear.


