Inserting a Field Using the Field Dialog Box
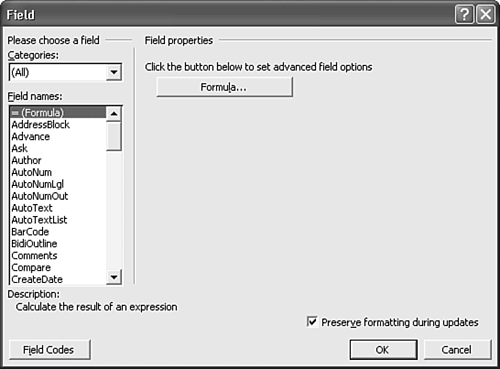
Although you can enter a field into your document directly, most people prefer to use the Field dialog box. Unless you're creating a simple field, or one with which you're especially familiar, working within the Field dialog box makes it easier to create field syntax Word understands, and it reduces your chances of making a mistake. Choose Insert, Field to display the Field dialog box (see Figure 23.2).
Figure 23.2. The default Field dialog box lists all available fields by category.
 For more information about entering a field directly, see "Placing Fields Directly into a Document," p. 780.
You can select the field code you want from a list of available fields in the Field Names box.
If you're not sure of the name of the field code you want, select a category of fields from the Categories drop-down box, and Word lists your choices for you. Word organizes its field codes into nine categories, listed in Table 23.2.
Field Category | What It Covers | Which Fields Are Available |
|---|---|---|
Date and Time | Fields that include the current date or time, or the date or time that an event relevant to your document took place (for example, the last time you saved or printed) | { CREATEDATE }, { DATE }, { PRINTDATE }, { SAVEDATE }, {TIME }, { EDITTIME } |
Document Automation | Compares values and takes an action (for example, runs macros, jumps to new locations, or sends printer codes) | { COMPARE }, { DOCVARIABLE }, { GOTOBUTTON }, { IF }, { MACROBUTTON }, { PRINT } |
Document Information | Inserts or stores information about your document | { AUTHOR }, { COMMENTS }, { DOCPROPERTY }, { FILENAME }, { FILESIZE }, { INFO }, { KEYWORDS }, { LASTSAVEDBY }, { NUMCHARS }, { NUMPAGES }, { NUMWORDS }, { SUBJECT }, { TEMPLATE }, { TITLE } |
Equations and Formulas | Creates and calculates the results of formulas; inserts symbols | { = (FORMULA) }, { ADVANCE }, { EQ }, { SYMBOL } |
Index and Tables | Creates entries for, or builds, indexes and tables of contents, figures, and authorities | { INDEX }, { RD }, { TA }, { TC }, { TOA }, { TOC }, { XE } |
Links and References | Inserts information from elsewhere in your document, from AutoText entries, or from other documents and files | { AUTOTEXT }, { AUTOTEXTLIST }, { HYPERLINK }, { INCLUDEPICTURE }, { INCLUDETEXT }, { LINK }, { NOTEREF }, { PAGEREF }, { QUOTE }, { REF }, { STYLEREF } |
Mail Merge | Specifies information to be used in a Word mail merge, such as information from a data source | { ASK }, { COMPARE }, { DATABASE }, { FILLIN }, { IF }, { MERGEFIELD }, { MERGEREC }, { MERGESEQ }, { NEXT }, { NEXTIF }, { SET }, { SKIPIF }, { ADDRESSBLOCK }, { GREETINGLINE } |
Numbering | Numbers your document's pagesor sections, inserts information about your document's page numbers or sections, or inserts a bar code | { AUTONUM }, { AUTONUMLGL }, { AUTONUMOUT }, { BARCODE }, { LISTNUM }, { PAGE }, { REVNUM }, { SECTION }, { SECTIONPAGES },{ SEQ } |
User Information | Stores your name, address, or initials, or inserts them in a document or an envelope | { USERADDRESS }, { USERINITIALS }, { USERNAME } |
NOTE
Notice the Preserve Formatting During Updates check box. If you mark this box and later make manual formatting changes to your field's contents, Word won't eliminate your manual formatting changes when it updates your field.
For example, if you insert a field with this box checked and later format the field result as boldface, Word will retain the boldface. If you clear this box before you enter the field, Word eliminates the boldface.
Using Word 2003's Field Dialog Box
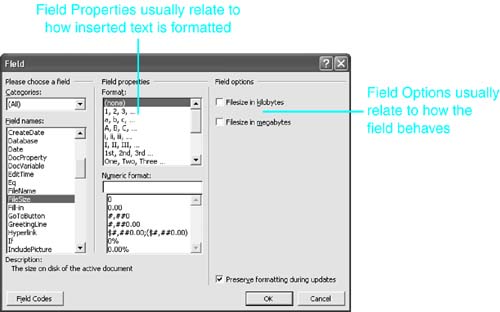
After you select a Field Name, the field name appears in the text box, and a brief description of the field's purpose appears at the bottom left of the Field dialog box. In most cases, Word 2003's Field dialog box also changes to display the options available for the field you've selected. Depending on the field, Word may present check boxes, scroll boxes, drop-down lists, text boxes, and other interface elements familiar to anyone who has worked with Windows software.
For instance, Figure 23.3 shows the Field dialog box as it appears when the { FILESIZE } field is selected. This field allows you to automatically update a document to display its size in kilobytes and megabytes.
Figure 23.3. The Field dialog box as it appears when the FileSize field is displayed.
NOTE
In some cases, such as { INDEX }, the field that compiles an index and places it in your document, the Field dialog box displays a button in place of Field Properties and Field Options. When you click the button, Word closes the Field dialog box and opens the relevant dialog box associated with this Word feature. In this example, Word opens the Index tab of the Index and Tables dialog box.
The Field Properties settings that appear in the center of this dialog box allow you to control the formatting of the text that Word places in your document. In the { FILESIZE } field, you can control two aspects of formatting:
The sequence used by the field? for example, 1, 2, 3…; A, B, C…; 1st, 2nd, 3rd; One, Two, Three; or other options. (Other fields may offer other options. For example, the { AUTHOR } field and other fields that display text in a document will offer case options, such as Uppercase, Lowercase, First capital, and Title case.)
The numeric format used by the field? for example, whether decimal points, percentage marks, or dollar signs will be used. (Numeric formatting is covered in greater detail later in this chapter, in the "Using Word's Built-In Number Sequences" section.)
The Field Options settings that appear on the right side of the dialog box allow you to control unique aspects of the field's behavior?in this case, whether the field displays values as kilobytes or megabytes.
Sometimes, you won't need to make any adjustments to Word's default settings for a field. You can simply click OK, and Word will insert a field that does what you want. For example, if you want Word to insert the user's name, and you don't need to change the way the field results are capitalized, choose the { USERNAME } field and click OK.
More often, however, simply creating a field that consists of the field name won't accomplish what you intend. You'll find that you need to refine the field by choosing from the settings provided in the Field dialog box. When you change these settings, Word inserts text or "switches" that modify the field's behavior.
Viewing and Editing the Field Code Directly
To see the entire field code as Word will insert it?or to make edits to a field code manually?click the Field Codes button at the bottom left of the Field dialog box. The Field dialog box now changes (see Figure 23.4), displaying the Advanced Field Properties area. Here, you can view the existing field code or enter switches of your own.
Figure 23.4. After you click the Field Codes button, the Field dialog box displays a text box where you can view field codes and manually edit them.
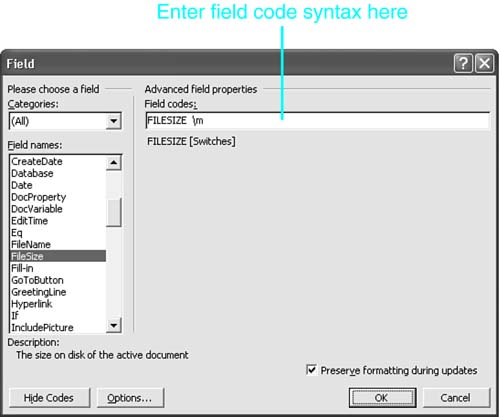
To discover the syntax Word expects you to use, look at the generic syntax Word displays in the Field dialog box, just below the text box where you type your field instructions. After you know what syntax to use, you can enter the correct text and switches in the text box in the Field dialog box.
Of course, there's a bit more to field syntax than this. Later in this chapter, you'll take a closer look at syntax you might need to add to your fields manually, and how you can do it.


