Placing Fields Directly into a Document
It's possible to insert a field in your document manually, without using the Field dialog box at all. This can be faster, if you already know exactly what kind of field you need, and especially if the field is not complex.
For instance, if you want to insert a page count within your document text, the field you need is simple:
{ NUMPAGES }
By placing this field in your document directly, you save yourself the trouble of scrolling through a long list of field names in the Field dialog box.
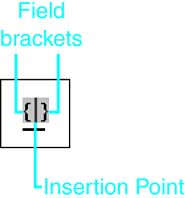
To enter a field directly into your document, press Ctrl+F9. Word places two curly brackets around your insertion point and colors them gray to indicate that you're in a field (see Figure 23.5). These curly brackets are called field characters.
Figure 23.5. When you press Ctrl+F9 to insert a field, the field appears as two curly brackets; by default, these are highlighted in gray.
NOTE
You can't insert field characters by pressing the curly bracket keys on your keyboard; you must press Ctrl+F9.
However, you can customize a menu, toolbar, or shortcut menu to include a command for inserting field brackets. From the Commands tab of the Customize dialog box, select the command InsertFieldChars and drag it to the toolbar or menu you want.
After you've inserted field characters, you can type any field names and any instructions inside the brackets. You can also cut and paste text into a field code from outside. Conversely, you can also cut or copy text from within field brackets to a location outside the field brackets. Keep the following syntax points in mind:
You must leave one blank space after the left field bracket and before the right field bracket.
After the first space, enter the field name; you can enter it in uppercase, mixed case, or lowercase.
Leave one space between the field name and any switch.
Leave one space between a switch and any parameters associated with that switch.
If the field refers to a filename or specific text, enclose the filename or text in quotation marks.
TIP
Whenever you create a complex field instruction you might reuse, make it an AutoText entry. Then you have to enter it correctly only the first time; you can just copy it from then on.
 For more information about working with AutoText, see "AutoText: The Complete Boilerplate Resource," p. 301.
What Goes into a Field
Chances are that you will create most of your fields using the check boxes, scroll boxes, and other shortcuts that appear in Word 2003's Field dialog box. If you do, you may rarely see the field codes themselves; Word inserts them for you.
However, you may occasionally need to troubleshoot or slightly modify a field code. For those times, it's valuable to understand more clearly how they work.
You already know that every field has a name and that many fields require additional field instructions. Two of the most common field instructions are arguments and switches; these are covered next. More complex field instructions are covered later in this chapter, in the section "A Closer Look at Field Instructions."
Using Arguments to Give Word Essential Field Information
In the example discussed earlier, you used { USERNAME } without any additional field instructions to insert the name of a user. When Word encounters this field, it inserts the username it finds stored in the User Information tab of the Options dialog box.
However, you can also use a { USERNAME } field to place a new name in the document and then permanently store that name in the User Information tab, where it can be used later for other purposes. If this is what you want to do, you have to tell Word what name to use. The syntax is as follows:
{ USERNAME "Robert Smith" }
The easiest way to create this field is to choose Insert, Field; select UserName from the Field Names scroll box; and enter Robert Smith in the New Name text box that appears. If you prefer, you can click the Field Codes button and enter the text manually.
In the example given previously, the field instructions in quotation marks after USERNAME are a simple example of an argument. Arguments are text, numbers, or graphics that help a field decide how to act or what information to insert.
Arguments should always be enclosed in quotation marks. If you insert the fields using the check boxes, scroll boxes, and other shortcuts provided in the Field dialog box, Word enters the quotation marks for you.
If you enter the field codes manually?either by clicking Field Codes to display the Advanced Field Properties text box or by pressing Ctrl+F9 in the document to display field brackets?you then need to enter the quotation marks yourself.
NOTE
Word correctly recognizes one-word arguments without the quotation marks, but it's best to get in the habit of using quotation marks all the time. Quotation marks are required whenever you use an argument longer than one word, and if you don't use them consistently, you may forget to do so when necessary.
NOTE
Once in awhile, you may need to tell Word that you actually want real quotation marks to appear in the document. To indicate this, use backslashes, as in the following example:
{ TITLE "Start \"Loafing\" Around" }
This begs the question: What if you need to specify a document path, which already uses backslashes? (This might be necessary if you were using an { INCLUDEPICTURE } field to insert a picture stored in a different folder on your drive or network.) The answer: Use two backslashes wherever you would otherwise have used one:
{ INCLUDEPICTURE "c:\\reports\\image12.jpg" }
By using quotation marks around the filename, you make sure that Word can read any filename, even if it consists of several separate words.


