Using Frames
Frames are an alternative to tables in structuring a Web site's navigational system. They have both advantages and disadvantages over the tables-only method described in the preceding section.
With a frame system, you create a Web page with a frameset that will serve as the master template for the entire Web site. It is divided into separate sections called frames, and each frame pulls its content from a separate Web page file. The navigation bar for the site appears in a frame that remains constant no matter what other content is being displayed, so the navigation bar needs to be created only once. The other pages appear in other frames on the page that change based on which hyperlink in the navigation bar is clicked.
A frame system can make the Web designer's job easier because the navigation bar need not be manually repeated on each page. However, hyperlinking becomes more complicated because a hyperlink in the navigation frame needs to refer to a different frame as its target.
NOTE
Not all Web browsers support frames, so it is considered good Web design practice to also develop a nonframes version of any Web site that uses frames. Therefore, you don't really save any Web design time by using frames; rather, you create twice as much work for yourself. If you ignore that guideline and create the frames version alone, however, you do save some time and effort.
Adding Frames
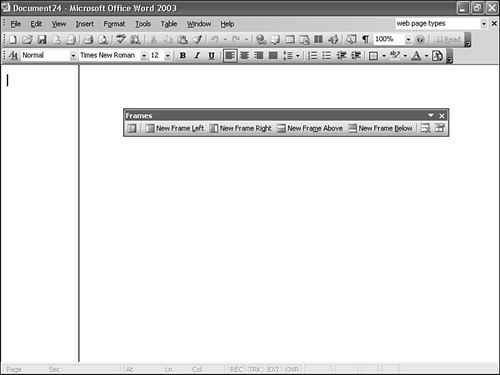
You can create a set of frames on a Web page, either by choosing Format, Frames, New Frames Page from the menu or by opening the Frames toolbar. From the Frames toolbar, shown in Figure 24.18, you can choose to put a frame on any side of the existing page (above, below, left, or right). You can then drag the divider bar between the frames to adjust their relative sizing.
Figure 24.18. Adding frames to a Web page.
Creating and Saving Frame Content
To create content to appear in a frame, click in that frame and start typing.
The frameset is a container page that tells the browser how to split the screen real estate among the pages in the set. For instance, a browser displaying two Web pages as frames is actually using three Web pages: one Web page for display in each frame and the third frameset page defining how the screen is split up between the other two pages.
Each frame's content will be saved in a separate file. Word will make up names for the files, but it's better if you name them yourself because that way you get to pick the name.
To save the content of a frame, follow these steps:
Right-click the frame and choose Save Current Frame As. The Save As dialog box appears.
Type a filename and click Save.
CAUTION
If you resave a frame's content under a different name with Save As after saving it initially, the frameset's reference to it may not automatically update. To avoid that whole headache, try to stick with the original names for frame content.
Specifying Frame Sizes
After you have a frameset, you can drag the bar between frames to resize each frame manually.
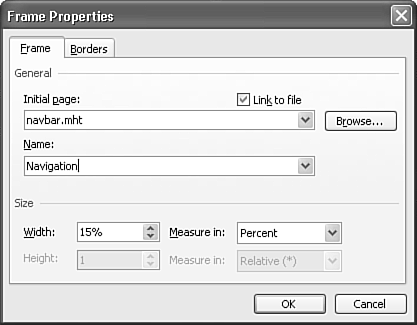
Not precise enough? There's always the dialog box method. With it, you can resize the frame based on Percent, Inches, or Relative (that is, proportionately). For example, in Percent mode, you can define the current frame as 30%. Word resizes this window to take up 30% of the screen and automatically resizes the second frame to take up 70%. Using Inches simply resizes the frame to whatever width you enter. If you choose Relative, you are defining each frame in proportion to the others. A setting of 1 means a one-to-one (1:1) proportion between frames or each frame will fill half of the screen. A setting of 2 (2:1 proportion) means that the first frame will be twice as large as the second or fill two-thirds of the width of the frame.
You can also prevent people viewing the frameset in a Web browser from resizing the frames.
Follow these steps to access the frame properties that deal with sizing:
Right-click the frame and choose Frame Properties.
If you are interested solely in preventing users from resizing frames, the frame you want in step 1 is the one to the left of or above the frame border you want to freeze.
Click the Frame tab, and enter or change the measurement for the frame's size. See Figure 24.19.
Figure 24.19. The Frames tab of Frame Properties.
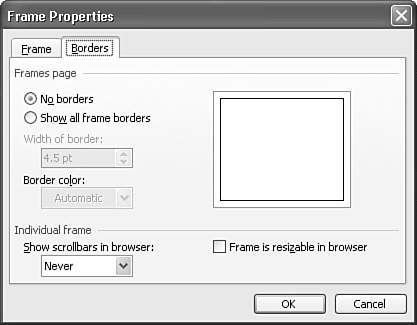
Click the Borders tab, and then, if desired, clear the Frame Is Resizable in Browser check box. See Figure 24.20.
Figure 24.20. The Borders tab of Frame Properties.
Click OK.
Controlling Frame Appearance
One of the reasons frames have gotten a bad rap in the past is that some people didn't know how to set them up attractively. That big thick default border between the frames has to go! And if a frame contains no more than one screenful of material (at any resolution), the scrollbar for it can go away too. With both of these formatting options applied, a page with a frameset is virtually indistinguishable from one created with tables.
TIP
For some particularly egregious examples of bad frame usage, check out www.sfwa.org/members/webspinner/BadFrames.html and www.arches.uga.edu/~macwoman/baddesign.html.
To change frame appearance settings, do this:
Right-click the frame and choose Frame Properties.
On the Borders tab (Figure 24.20), click No Borders.
(Optional) In the Show Scrollbars in Browser drop-down list, choose Never to hide the scrollbar.
Click OK.
CAUTION
Be cautious about turning off scrollbars completely. Even though the contents of one frame may not change (your navigation frame, for instance), it may not display the same in every browser, especially if you use text. Another browser may choose a larger default font. If you don't enable the scrollbars, your visitor won't be able to read the contents of your frame. Also, visitors using laptops or mobile computing devices with small screens may need the scrollbars just to view the entire content of a frame.


