Using the XML Structure Task Pane
So far we have discussed the flexibility of XML data, XML schemas and how they allow us to control the structure and content of the XML, and how to apply those schemas to XML content. By now you are probably wondering how to use Word to create the XML data to begin with. Word's XML Structure task pane is the answer to your question.
The XML Structure task pane gives you the ability to do these things:
Construct your XML data (add and remove elements) based on the attached schemas
View the subset of valid child elements for any existing element in the document
Review the structure of new or existing documents in a hierarchical manner
See any schema violations along with a description of the error
Control display of the XML tags in the document
Creating a New XML Document
Let's get started by creating a new XML document based on the ContactML schema presented earlier in this chapter.
To create a new XML document, select File, New from the menus and click on the XML document link in the New Document task pane. You will see an empty document with the XML Structure task pane displayed, as shown in Figure 25.11.
Figure 25.11. Creating a new XML document.

Looking at the XML Structure task pane, you can see that Word needs you to tell it what schema you want to use for the document. It's important to always remember that Word can allow you to modify the structure of any XML document only if you tell it what the schema of the document should be.
Click on the Templates and Add-Ins link to bring up the Templates and Add-Ins dialog and add the ContactML schema to the document. See the section "Adding an XML Schema to a Document," earlier in this chapter, for more information.
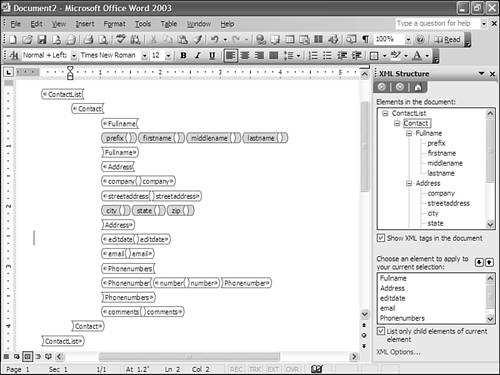
After you have added the ContactML schema to the document, the XML Structure task pane updates to show you the elements in the current document (which there are none of at this point) and the elements that are available to add to the document, as shown in Figure 25.12.
Figure 25.12. A new XML document with a schema attached.
At the bottom of the XML Structure task pane is a check box named List Only Child Elements of Current Element that is normally checked by default. When this option is checked, Word will display only elements that are valid to apply to the element selected in the Elements in the Document list. Clear this check box now and see the effect it has (see Figure 25.13). Most of the time you will want to keep this option checked to help you in creating a valid XML structure. Note that you can apply any element displayed to your document, which means you are free to create a structure that is completely invalid based on your schema. Be sure to check this option before continuing.
Figure 25.13. Displaying all elements in the XML Structure task pane.

At this point the available elements list should have only a single entry, ContactList. This makes sense because nothing has been added to the document yet, and well-formed XML can have only a single top-level root node. Click on this element name and it will be added to your XML document. Figure 25.14 shows the contact list element.
Figure 25.14. The ContactList element.
Looking first at the document itself, notice that the beginning and ending tags of the contact list are treated as objects. The insertion point will always be placed just inside the starting tag when you insert an element. You can use the arrow keys to move in and out of the element, double-click on the beginning or ending tag to select the element, or use the Enter and Tab keys to move the tag locations around.
Now let's focus on something else Word is doing for you: schema validation. If you look closely at Figure 25.14, you will notice a purple wavy line on the far-left margin. Also, if you look at the XML Structure task pane, you'll see that the Elements in the Document list has started to build a structure for your document (see Figure 25.15). The yellow icon displayed to the left of the element name indicates that a schema validation problem has occurred.
Figure 25.15. The ContactList element in the XML Structure task pane.
To see exactly what the problem is, you can either right-click on the purple wavy line or hover the mouse pointer over the icon displayed in the XML Structure task pane. Figure 25.16 shows the error that has occurred, which in this case is not surprising because we have not added any child elements or data.
Figure 25.16. Displaying the schema validation error.
Finally, take a look at the list of available elements that is shown in Figure 25.15. It has been updated to have only one entry named Contact. If you look back at the schema we are using, you can see that the Contact element is the only valid child to the ContactList element. As you can see, the capability to limit this display to only valid child elements is a great help in building valid XML structures.
Now we are ready to add some more elements that will actually have some real data in them, but before we do there are a few issues about how Word handles the display of the XML to consider:
When adding elements to the XML, Word inserts the element directly at the current insertion point and does not attempt to do any arranging of the XML to make it easy to read and follow (see Figure 25.17). If you like your XML displayed in a more structured manner, move the tags of the existing elements around before adding more elements (see Figure 25.18).
Figure 25.17. Inline XML construction can be hard to read.
Figure 25.18. Structured arrangement of XML tags.
When editing or arranging the XML content of the document, Word changes the presentation of the XML element to a single "self-closed" style of tags instead of separate opening and closing tags. See Figure 25.19 for an example of this display. This behavior happens if you insert two data elements adjacent to each other (like the prefix and firstname child elements of the Fullname element in our example) or if you place the cursor immediately to the left of an opening tag and press the Tab key. Also, when an element is changed to this self-closed format, all child elements are also changed. This has no affect on how the XML itself is saved, but it can be a little confusing if you are not prepared for it.
Figure 25.19. A self-closed XML tag display.
Now let's add a Contact and a Fullname structure for that contact. To add these to your document, follow these steps, keeping an eye on the schema validation icons along the way:
If it is not there already, place the insertion point inside the ContactList element.
Press Enter a few times to open up space for the Contact.
In the XML Structure task pane, click on the Contact element to apply it to the document. Notice that the list of available elements now shows several new things to add.
Press Enter a few times to open up space for the Fullname element.
In the XML Structure task pane, click on the Fullname element to apply it to the document.
Press Enter a few times to open up space for the prefix element.
In the XML Structure task pane, click on the prefix element to apply it to the document. Notice that the prefix element has no child elements.
Press the right-arrow key to move the insertion point outside the prefix element, and press Enter to get a new line.
In the XML Structure task pane, click on the firstname element to apply it to the document.
Repeat steps 8 and 9 to add the middlename and lastname elements.
When you have completed these steps, you should have a document that looks similar to that shown in Figure 25.20.
Figure 25.20. The Contact element with a Fullname.
Before moving on to complete the Contact structure, take a few minutes to see how Word handles navigating and selecting the XML elements. In particular, take note of these behaviors:
In the XML Structure task pane, you can double-click on the plus or minus sign of the tree display to expand or collapse that element.
In the XML Structure task pane, you can click on any element in the tree display and the contents of that element are selected in the document.
In the XML Structure task pane, you can double-click on any element in the tree display and the entire element is selected in the document.
In the document, you can click on the opening or closing tag of the element and the contents of that element are selected.
In the document, you can double-click on the opening or closing tag of the element and the entire element is selected.
Using steps similar to those used to add the Fullname, you should now be able to complete the structure for the Contact. When you have added all the elements, you should have a structure that looks similar to what's shown in Figure 25.21.
Figure 25.21. The completed Contact XML structure.
Now that you have a completed Contact structure, you can add some data into the various elements of the structure if you want. After you have done that, go ahead and save the document and name it ContactList. See the section "Saving to XML," later in this chapter, for more details on saving XML documents.
Congratulations! You've just constructed your first XML data structure and document.
Editing an Existing XML Document
As with most data files that we deal with, the need to review or edit them will happen more frequently than creating them from scratch. When editing XML files in Word, we need to consider two scenarios: editing XML files saved as Word XML documents (using WordML) and editing standard (or data only) XML files.
Editing a Word XML Document
Editing a Word XML document is pretty simple: Just double-click on the file in Explorer, or use the File, Open menu inside of Word and select the file. The file is opened and you can edit the document based on the same XML schema used to create it.
But what happens if you send this XML file to someone else or you want to edit it on a different computer? Remember that Word requires access to the XML schema file if you want to have full editing and validation of your XML structure. If the schema used to create the document is not available, Word will provide the same level of editing capabilities as provided for data-only XML files (see the next section, "Editing a Data-Only XML File"). Be sure that you include the schema file when sending the document to another person or when taking the document to a different computer.
Editing a Data-Only XML File
Obviously, there are many other sources of XML files out there than just those created in Word. You can open a data-only XML file using the File, Open menu and Word will present the XML structure along with the XML Document task pane, as shown in Figure 25.22.
Figure 25.22. The XML Document task pane.
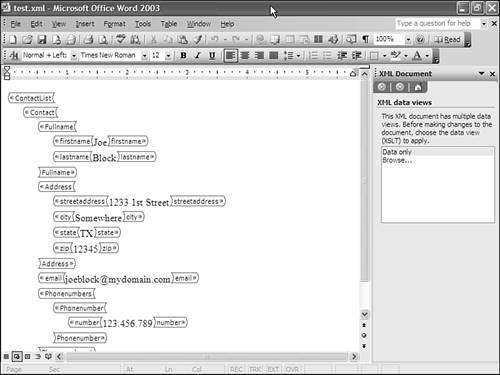
When opening a data-only XML file, Word gives you the option of using the full data structure (represented by the Data Only entry in the XML data views) or browsing to a separate XSLT transformation file. As soon as you make any changes to the data in the document, you are locked in to the view of the data that is currently presented. At that point the XML Document task pane will be removed completely for that editing session.
To apply a different transformation, or data view, follow these steps:
Click on the Browse entry in the XML Data Views list. The XSL Transformation dialog will be presented (see Figure 25.23).
Figure 25.23. The XSL Transformation dialog.
Browse to the desired transformation (.xsl) file.
Click Open.
The new data view will be added to the XML Document task pane, and the transformation will be applied to the document. You can click between the data views that are loaded or add other data views if you choose. You can continue this process until any changes are made, at which time the XML Document task pane will be removed.
CAUTION
If you save a file using an XSLT transformation, Word saves only the result of the transformation. See "What to Do If You Lose Data after Saving Your XML File," in the Troubleshooting section at the end of this chapter.
Applying XML Elements to an Existing Document
Up to this point we've established that Word has solid functionality dealing with XML data and XML schemas. Word's XML integration capabilities really shine, however, when you combine them with Word's existing document publishing capabilities. This powerful combination provides attractive and user-friendly documents driven by XML schemas for maximum benefit to everyone. Let's use our contact example to illustrate this capability.
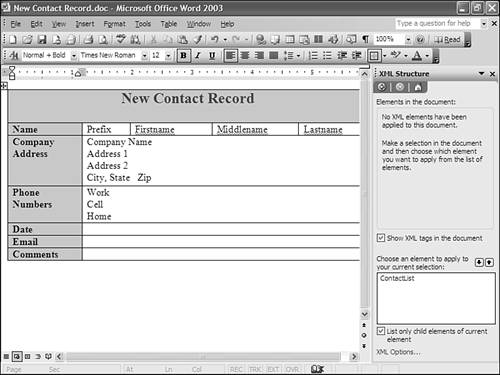
If you've followed through the previous few sections, you have seen that although Word provides full editing capabilities of native XML data structures, the presentation and usability of the editing could use some improvement. What we would like to do is take a document like the one shown in Figure 25.24 and integrate it with our XML schema.
Figure 25.24. The new contact record document.
To apply our ContactML schema to this document, follow these steps:
Open the new contact record document.
Select Tools, Templates and Add-Ins, and click on the XML Schema tab.
Add the ContactML schema to the document (see the section "Adding an XML Schema to a Document," earlier in this chapter), and then click OK. The document should be similar to the one shown in Figure 25.25.
Figure 25.25. The new contact record document with schema applied.
In the XML Structure task pane, click on the ContactList element name. The dialog in Figure 25.26 is then displayed. Click the Apply to Entire Document button.
Figure 25.26. Applying the ContactList element to the document.

With the contents of the ContactList element still selected, click on the Contact element in the XML Structure task pane.
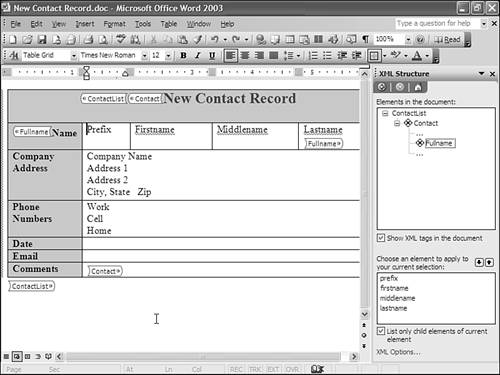
Select the top row of the table that begins with Name and then click on the Fullname element in the XML Structure task pane. At this point the document should be similar to what's shown in Figure 25.27.
Figure 25.27. The new Contact document with some elements applied.
Take a moment to look at the Elements in the Document list of the XML Structure task pane. You'll see some unusual-looking errors and elements being displayed. If you click on the elements labeled as ". . ." the non-XML data parts of the form get selected. The problem being seen here is caused by what is called "mixed content." Mixed content means that there is a mixture of XML data and formatting text in the document. Word provides a way to deal with this in the XML Options dialog (see the section "Setting XML Options," earlier in this chapter). Let's keep going now.
In the XML Structure task pane, click the XML Options link to display the XML Options dialog, check the Ignore Mixed Content option, and click OK.
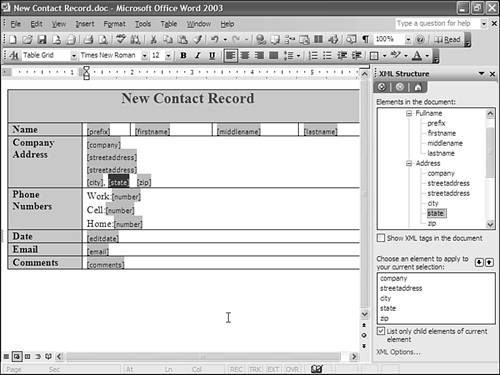
Select the rows of the table that contain the company name and address, and then click the Address element name in the XML Structure task pane. Continue to select the appropriate blocks of text and individual text items until you have completed the contact record. After you have completed the structure, your document should look similar to that shown in Figure 25.28.
Figure 25.28. The new Contact document with all elements applied.

We've made progress, but it doesn't exactly look like the original document. Let's keep going and see whether we can get back to the format of the original document.
Return to the document and remove the placeholder text that was present in the original document (Company Name, Firstname, and so on).
In the XML Structure task pane, click on the XML Options link to display the XML Options dialog. If the Show placeholder text for all empty elements option is not checked, check it and click OK.
In the XML Structure task pane, clear the Show XML Tags in the Document check box.
After completing these steps, you should have a document that looks similar to the one shown in Figure 25.29. Select File, Save As and save this as a Word template (.dot file).
Figure 25.29. The new Contact form template.
We now have an easy-to-use document template that can be used to record new contact records based on our predefined XML schema. The template can be saved as a Word XML document, and the data only can be saved in XML as well.


