Working with XML Schemas
The full power of XML stems from combining the flexibility to create tags using whatever names you want and in whatever structure you want with enforcing strict compliance to that structure. The rules that are used to enforce this strict compliance are called XML schemas. Word provides you with the ability to manage the schemas you have available and to control which schemas are enforced for a given document.
Understanding XML Schemas
An XML schema is an abstract description of the structure you expect to use in an XML file. In the schema file (normally named with an extension of .xsd), you will find things such as these:
Namespace definition
Object/tag types (element, complex type, attribute, and so on)
Object/tag names
Data types (string, date, and so on)
Object/tag relationships (hierarchy, min and max occurrences, and so on)
What you won't find in an XML schema is actual data, transformation or presentation logic, or information related to the implementation of the structure.
Adding an XML Schema to a Document
Before Word can start applying a schema to a document, you need to add the schema to the document. You can add as many different schemas to a document as you need. To add a schema to your document, follow these steps:
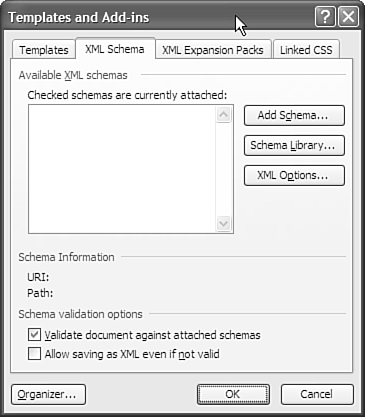
Choose Tools, Templates and Add-Ins and then select the XML Schema tab (see Figure 25.1).
Figure 25.1. The XML Schema tab.
Click the Add Schema button to get to the Add Schema dialog (see Figure 25.2).
Figure 25.2. Selecting a schema file.
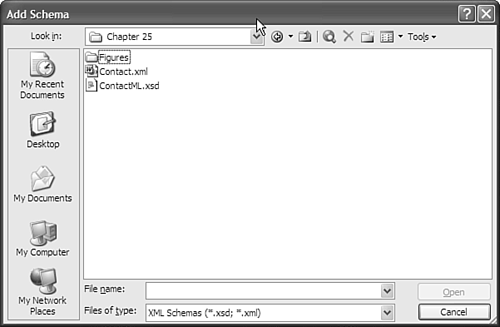
Browse to the schema file you want and click Open.
In the Schema Settings dialog (see Figure 25.3), enter an Alias name for the schema. This is not required but is highly recommended. If no alias is entered, the schema name will always be shown as the long namespace definition (starting with http://). This is not always easy to decipher later. If you enter a friendly alias name (like "Contacts List"), it will be more obvious what the schema controls when you have multiple schemas loaded.
Figure 25.3. Setting the schema options.
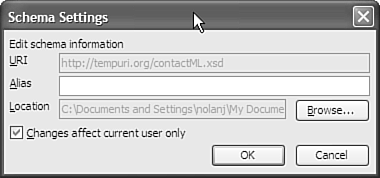
If you want this schema definition to be available for all users, clear the Changes Affect Current User Only check box.
Click OK to add the schema.
NOTE
When you add a schema, Word references it using the local file path. If you move or rename the schema file after having added it to Word, you will need to update the schema settings to correct the path (see the section "Managing Schemas in the Schema Library," later in this chapter).
You'll now see the schema show up in the Available XML Schemas list (see Figure 25.4), and it will be checked, indicating that it has been applied to the document.
Figure 25.4. An XML schema applied to the document.
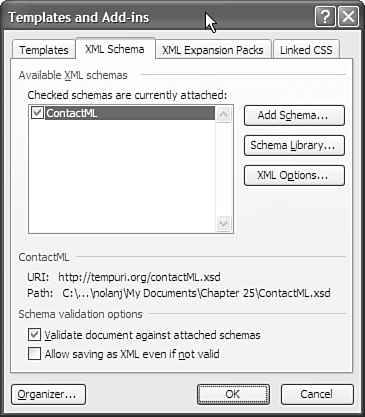
When applying a schema to a document, you also have some options that control how Word will validate your document (see Figure 25.4):
Validate Document Against Attached Schemas: If you clear this check box, Word will not attempt to validate the XML content against the selected schemas. This can allow more flexibility when the specific rules of the schema don't match with how you want to construct the XML. You are not prevented from saving the changes; you just don't see the graphical display of the validation in the XML Structure task pane (see the section "Using the XML Structure Task Pane," later in this chapter). This option is checked by default.
Allow Saving as XML Even If Not Valid: If you clear this check box, Word will not allow you to save a document in XML format if the XML content cannot be validated against the schema. This setting can be very useful when you want to preserve your changes to the document before you have completed the entire XML structure. Technically, the XML you are saving is valid and well formed; it just does not adhere to the rules specified by the schema. After you have completed the data, you can turn this option back off to protect the integrity of the data. This option is not checked by default.
Choosing an XML Schema for a Document
Anytime you add library (see the section "Managing Schemas in the Schema Library," later in this chapter). This makes it very convenient to use the schemas in the future. To choose an existing schema from the schema library to apply to your document, follow these steps:
Choose Tools, Templates and Add-Ins and then select the XML Schema tab (see Figure 25.4).
Locate the schema you want to apply in the Available XML Schemas list.
If they are not already checked, check the boxes next to the schemas you want to apply.
Click OK.
Managing Schemas in the Schema Library
When you add an XML schema to a document, it is also added to Word's Schema Library. The Schema Library allows you to maintain your schema references as well as work with XML Solutions (see the section "Working with XML Solutions," later in this chapter). To access the Schema Library, click the Schema Library button on the XML Schema tab of the Templates and Add-Ins dialog (see Figure 25.4).
The Schema Library dialog is shown in Figure 25.5.
Figure 25.5. The Schema Library dialog.
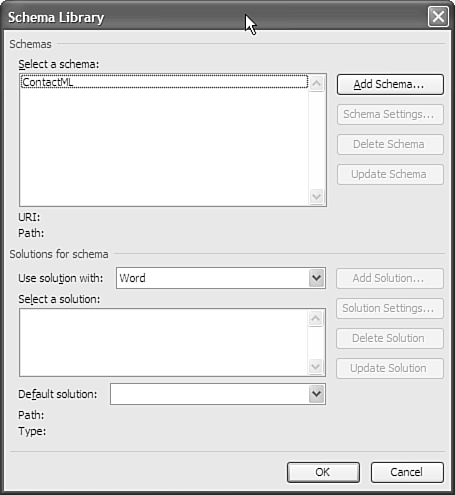
The Schema Library allows you to perform the following functions:
Add a schema by clicking the Add Schema button (see the section "Adding an XML Schema to a Document," earlier in this chapter).
Modify schema settings by clicking the Schema Settings button (see Figure 25.5). From the Schema Settings dialog you can modify the alias name used for the namespace, change the path to the schema file, or change whether your updates to the schema library affect other users.
Delete a schema reference by clicking the Delete Schema button. This only removes the reference to the schema from Word. It does not remove the schema file from disk.
An XML Schema Example
At this point you are probably wondering exactly what an XML schema looks like. We'll need a basic schema later in this chapter, so a sample schema for managing contact information is shown next. We'll call this XML contact dialect "ContactML."
<?xml version=" 1.0"  ?>
<xs:schema id=" ContactML"
    targetNamespace=" http://tempuri.org/contactML.xsd"
    xmlns=" http://tempuri.org/contactML.xsd"
    xmlns:xs=" http://www.w3.org/2001/XMLSchema"
    attributeFormDefault=" qualified"  elementFormDefault=" qualified" >
    <xs:element name=" ContactList" >
        <xs:complexType>
        <xs:choice maxOccurs=" unbounded" >
        <xs:element name=" Contact" >
            <xs:complexType>
            <xs:sequence>
            <xs:element name=" Fullname"  minOccurs=" 1"  maxOccurs=" 1" >
                <xs:complexType>
                <xs:sequence>
                <xs:element name=" prefix"  type=" xs:string"
                    minOccurs=" 0"  maxOccurs=" 1"  />
                <xs:element name=" firstname"  type=" xs:string"
                    minOccurs=" 1"   maxOccurs=" 1" />
                <xs:element name=" middlename"  type=" xs:string"
                    minOccurs=" 0"   maxOccurs=" 1" />
                <xs:element name=" lastname"  type=" xs:string"
                    minOccurs=" 1"  maxOccurs=" 1"  />
                </xs:sequence>
                </xs:complexType>
            </xs:element>
            <xs:element name=" Address"  minOccurs=" 0"  maxOccurs=" unbounded" >
                <xs:complexType>
                <xs:sequence>
                <xs:element name=" company"  type=" xs:string"
                    minOccurs=" 0"  maxOccurs=" 1"  />
                <xs:element name=" streetaddress"  type=" xs:string"
                    minOccurs=" 0"  maxOccurs=" 2"  />
                <xs:element name=" city"  type=" xs:string"
                    minOccurs=" 0"  maxOccurs=" 1"  />
                <xs:element name=" state"  type=" xs:string"
                    minOccurs=" 0"  maxOccurs=" 1"  />
                <xs:element name=" zip"  type=" xs:string"
                    minOccurs=" 0"  maxOccurs=" 1"  />
                </xs:sequence>
                <xs:attribute name=" type"  form=" unqualified"  type=" xs:string"  />
                </xs:complexType>
            </xs:element>
            <xs:element name=" editdate"  type=" xs:date"
                minOccurs=" 0"  maxOccurs=" 1"  />
            <xs:element name=" email"  type=" xs:string"
                minOccurs=" 0"  maxOccurs=" 1"  />
            <xs:element name=" Phonenumbers"  minOccurs=" 0"  maxOccurs=" 1" >
                <xs:complexType>
                <xs:sequence>
                <xs:element name=" Phonenumber"
                    minOccurs=" 0"  maxOccurs=" unbounded" >
                    <xs:complexType>
                    <xs:sequence>
                    <xs:element name=" number"  type=" xs:string"
                        minOccurs=" 1"  maxOccurs=" 1"  />
                    </xs:sequence>
                    <xs:attribute name=" type"  form=" unqualified"
                        type=" xs:string"  />
                    </xs:complexType>
                </xs:element>
                </xs:sequence>
                </xs:complexType>
            </xs:element>
            <xs:element name=" comments"  type=" xs:string"
                minOccurs=" 0"  maxOccurs=" 1"  />
            </xs:sequence>
            </xs:complexType>
        </xs:element>
        </xs:choice>
        </xs:complexType>
    </xs:element>
</xs:schema>
If you are not familiar with XML schemas, take a few minutes to scan the example carefully. You will find that the structure is made to be a list of contacts, with each contact consisting of a full name, address, edit date, email, phone numbers, and comments. The full name is made up of a prefix, first name, middle name, and last name. An address has a type, company, street address, city, state, and ZIP. Phone numbers have a type and a number.
If you want to follow along to try out some of the examples shown later, create a text file now named contactml.xsd and enter the preceding schema information into it.
A full discussion of XML schemas is outside the scope of this chapter and indeed is a topic that can require an entire book itself.


