Keeping Track of Changes Among Multiple Documents
Imagine that you've asked someone to review a document, but you forgot to turn on Track Changes first. Have you forever lost the chance to see where changes were made and systematically resolve them? Not necessarily.
If you have a copy of the document in its original form (before the reviewer edited it), you can use Word's Compare and Merge Documents feature. When you're finished, you have a document that includes change marks wherever additions, deletions, and, optionally, formatting changes were made?just as if the edits were made with Track Changes enabled. Follow these steps:
Open the document where you want the change marks to appear.
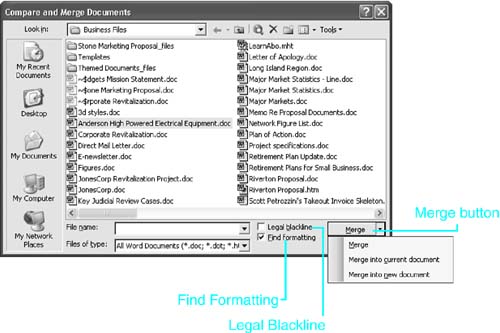
Choose Tools, Compare and Merge Documents. The Compare and Merge Documents dialog box opens (see Figure 26.19).
Figure 26.19. The Compare and Merge Documents dialog box.
Browse to and select the file you want to compare with the one you already have open.
By default, Word finds and tracks differences in formatting between two documents. If you don't want Word to do this, clear the Find Formatting check box.
Choose where you want the differences between the documents to be displayed:
If you want the differences to be displayed in the "target" document?the one you selected through the Compare and Merge Documents dialog box?click Merge.
If you want the differences to be displayed in the "current" document?the one you opened before you selected a document to compare it with?click the down arrow next to the Merge button and choose Merge into Current Document.
If you want the differences to be displayed in a brand-new document, click the down arrow next to the Merge button and choose Merge into New Document.
After you have merged the documents, all differences between them appear in purple as tracked changes. Balloons appear in Print Layout view and Web Layout view to describe the differences in more detail.
NOTE
To improve the accuracy of document comparison, Word inserts a hidden random number to help keep track of related documents. These random numbers could be used to identify related documents and potentially identify their authors.
If you don't want these random numbers stored in your document, choose Tools, Options, Security; then clear the Store Random Number to Improve Merge Accuracy check box. Clearing this check box may reduce the accuracy of document comparisons.
Merging Revisions from Several Reviewers into a Single Document
You've already seen one scenario for reviewing a document: You send a file to one reviewer who makes changes and then forwards it to another reviewer who makes changes that are recorded in a different color, and so on. When everyone is finished, the changes are returned to you in one rainbow-colored document.
In today's fast-paced business world, however, you may not have time to wait for each person to review a document consecutively. You may have to send a separate copy of the document to each reviewer and receive separate marked-up copies in return. You can use Word's Compare and Merge Documents feature to integrate all those changes into a single document, where you can resolve them all at once in an organized fashion.
Follow these steps to merge revisions from several documents into a document you already have open:
Choose Tools, Compare and Merge Documents. The Compare and Merge Documents dialog box opens (refer to Figure 26.19).
Browse to select the document you want to merge.
Click the down arrow next to Merge; then click Merge into Current Document.
Repeat steps 1?3 for each additional document with revisions you want to incorporate.
Using Word's Legal Blackline Feature to Compare Documents
As you've just seen, Word's standard Compare and Merge Documents feature can be used to merge multiple sets of changes into a single document for review. Often, lawyers who need to review document changes have a slightly different problem: They must clearly see only the differences between two documents.
For this purpose, Word also provides a Legal Blackline feature. Unlike standard Compare and Merge, Legal Blackline treats requested changes as if they had been accepted. Unlike Word's standard Compare and Merge Documents feature, Legal Blackline always creates a new document marking the differences between the two source documents.
To use Legal Blackline, carry out these instructions:
Choose Tools, Compare and Merge Documents. The Compare and Merge Documents dialog box opens.
Browse to select the document you want to merge.
Check the Legal Blackline check box. The Merge button changes to a Compare button.
Click Compare.
If tracked changes are present in either document you are comparing, Word displays a dialog box indicating that it will consider the tracked changes to be accepted for the purposes of the document comparison. Click Yes to continue comparing the documents.
Word displays a new document containing balloons marking every difference between the two documents you compared.
Comparing Documents Side by Side
Before or after you merge two documents, you may want to compare them side by side. Word 2003 makes this easy: |
Open both documents, and make sure one of them is displayed.
Choose Window, Compare Side by Side. The Compare Side by Side dialog box opens (see Figure 26.20).
Figure 26.20. The Compare Side by Side dialog box.
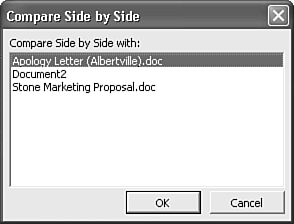
Choose the document you want to view alongside the document that is already displayed.
Click OK.
Both documents now appear side by side (see Figure 26.21). You can control them from the Compare Side by Side toolbar.
Figure 26.21. Documents displayed side by side.
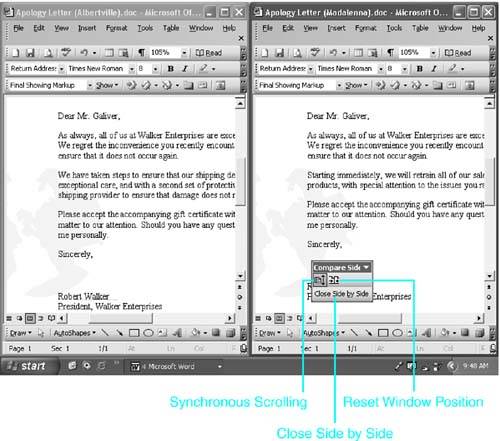
By default, when you scroll in one document, the other document automatically scrolls as well. Because the two documents may not be displayed at the same location in the document, this can be annoying. To prevent synchronous scrolling, click the Synchronous Scrolling button on the Compare Side by Side toolbar.
You might occasionally resize one or both of the windows to see more or less of a single document. To return the documents to their original size?each taking up half of the available editing space?click Reset Window Position.
When you're finished viewing the two documents side by side, click Close Side by Side.
TIP
You may find it easier to review the contents of both documents if you use Word's option to wrap text to the width of a window. Choose Tools, Options, View; then check the Wrap to Window check box, and click OK.


