Limiting the Changes Reviewers Can Make in Your Document
As you've learned, one of the main benefits of Word's Comments feature is that it prevents reviewers from cluttering up a document with text that must simply be deleted later. You can go beyond inviting reviewers to use Word's Comments feature. You can set up your document so that they can do nothing but make comments. Follow these steps:
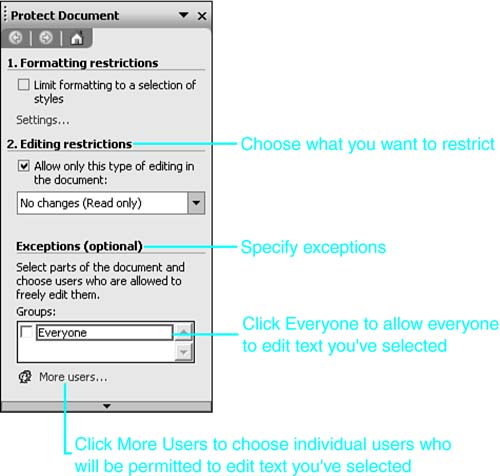
Choose Tools, Protect Document. The Protect Document task pane opens (see Figure 26.13).
Figure 26.13. Using the Protect Document dialog box, you can prevent reviewers from doing anything except making comments.
Check the Allow Only This Type of Editing in the Document check box. New options appear in the Protect Document check box (see Figure 26.14).
Figure 26.14. When you begin setting editing restrictions, new options appear.
Choose Comments from the drop-down box.
TIP
To limit reviewers to making changes using Word's Tracked Changes feature, choose Tracked Changes instead.
To limit reviewers to filling in Word forms, choose Filling in Forms instead.
Click Yes, Start Enforcing Protection. (You may have to scroll down inside the task pane to see this option.) The Start Enforcing Protection dialog box appears (see Figure 26.15).
Figure 26.15. Using the Start Enforcing Protection dialog box, you can control the level of protection in your document.
Choose which level of document protection you want:
If you choose Prevent Accidental Changes, you can assign a password to your document. However, anyone who knows the password can remove it?and therefore remove the protection. Moreover, the document is not encrypted, so it may be at least partly readable in text editors such as Notepad. In fact, reviewers who can view your document in order to comment on it can also copy all of your document's text, images, and fields into another document that has no protection at all.
If, on the other hand, you choose Prevent Intentional or Malicious Changes, the document will be encrypted. Moreover, Word will permit users to remove document protection only if they have been authenticated via an SSL-secured authentication system, such as Microsoft Active Directory.
If you chose Prevent Accidental Changes, enter a password in the Enter New Password (Optional) dialog box; then reenter the password in the Reenter Password to Confirm dialog box.
NOTE
If you do not use a password, when a reviewer opens the document he or she will still be restricted to making comments only. However, choosing Tools, Unprotect Document will unlock the document for any kind of editing.
Click OK. The protection is applied.
Gaining Finer Control over Editing Restrictions
Word allows you to select specific areas of your document and specify which users can freely edit those areas of the document. By doing so, you can restrict certain users to commenting on parts of the document you don't want them to edit. Meanwhile, you can specify individuals who will be permitted to edit as well as comment on the entire document.
To restrict different users in different ways, follow these steps:
Choose Tools, Protect Document. The Protect Document task pane appears.
Click the Allow Only This Type of Editing in the Document check box.
Choose Comments from the drop-down box.
In the document, select a block of text you want some or all document reviewers to be able to edit without restriction.
If you want everyone to be able to edit that text, check the Everyone check box in the Groups box (refer to Figure 26.15). If you want only some users to be able to edit the text you selected, click More Users. The Add Users dialog box opens (see Figure 26.16).
Figure 26.16. Adding specific users who will be permitted to edit the text you selected.
Enter user names corresponding to the users you want to give editing permission to. You can enter names by email address or Microsoft Windows user account:
If you intend to use Word 2003's strongest available protection (Prevent Intentional or Malicious Changes), use email addresses.
If you intend to use weaker password protection (Prevent Accidental Changes), use Microsoft Windows user accounts.
Click OK.
To give another individual (or individuals) editing rights to a different block of text, select the text, and repeat steps 5?7.
In the Protect Document task pane, click Start Enforcing Protection. (You may have to scroll down in the task pane to see this option.
The Start Enforcing Protection dialog box opens. Choose the form of document protection you want: Prevent Accidental Changes or the stronger Prevent Intentional or Malicious Changes.
 For more information about these options, see "Limiting the Changes Reviewers Can Make in Your Document," p. 892.
If you chose Prevent Accidental Changes, enter a password in the Enter New Password (Optional) dialog box; then reenter the password in the Reenter Password to Confirm dialog box.
Click OK. The protection is applied.
Working with Documents That Have Been Restricted
If you open a document that has been restricted to comments (or to tracked changes or fill-in forms), the Protect Document dialog box will appear when you attempt to make an unauthorized edit (see Figure 26.17).
Figure 26.17. If you have been restricted from editing part or all of a document, the Protect Document task pane tells you so.
By default, the areas of text you are permitted to edit are highlighted in yellow and bracketed with brown brackets. You now have several options for working with the document:
To select the next area of text you are currently permitted to edit, click Find Next Region I Can Edit.
To select all the areas of text you are currently permitted to edit, click Show All Regions I Can Edit.
To toggle highlighting on and off, check or clear the Highlight the Regions I Can Edit check box.
To turn off protection altogether, click Stop Protection.
If the document was protected using Prevent Accidental Changes, and no password was used, the protection will be turned off. If a password was used, the Unprotect Document dialog box will appear (see Figure 26.18). Enter the password, and click OK.
Figure 26.18. Enter your password in the Unprotect Document dialog box to stop enforcing protection.