Working with Comments
It's a classic problem: How do you make (or invite) comments in a document without introducing text changes that have to be undone later? The solution is Word's Comments tool.
With Comments, your colleagues have a way of annotating your document that doesn't get in your way as you edit and format it. Whenever you're ready, their inserted comments are easy to view, print, and resolve.
TIP
You can also use Comments to create notes to yourself about facts that need checking, additional text that needs to be added, and other unfinished business.
To insert a comment, either click where you want your comment to appear or select the text that relates to the comment you want to make, and then press Alt+Ctrl+M, or click the Insert Comment button on the Reviewing toolbar. (You can also choose Insert, Comment.)
If you are working in Normal view, a comment marker appears at the point in your document where you are entering the comment, and the Reviewing pane appears (refer to Figure 26.5 for an example). In Word, the word your insertion point was in appears highlighted; this highlighting will not appear in the printed document unless you choose to print comments.
If you are working in Print Layout view or Web Layout view, a comment balloon also appears. You can now type your comment.
NOTE
If you do not want to see comment balloons in your document, click Show on the Reviewing toolbar and clear the Comments check box.
Inserting Comments from Multiple Reviewers
Several people can use Word's comments feature to annotate the same file. Word automatically places each reviewer's name above her comment marks, using the name that appears in the User Information tab of the Options dialog box.
TIP
As mentioned earlier, Word displays your name above the comment in the Reviewing pane. If the name Word displays is incorrect, choose Tools, Options, User Information and enter your name in the Name text box.
If you're using someone else's computer to make comments on a document, change the User Information to ensure that your name is associated with future comments. The change takes effect immediately; however, no name changes are made to comments that have already been inserted.
Inserting Voice Comments
Occasionally, you might want to insert a brief audio comment in a file. For example, there may be a point you find it hard to explain in writing but easy to explain verbally. Or you may have a digitized quote you want to include. If you have a microphone and a sound card, Word makes it easy to add an audio comment. Even if your computer isn't audio equipped, you can insert WAV audio files you may have acquired elsewhere.
To record your own audio comment, follow these steps:
On the Reviewing toolbar, click Insert Voice. The Windows Sound Recorder applet opens (see Figure 26.7).
Figure 26.7. The Windows Sound Recorder opens whenever you want to insert an audio comment.
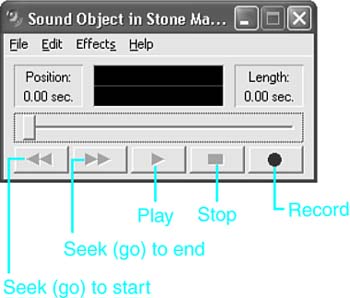
Click the Record button and speak.
When you finish speaking, click the Stop button.
Choose Exit & Return from the File menu.
If the cassette icon is grayed out, preventing you from using it, see "What to Do If the Voice Comment Recorder Command Is Unavailable," in the "Troubleshooting" section of this chapter. |
TIP
You can edit your sound file while Sound Recorder is open. For example, you can choose Edit, Insert File to insert another audio file into the comment. Or you can play your recorded file to the point where you made your most important point and choose Edit, Delete Before Current Position to edit out everything that came before it.
Your voice comment appears as a speaker icon both in the Reviewing pane and in a comment balloon (see Figure 26.8). You can include text along with an audio comment: Just enter the text to the right of the Speaker icon in either the Reviewing pane or the comment balloon.
Figure 26.8. The Speaker icon signifies an audio comment; double-click the speaker to hear it.
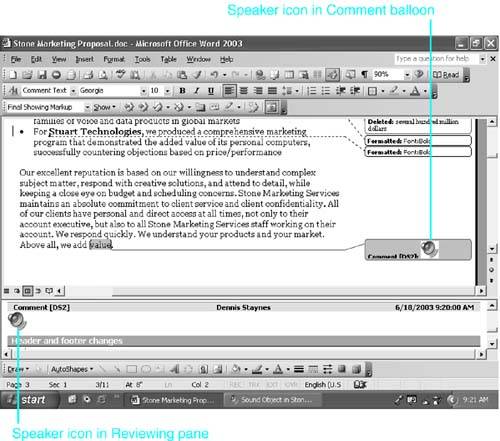
To listen to an audio comment, double-click the icon. To edit the comment, right-click the icon; the shortcut menu appears. Choose Wave Sound Object, Edit, and the Sound Recorder applet opens.
CAUTION
Make your audio comments brief. Audio can dramatically enlarge the size of your files, reducing performance and straining your network.
Also keep in mind that your reviewer needs a sound card and speakers to hear your audio comments.
Inserting Ink Comments
If you are running Word on a Tablet PC, you can insert handwritten comments with "ink," using the Tablet PC's stylus. (Note that this feature will not work on a regular PC even if the PC is equipped with a writing tablet.) To insert a handwritten comment, do this:
Click on the text or document element where you want to insert your comment. To comment on a paragraph, you can also tap at the end of the paragraph.
Choose Insert, Ink Comment. A comment balloon appears.
Write your comment inside the comment balloon. If you need to erase part of your comment, tap Eraser on the Ink Comment toolbar; then drag the eraser across the ink you want to erase.
TIP
If you are working with a Tablet PC, you are not restricted to making ink comments inside comment balloons. If you switch to Print Layout or Reading Layout view, you can mark up the document just as if you were marking up a paper document.
For example, you might cross out, circle, or underline text; add marginal notes; or add handwritten text to be inserted within existing text.
Unlike Ink Comments, however, this markup cannot be reviewed one at a time through the Reviewing pane along with other typed comments.
Viewing and Editing Comments
So you've sent your document around for review, and you now have more comments than you know what to do with. Word makes it easier than ever to read, edit, and delete your comments. You can review all your comments systematically, in the Reviewing pane. Or you can review them more informally in the editing window.
TIP
Before you start, consider saving a version of your file that contains all the comments as inserted by your reviewers. That way, you have a complete record of your document as it appeared before you decided what to do about each comment.
To save a version, choose File, Versions and click Save Now. You'll learn more about versioning later in this chapter, in the "Using Word's Versioning Feature" section.
Reviewing Comments in the Reviewing Pane
To review comments in the Reviewing pane, make sure that the Reviewing toolbar is displayed (if necessary, choose View, Toolbars, Reviewing). Next, click the Reviewing Pane button.
By default, Word displays all the comments made by all your reviewers. In some instances, you might want to review all the comments made by a single reviewer, or walk through the document one reviewer at a time.
If your document has comments from multiple reviewers, you may find it helpful to focus on one set of reviewer's comments at a time. To view just one reviewer's comments, select Show, Reviewers on the Reviewing toolbar, and choose the name of the reviewer from the cascading menu.
 For more information about these options, see "Introducing Word's Reviewing Toolbar," p. 876.
Whenever you click a comment within the Reviewing pane, Word displays the corresponding text in your document?making it easy to see to which text a reviewer is reacting. If a reviewer has suggested language you want to use in your document, you can select it from the Reviewing pane and copy it into your document. More likely, you will want to edit a comment before incorporating it; most of Word's editing tools are available in the Reviewing pane.
When you finish working in the Reviewing pane, click the Reviewing Pane button or press Alt+Shift+C to close it.
TIP
If your document contains many comments, you might want to enlarge the Reviewing pane by dragging its top border higher in the editing window.
Reviewing Comments in the Document Window
You don't need to open the Reviewing pane to view and resolve comments: You can work with Word's comment balloons. To display comment balloons, first switch to Print Layout view or Web Layout view. If comments do not appear, click Show on the Reviewing toolbar and check Comments.
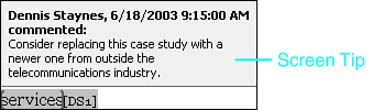
Comment balloons only identify comments by the reviewer's initials. However, if you hover your mouse pointer over a comment, a ScreenTip appears, showing the reviewer's full name and when he or she made the comment, as shown in Figure 26.9.
Figure 26.9. Viewing the ScreenTip associated with a comment balloon.
TIP
You can use Edit, Find to locate specific text in a comment, either in the Reviewing pane or in a comment balloon.
Navigating and Responding to Comments
You've already seen that you can click a comment in the Reviewing pane to move to it in the document. The Reviewing toolbar offers a more systematic way to review comments. If it is not open, choose View, Toolbars, Reviewing to display the Reviewing toolbar. Then move from one comment to the next, using the Previous and Next buttons.
NOTE
By default, clicking Previous or Next moves to either the next comment or the next tracked change (an insertion, a deletion, or a formatting change). If you do not want to review tracked changes, click the Show button; then clear the Insertions and Deletions and Formatting check boxes.
At some point as you navigate from one comment to the next, you'll find one that you think necessitates a response to the comment's author. Word allows you to respond to comments in various ways:
You can copy text from within the comment into your document and, if necessary, edit it there.
You can add new text to the document.
You can reply to the comment with another comment.
Of course, you can also choose to disregard the comment.
After you've made your decision, you will generally want to delete the comment. To do so, select the comment balloon (or click on the comment's text in the Reviewing pane); then click the Reject Change/Delete Comment button on the Reviewing toolbar.


