Adding Interactivity with Form Fields
So far, you've seen only how to create a document that resembles a form?in other words, the skeleton of a form. In the rest of this chapter, you'll learn how to add interactivity and automation to your form with form fields. Form fields are special document elements that make it possible to fill out the form more easily and quickly, and to use the form's information after it's there.
Working with the Forms Toolbar
Working with forms requires access to a specific set of tools. Word 2003 has grouped the essential commands for creating and editing a form together in the Forms toolbar. You can display this toolbar as you would any other: Choose View, Toolbars, and then choose Forms from the submenu. Figure 28.2 shows the Forms toolbar.
Figure 28.2. The Forms toolbar.
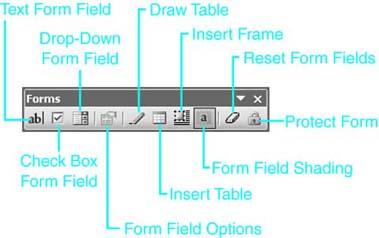
Ten buttons appear on the Forms toolbar:
Text Form Field inserts a text form field where users can enter text, numbers, symbols, and spaces. You can also use text form fields to make calculations based on entries that users make in other form fields.
Check Box Form Field inserts a check box in your document; users can either check the box or leave it unchecked.
Drop-Down Form Field inserts a drop-down form field that gives a user a list of alternatives; the user is limited to choosing one of those alternatives.
Form Field Options is used to specify the detailed settings for any form field after you've inserted it.
Draw Table displays the Tables and Borders toolbar, which contains buttons the form designer can use to build tables more easily and activates the Draw Table tool.
Insert Table inserts a table with a specific number of columns and rows, all of them the same height and width. This is the same Insert Table button that appears in the Standard toolbar.
 To see how to draw or insert tables, see "Word's Multiple Approaches to Creating a Table," p. 388.
Insert Frame includes a free-floating box in the form that you can format with a precise size and location. (Insert Frame does not insert text boxes.)
Form Field Shading toggles your form's text, check box, and drop-down fields between medium gray shading and no shading.
Reset Form Fields clears all entries that have been added to a form.
Protect Form enables you to protect all areas of a form from change, except for those that users are intended to fill in.
TIP
As you build your form, you'll often want to use Protect Form to toggle between protecting the form (which shows how it will look and act when users work with it) and unprotecting the form so that you can make changes to it.
Inserting a Text Form Field
When it comes to basic forms, by far the most common type of entry is plain free-form text. Most forms, at a minimum, gather your name and address?and others may require widely varying types of information, much of which must be entered as text. Text form fields are the workhorses of forms.
To enter a standard text form field, display the Forms toolbar, position your insertion point where you want the field to appear, and click the Text Form Field button. You've just inserted a text form field; it appears shaded in your document (see Figure 28.3).
Figure 28.3. A text form field as it appears after being inserted in a document.
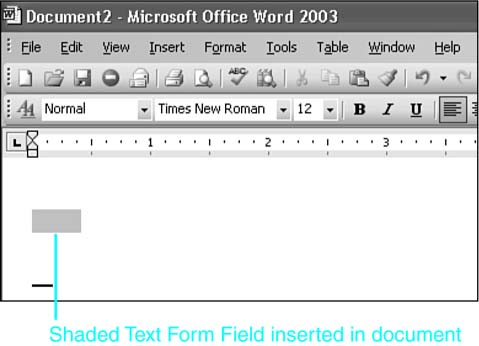
The generic 1/2"-wide Text Form Field button you've just placed in your document enables users to insert any text, of any length. But you may want to restrict what users can enter here?and give them some help in entering the information you need.
You control the options associated with a text form field through the Text Form Field Options dialog box, shown in Figure 28.4. This dialog box can be reached in two ways. You can select the field you want to edit and click the Form Field Options button on the Forms toolbar, or you can right-click on the field and click Properties from the shortcut menu that appears.
Figure 28.4. From the Text Form Field Options dialog box, you can control the behavior of a text form field.
Placing a Number, Date, or Time in a Text Form Field
The first aspect of the text form field you can control is whether it should contain text. You can use the Type drop-down list box in the Text Form Field Options dialog box to specify several alternatives, including these:
Regular Text. The default setting; users can enter anything they want.
Number. This setting restricts entry to numbers and number-related characters and punctuation (for example, $ and : characters). If a user enters a character other than a number, the form stores the number zero instead.
Date. This setting restricts entry to a valid date or time. An error message appears if the user enters something else.
Current Date. This setting inserts a { DATE } field. The field is updated when the document is first opened or created, and afterward in accordance with the traditional Word field updating rules (for example, you can select the field and press F9 to update it).
Current Time. This setting inserts a { TIME } field.
Calculation. This setting tells Word you want the field to perform a calculation. As you'll see later in this chapter, in the "Using Calculations in Text Form Fields" section, if you use this setting, you have to create the equation as well.
Setting Default Information for Your Text Form Field
In many text form fields, users want to insert the same information most of the time. You can automatically provide this information, which then appears automatically in the form unless the user changes it.
To specify default information, display the Text Form Field Options dialog box and enter the information in the Default Text text box. You can enter text, numbers, symbols, or spaces, unless you've restricted the type of data that can be entered?for example, by choosing Current Date, Current Time, or Calculation.
The default information you specify will appear in the form as you typed it; the user can type over it to replace it with new information.
If your users are not familiar with Word forms, you may need to provide instructions that let the user know he or she can change this information.
Controlling the Length of User Input
Many forms are designed to restrict the number of characters a user may enter in a specific area. For example, if your users are entering Social Security numbers, you should limit the number of digits to nine; any more digits than that, and the input is incorrect. You can set the length of a text form field in the Maximum Length scroll box in the Text Form Field Options dialog box.
Controlling Capitalization in Text Form Fields
You apply most text formatting to form fields the same way you apply other text formatting: by manually applying it to characters or paragraphs, or by using styles. However, the Text Form Field Options dialog box does enable you to control the case to be used in regular text entries. Make sure that Regular Text is selected in the Type drop-down box; then choose Uppercase, Lowercase, First Capital, or Title Case from the Text Format drop-down box.
Using Numeric Formats in Text Form Fields
As you've already learned, you can limit a text form field to one of several types of information. One of the most useful types of information available to you is Number.
Specifying that data be entered as a number takes you one small step toward ensuring data integrity. Nobody can fill in alphabetical characters, for example, in a field that requires a dollar amount.
After you choose Number, you can also specify the format in which the number appears. Make a choice from the Number Format combo box. Among the options Word provides are options to
Include decimal points; for example, 3.28
Add commas as thousands separators; for example, 12,516
Place negative numbers in parentheses; for example, (132.14)
Use percentage symbols; for example, 38%
Use combinations of these symbols
Then, even if the user enters a number in a different format, Word automatically changes it to be consistent with all the other forms you're collecting.
NOTE
Some elements of the Text Form Field Options dialog box change their names depending on the type of information you choose to include in your text form field.
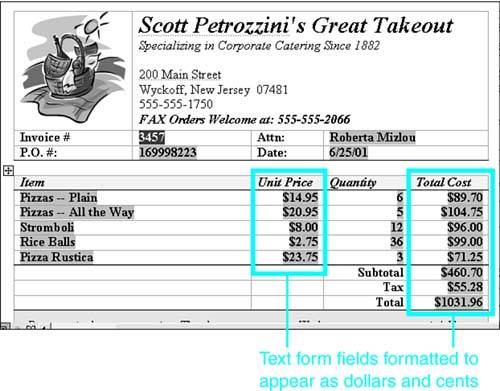
In the sample invoice shown in Figure 28.5, text form fields have been added to each table cell under Unit Price. These text form fields have been set to appear in dollars-and-cents format.
Figure 28.5. The text form fields have been formatted to appear as dollars and cents.
TIP
You can go beyond standard numeric formats by adding a "numeric picture" in the Number Format combo box. The numeric picture ###.#, for example, tells Word to round off any entry to tenths. Numeric pictures are explained in the "Customizing Numeric Formats to Your Specific Needs" section of Chapter 23, "Automating Your Documents with Field Codes."
Using Dates and Times in Text Form Fields
You can also specify that text form fields include dates and/or times. You can allow users to enter the dates or times, following date and time formats you specify. Or, if you prefer, you can time stamp your form with the current date or time when the form is first opened by a user.
To allow users to enter a date, display the Text Form Field Options dialog box, and choose Date from the Type drop-down box. Choose a Date Format from the drop-down box; if you want to include space for Time, choose a date format that contains h:mm.
For more information about choosing and customizing Word's date/time formats, see "Formatting Dates and Times in Field Results," p. 795.
In some cases, you want your form field to display the date when the form was opened for the first time, instead of permitting users to enter a date manually. To display the date when the form was opened, choose Current Date from the Type drop-down box. To display the time the field was opened, choose Current Time from the Type drop-down box.
CAUTION
Remember that a user can still circumvent your date and time settings by resetting the system clock, thereby making it appear that a form was filled out sooner than it really was.
CAUTION
When you're creating or editing your form, get in the habit of protecting your document before you test your changes. Otherwise, selecting the form field and then entering some text overwrites any default value you have established for the field. To quickly lock and unlock your form, use the Protect Form button on the Forms toolbar.
After you test a form field, be sure to clear all entries you don't want included in the final form. You can do this by clicking the Reset Form Fields button.
Other features of the Text Form Field Options dialog box are covered later in the chapter. In particular, adding Help Text is covered in the "Adding Help to Your Forms" section, and running macros is covered in the "Running Macros from Form Fields" section.
Using Calculations in Text Form Fields
In Chapter 12, you learned that Word can perform simple calculations within tables, much as a spreadsheet program such as Excel can. Forms can especially benefit from this capability. For example, you can create invoices that calculate totals based on how many of each item someone orders, and how much each item costs.
Use the Text Form Field Options dialog box to build calculations. First, choose Calculation as the Type of data you want to insert. To the right of the Type drop-down box, the Expression text box appears. An equal sign is placed in the text box. (All formulas in Word begin with an equal sign.) You can now use any of Word's basic calculation techniques.
To specify values in table cells, you can specify the table cells. The first row of a table is row 1. The first column of a table is column A. The cell at the upper left of a table, therefore, is cell A1. To add the contents of cells A1 and A2, enter
=A1+A2
Because every form field has a corresponding bookmark, you can also use bookmarks, such as
=Quantity1+Quantity2
You can also use any of the calculation functions Word provides. The simplest are SUM for addition and PRODUCT for multiplication. For example, to add the numbers in cells B1 and B2, enter
=SUM(B1,B2)
Or to add all the numbers above your current cell, enter
=SUM(ABOVE)
To multiply the numbers in cells B1 and B2, enter
=PRODUCT(B1,B2)
For more information about working with formulas, see "Calculating with Tables," p. 427.
Using Calculate on Exit to Automate Your Calculations
If you've ever worked with a spreadsheet program such as Excel and then had to do calculations in a Word table, you've probably wished that Word could automatically recalculate formulas every time a value was changed. With the Calculate on Exit feature for form fields, Word can recalculate specific form fields whenever a user changes a value the field depends on. Calculate on Exit works when you click or tab away from the form field that contains this setting. (You don't have to wait until you exit Word or close the document.)
Because Calculate on Exit requires information from other fields in your form, setting this up is a bit more complicated than simply inserting a field. To use Calculate on Exit, follow these instructions:
Click the Text Form Field button on the Forms toolbar to place text form fields where you want to enter your numbers. Then insert a final form field to use for the value you are calculating.
In all but the final form field (where the calculated value is to appear), first change the Type from Regular Text to Number in the Text Form Field Options dialog box. Next, check the Calculate on Exit check box. If you want, you can also change the Number Format. Note the name of each form field in the Bookmark text box.
In the text form field that is to display the total, first change the Type to Calculation. Next, put your formula in the Expression text box. You can refer to the other form fields through their bookmark names. A typical formula that, for example, might add up the total of three form fields would read =SUM(TEXT1,TEXT2,TEXT3).
Do not select the Calculate on Exit option for this final form field box.
After you close the text form field dialog boxes, lock the form by clicking the Protect Form button on the Forms toolbar.
Now, whenever a user enters or changes a number that is part of a calculated formula, the formula will automatically recalculate.
Adding Check Box Form Fields
Check boxes are a handy way to enable users to select one or more options that are not mutually exclusive. For example, in Figure 28.6, check boxes indicate that a user can sign up for as many courses as he or she wants.
Figure 28.6. An example of how check boxes can be used in a form.

Check boxes are generally used when it doesn't matter how many of the items in a group your user can select. For example, a check box is the method of choice when you see the phrase "Check all that apply" in a survey or questionnaire.
To insert a check box, place your insertion point where you want the check box to appear, and click the Check Box Form Field button on the Forms toolbar.
By default, Word displays boxes unchecked. If you want a box to appear checked by default, or to change other options associated with a check box, display the Check Box Form Field Options dialog box, shown in Figure 28.7. To do so, select the check box form field you just created and click Form Field Options, or right-click on the check box form field, and choose Properties from the shortcut menu.
Figure 28.7. Controlling the behavior of a check box form field.
To specify that a check box should appear checked by default, choose Checked in the Default Value area. While you're here, you may want to consider some other settings as well.
TIP
Whether you prefer a default setting of Checked or Not Checked, there may be times when you want to prevent users from changing the default. For instance, you might want to include a check box in your form to indicate that you plan to make an option available in the near future, but prevent the user from checking the box until the option becomes available.
To prevent the user from changing the setting you specify, clear the Check Box Enabled check box in the Field Settings area.
By default, Word keeps your check box the same size as the text that follows it; if that text changes size, so does your check box. The Check Box Form Field Options dialog box, however, enables you to change the size of the check box without changing the size of any surrounding text. For example, you could enlarge a box for emphasis.
To specify the precise size of a form field check box, choose the Exactly option button in the Check Box Size area. Then enter the new size in the spinner box.
Later, after you protect the form and make it available to users, they will see a square shaded box. To check it, they can click it once, or press either the spacebar or the X key. The same techniques uncheck a box that's already checked.
For information about adding Help and macro functionality to check box form fields, see "Adding Help to Your Forms," p. 949, and "Running Macros from Form Fields," p. 951.
Adding Drop-Down Form Fields
Often, you'll want to give users a specific set of options from which to choose?and prevent them from entering any other alternative. For example, you might create a form that asks your telephone customer-service representatives to specify which product family a caller is calling about. Word's drop-down form fields enable you to do this.
NOTE
The form must be unprotected for you to change the formatting of a form field.
In other forms software, round radio buttons are sometimes used to indicate that only one choice is possible (for example, a field that must be answered "Yes" or "No"). Word does not provide radio buttons for electronic forms; however, drop-down fields are a good substitute in forms that will be filled out electronically.
Drop-down fields are not an adequate substitute in forms designed to be printed and hand-filled, because some of the options provided by the drop-down field may not be visible on the printed form.
To add a drop-down form field to a form, display the Forms toolbar and click the Drop-Down Form Field button. This inserts a drop-down form field without any options for users to choose from.
You can supply the options by displaying the Drop-Down Form Field Options dialog box (see Figure 28.8). Select the drop-down form field you just created and click Form Field Options or right-click on the form field and choose Properties from the shortcut menu.
Figure 28.8. Creating options for a drop-down form field.
Now, populate the drop-down list with items that will be available to your form's users. One by one, type the items in the Drop-Down Item box and click Add. If you need to change the order of entries in the drop-down list, select an item you want to move, and click the Move Up or Move Down arrows.
Word treats the first item in your list as your default choice. That means it is the option that appears selected when the user opens the form, as shown in Figure 28.9.
Figure 28.9. Sample use of a drop-down form field.
Suppose that you no longer need one of your options; perhaps you've discontinued a product or service. You can delete the option from your form by selecting it and clicking Remove.
As with check box form fields, there might be times when you want to specify choices but not allow users to access them. Perhaps you plan to make the choices available later, but for the moment, only your default option is available. To disable the drop-down list box while still displaying the default option, clear the Drop-Down Enabled check box.
For information about adding Help and macro functionality to drop-down form fields, see "Adding Help to Your Forms," p. 949, and "Running Macros from Form Fields," p. 951.
Formatting Your Form Fields
You can format form fields just as you would any other text characters: Select their contents and apply formatting using the Formatting toolbar, keyboard shortcuts, or menu commands. You can make text and drop-down form fields bold, italic, or underline; change the font name or size; and so on. The field itself retains the same gray shading. You can toggle this gray shading on and off with the Form Field Shading button on the Forms toolbar.
Most of the formatting you add?especially font formatting?isn't evident unless text appears in the field, either as a default setting or as entered by a user.
NOTE
The form must be unprotected for you to change the formatting of a form field.
CAUTION
When applying font formatting in a form, make sure that you use fonts that will be available on all the computers using your form. Otherwise, Windows may substitute fonts that look unattractive or are difficult to read.
This isn't a problem if you use basic Windows fonts such as Arial or Times New Roman. However, if you must use nonstandard fonts?perhaps to follow a corporate style guide?you may have another option. In some cases, you can embed the fonts you need directly in your form.
To do so, Choose Tools, Options, Save, and check the Embed TrueType Fonts check box. When enabled, this check box tells Word to actually store a copy of the font in the template.
Be aware that a template containing fonts increases the file's size, making it slower to open and close or send through email. Also, some fonts cannot be embedded due to manufacturer restrictions. To discover whether a font contains embedding restrictions (and to learn more about the detailed characteristics of a font), download and install the ttfext add-in available at Microsoft's Web site, at www.microsoft.com/typography/property/property.htm.
Removing a Form Field from Your Form
As you create and modify form templates, you may find that some fields are no longer needed. To remove a form field from your document, first click on it to select it. The field turns a darker shade of gray than normal. After it's selected, pressing Delete removes the form field; you can also click Cut on the Standard Toolbar, press Ctrl+X, or choose Edit, Cut.
NOTE
If your document is protected, you must first unprotect it. Choose Tools, Unprotect Document, or click the Protect Form button on the Forms toolbar.
CAUTION
Although Cut works to remove an unwanted form field, you need to be more careful about using Copy and Paste to create multiple copies of a form field.
If calculations are involved (as in a column of form fields that each calculate a line on an invoice), you need to manually update each form field to make sure it is calculating the correct bookmarked form fields.
Also, if the form field you copy contains a bookmark, you need to manually create new bookmarks for all the copies.


