Advanced Form Field Features
Word provides some powerful form field automation options that are available to you regardless of the types of form fields you're using. These include
Adding help to your forms, including anything from a simple message in the status bar to a more detailed message that appears when the user presses F1. (Unfortunately, Word provides no way to add a ScreenTip to a form field?something your users might now be trained to expect.)
Associating form fields with bookmarks.
Running macros when users enter or exit a form field. This means that your form can help complete itself, based on the specific entries the user makes.
Adding Help to Your Forms
If you're in charge of helping people fill out their forms, you can cut down dramatically on the support you need to provide by adding built-in help to your online forms. Word's built-in help for forms can provide more detailed explanations than your form itself may have room for. You can use it to elaborate on the options you're offering, the information you want to collect, or how to use the form itself.
TIP
You should give at least basic help in the form itself, where the help is visible for people who don't know how to look for it. Type language such as the following directly onto the form:
To get help about any item, move to it with the mouse or the keyboard and press F1.
To add help text, create the type of form field you need, right-click on it, and choose Properties; its Form Field Options dialog box appears. Click the Add Help Text button. The dialog box shown in Figure 28.10 appears.
Figure 28.10. In the Form Field Help Text dialog box, you can specify where help comes from, where it appears, and what it says.
You now have two choices to make: where your help message appears and where its contents come from. If you want help to appear in Word's status bar, click the Status Bar tab. If you want it to appear when the user presses F1, click the Help Key (F1) tab.
NOTE
You can create both kinds of help, by placing entries in each tab, as discussed in the next section, "Using Both Forms of Help Together."
No matter which tab you choose, you have the same two sources for your help text:
An existing AutoText entry containing boilerplate text you've already created. (Choose the AutoText entry you want from the AutoText Entry drop-down box, which lists all AutoText entries that are available to the template you're working in.)
New text (type it in the Type Your Own text box).
If you choose to use an AutoText entry, it's quite likely that this entry does not yet exist. To create an AutoText entry, type the text in your document; then choose Insert, AutoText, New. Enter a name for your AutoText entry, and click OK.
 For more information about working with AutoText entries, see "AutoText: The Complete Boilerplate Resource," p. 301.
For simple "one-off" forms that aren't part of an extensive forms system, you'll probably want to use Type Your Own rather than a preexisting AutoText Entry. Type Your Own entries are conveniently stored with each form, and can easily be revised through this dialog box.
You might, however, use AutoText entries if you are creating a help entry you intend to use in multiple forms or multiple locations. This way, if you need to update the entry later, it will automatically be updated in all the locations where it appears.
CAUTION
If you use an AutoText entry, be aware that neither the status bar nor these Help dialog boxes can contain graphics, even though graphics can be stored in AutoText entries.
When you finish creating help, click OK.
Using Both Forms of Help Together
You don't have to choose between offering help in a dialog box and offering it in the status bar. For example, you might provide abbreviated help in the status bar, ending the status bar message with "Press F1 for more help." You could then associate more extensive information with the F1 key so that when the user presses it, Word displays the added help information in a special Help dialog box. (Status bar help is limited to 138 characters; help presented in a dialog box can be up to 255 characters in length.) Figure 28.11 shows how both kinds of help can complement each other in this fashion.
Figure 28.11. Providing help to users of a form.
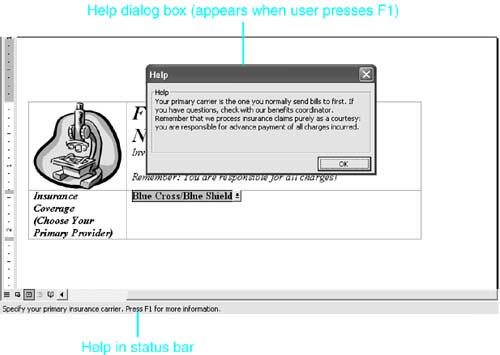
Some users provide simple instructions on using the form in the status bar and provide background about how to interpret the form's questions in the dialog box.
For example, in a travel reimbursement form, the status bar might say "Enter total airline ticket cost," whereas the F1 key might summarize the company's travel reimbursement policies.
Running Macros from Form Fields
You can instruct Word to run a macro whenever a user enters or leaves a field. In either case, you can select from macros available in your current document or template.
TIP
If you already have a macro you want to use, copy it to your form template using the Organizer.
For more information about working with the Organizer, see "Keeping Track of Styles with the Organizer," p. 349.
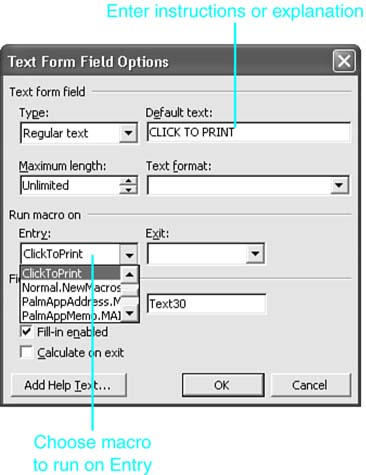
Figure 28.12 shows an example of how you might use this feature. In this example, a macro, ClickToPrint, has been recorded. ClickToPrint sends the form to a user's default printer. Whenever a user tabs to?or clicks in?the CLICK TO PRINT field, the file prints automatically.
Figure 28.12. Creating a form that includes a Print button.
Every form field is automatically assigned a bookmark name. This makes it easy to create Word macros that check the current contents of a bookmark and, based on what they find there, place corresponding contents in other fields. For example, when a user inserts a name, the macro can automatically look up that name in a database and insert the corresponding company and address. Or, when the user checks a check box, the macro can enable other form fields that were previously grayed out.
After your macro is written, you need to link it to a form field. First, double-click the form field to which you want to attach the macro, or right-click on the field and choose Properties. This displays the Properties dialog box associated with the form field.
NOTE
If double-clicking on the form field doesn't work, choose Tools, Unprotect Document to permit changes to form fields.
Second, in the Run Macro On section, choose either Entry or Exit (you can create different macros for each, if you want). Third, select the macro from those listed. Click OK, and you're finished. As always, be sure to lock the document using the Protect Form button on the Forms toolbar after you make your changes.
For more information about recording macros that can be used in forms (or elsewhere), see "Recording and Running Visual Basic Macros," p. 1069.


