Integrating Excel and Word
Word 2003 can perform a surprising number of calculations all by itself, as you learned in the "Calculating with Tables" section in Chapter 12, "Structuring and Organizing Information with Tables." However, it's not a dedicated spreadsheet program like Microsoft Excel.
Luckily, if you've installed Excel, you can call on it whenever you need extra number-crunching power, inserting Excel spreadsheets or charts instead of building them with Word. And, of course, you can take advantage of work you've already completed in Excel, so you don't have to redo it in Word.
This integration between Word and Excel is a two-way street. Excel offers tremendous mathematical prowess, but it's obviously more limited than Word when it comes to creating and formatting complex documents. You can use Word to present your Excel data in a format that communicates the information more effectively than Excel could alone.
Moreover, the connection between Word and Excel is as lively as you want it to be. If, for example, you link your quarterly report to sales data kept in three different files (gathered by three different sales representatives) on your company's network, every time you open or print the report, your numbers are updated. Just as important, you can also set the links to not update automatically. That way, you can always generate an accurate archival record of a project as it existed at a given point in time.
You can use several techniques to bring Excel data into Word. None is especially complicated, and some are downright simple. In the next section, you'll leverage Excel's mathematical capabilities in Word by integrating a new Excel worksheet into a Word document.
Inserting a New Excel Worksheet in a Word Document
In Chapter 12, you learned how you can use Word to add numbers in a table or insert a field that can calculate a formula anywhere in a document, using basic arithmetic operations and functions. You may well find, however, that you need to perform calculations beyond Word's capability. Fortunately, you can tap Excel's powerful capabilities without leaving Word.
Inserting an Excel Worksheet of a Specific Size
If you need to create a new set of data that is reasonably compact, Word enables you to insert a blank Excel worksheet of specific proportions. The higher your screen resolution, the more rows and columns you can insert.
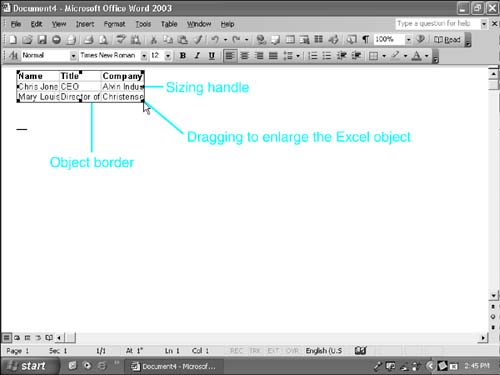
To insert a worksheet using the toolbar button, click in your document where you want the worksheet to appear and click the Insert Microsoft Excel Worksheet button on the toolbar. A grid appears (see Figure 29.1). Drag the mouse pointer down and across the grid to define the size of your worksheet. The worksheet appears in your Word document.
Figure 29.1. Dragging the Insert Excel Worksheet grid to insert a worksheet with specific proportions.
Inserting an Excel Worksheet Through Menu Commands
Another way to insert a new Excel worksheet is through menu commands. Choose Insert, Object to open the Object dialog box (see Figure 29.2). From the Create New tab, scroll down the Object Type list to select Microsoft Excel Worksheet. Click OK to insert the worksheet and close the dialog box.
Figure 29.2. Inserting a new Excel worksheet through the Object dialog box.
The default worksheet is 7 columns wide by 10 rows high. Because this procedure can only insert a sheet of the default size, you may have to adjust the size manually afterward, by dragging on the sizing handles at the corner of the worksheet object.
NOTE
You can use the Object dialog box to create an object corresponding to any Windows program that supports object linking and embedding (OLE), a Microsoft standard that allows you to create objects with one application and link or embed them in another. Simply choose the type of object you want to create in the Object Type scroll box.
Inserting a new worksheet through the Object dialog box gives you one option you don't have if you use the Insert Microsoft Excel Worksheet toolbar button. You can choose to insert the worksheet as an icon, rather than display the data itself in your document (see Figure 29.3). To do so, check the Display as Icon check box.
Figure 29.3. Displaying Excel data as an icon in your Word document.
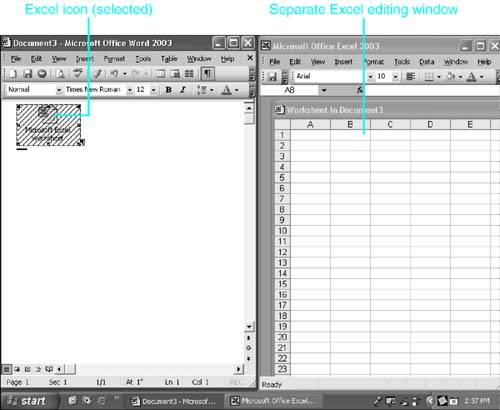
After you insert the icon, you can double-click on it to edit the Excel worksheet in a separate Excel window.
When would you display a worksheet (or any other object) as an icon? When you won't need to print it, and when you're running Word and Excel on a relatively slow computer.
You still have access to the live data, but Word runs a bit faster, because it needs to display only an icon representing the worksheet except when you are actually working with the data.
TIP
If you choose to display worksheet cells in your document, and later decide you prefer to display an icon?or vice versa?you can easily swap between the two options. Right-click on the object to display the shortcut menu and choose Worksheet Object, Convert. The Convert dialog box appears. Check or clear the Display as Icon check box and click OK.
If you open, edit, and save an Excel worksheet in Word and then cannot reopen it in Excel, see "What to Do If You Can't Open a Worksheet in Excel After You Edit and Save It in Word," in the "Troubleshooting" section of this chapter. |
Importing Excel Objects
In the previous sections, you learned how to insert a blank Excel worksheet. But it's equally likely that you'll already have an Excel workbook containing the data you want to include. Many users prefer to create their data in Excel before inserting the data into a Word document.
If you already have an Excel worksheet, Microsoft gives you plenty of options for incorporating it into a Word document. For example, you can
Import a copy of an entire existing Excel workbook
Import a linked version of an existing Excel workbook
Insert a range of cells from Excel as a table in Word
Insert a range of cells from Excel into Word and retain all the Excel formatting
Insert a range of cells as a link from Excel to Word
NOTE
A word about terminology: An Excel file is called a workbook. Workbooks consist of one or more worksheets?individual "pages" of the spreadsheet that can be displayed separately.
When you insert a blank worksheet into your Word document, Excel creates a workbook consisting of a single worksheet. If you insert an existing workbook, you need to pay attention to whether you're inserting one worksheet or several worksheets. Later in this section, you'll learn how to control which parts of a workbook you insert.
When you insert a workbook with multiple sheets, only the active cells in the first sheet are visible, and only those cells print. However, if you double-click on the workbook to edit it, you can choose to display the active cells from a different sheet by clicking on that sheet's tab at the bottom of the Excel window.
Importing an Entire Workbook
To import an entire workbook that already exists, follow these steps:
Choose Insert, Object.
Click the Create from File tab (see Figure 29.4).
Figure 29.4. Creating an object from an existing file.
Unless you know the exact filename and path, click Browse. The Browse dialog box appears, which looks like a standard Open File dialog box. (If you know the filename and path, you can simply enter it in the File Name text box, in place of the *.* characters that are present when you display this tab.)
Browse to and select your file.
Click Insert.
Click OK.
TIP
You've already learned how to embed a Microsoft Excel object; you can do the same thing with any kind of object, including a PowerPoint presentation, a Visio graphic, or any other file created in an OLE-compatible application?from Microsoft or anyone else.
Choosing How to Import Your Workbook
Word gives you three options for how to import a workbook as an object:
By default, Word embeds the workbook's contents in your document. You can edit them in Excel, but there is no connection to the original file; and if the original file changes, the change is not reflected in the Word document.
Check the Link to File check box in the Create from File tab. This not only inserts the contents of the Excel worksheet, but also establishes a link to the source file so that updates to the source file can be reflected in the Word document.
Check the Display as Icon check box in the Create from File tab. You've already learned that this option displays an icon in place of the worksheet cells; you can double-click the icon to open the worksheet in a separate editing window.
After you confirm your choice by clicking OK in the Object dialog box, a copy of the entire Excel workbook is inserted in your Word document as an object.
Linking to the Source File: Advantages and Disadvantages
When you choose Link to File, you're no longer working with a copy of the original file; you're working with the actual file. When you are working in Word and double-click the Excel object to edit it, Excel opens the workbook in another window, and any changes you make are incorporated into the source file. Likewise, with a linked object, any changes you make in the source file are reflected in the linked version.
Inserting a workbook as a linked file is both a blessing and a curse. The good news is that all your updates are centralized, and you don't have to worry about making changes in both Excel and Word. On the other hand, sometimes you want to lock in your report data after a certain point. Luckily, Word 2003 lets you have it both ways.
CAUTION
Linking worksheets into a document creates a path to the spreadsheets on your local/networked drive. If you send a file containing links to a colleague via email or on a floppy disk, you need to send the linked files as well. If the linked files are in a different folder, you might need to place all the linked files in the same folder as the original file and edit the links to match for your colleague to adequately use the links.
If you cannot create a link to a worksheet you recently created, see "What to Do If You Cannot Link Cells from an Excel Worksheet," in the "Troubleshooting" section of this chapter. |
Modifying an Object's Links
After you have embedded a linked object into your Word document, the Edit, Links option becomes active. Choosing this menu option opens the Links dialog box, as shown in Figure 29.5. (You can also display the Links dialog box by right-clicking on the linked worksheet to display the shortcut menu and choosing Linked Worksheet Object, Edit Link.) From the Links dialog box, you can choose to update your link automatically, to update it manually, or to completely lock the link.
Figure 29.5. You can modify a linked object's status at any time through the Links dialog box.
If the Manual Update option is chosen, you must select the object (or the entire document) and press F9 or click the Update Now button from the Links dialog box. Locking the link deactivates the Update Now button and prevents any updates from occurring until the link is unlocked. Your original Excel file can still be edited, but the Word file cannot be updated to reflect the changes.
Resizing a Worksheet to Fit Your Word Document
Often, after you insert an Excel worksheet, you'll discover that it is larger than your Word page. If this occurs, Word displays as much of your worksheet as it can, up to the edge of the page. Remaining cells beyond the edge are cut off and not displayed.
In some cases, making page setup adjustments can solve the problem. For example, to accommodate a worksheet that's too wide, you can change your page to Landscape mode. To change the page to Landscape, click on the worksheet object once to select, it and choose File, Page Setup. In the Margins tab, select the Landscape option button. Choose Selected Text in the Apply To drop-down box and then click OK.
If Page Setup changes are insufficient, Word gives you two ways to resize a worksheet object, which are covered in the next two sections.
 For more information on sections and Landscape mode, see Chapter 5, "Controlling Page Features," p. 157.
Resizing a Worksheet Without Changing the Number of Cells Displayed
The first approach to resizing a worksheet retains the same number of cells but shrinks or stretches the contents of each cell, changing font sizes if necessary. This approach is especially helpful if you need to make minor sizing adjustments and cannot change the number of cells that appear in your document.
To resize the worksheet, click on the worksheet object once to select it?black sizing handles appear (see Figure 29.6). Click and drag a sizing handle to the proportions you want, and then release the mouse button.
Figure 29.6. When you click on an Excel object, sizing handles appear within solid line borders.
CAUTION
Note that when you single-click an Excel worksheet in a Word document and drag its borders to change its shape, the existing cells are stretched or squeezed. If you need to shrink the worksheet extensively, the cells may become too small to be read comfortably.
Changing the Number of Cells Displayed in Your Document
Sometimes you may need to change the number of cells that appear in your Word document. For example, you may have to show fewer cells to make the information fit. Conversely, your worksheet may have changed and you need to show more cells. Perhaps you've added several new products and you need to display several additional rows of data about them in your Word document.
To adjust both the size of your worksheet object and the number of cells shown in it, follow these steps:
Double-click on the worksheet to edit it. Excel's menus and tools appear, and the worksheet is surrounded by diagonal cross-hatching (see Figure 29.7).
Figure 29.7. When you double-click on an Excel object, sizing handles appear within diagonal cross-hatch borders.
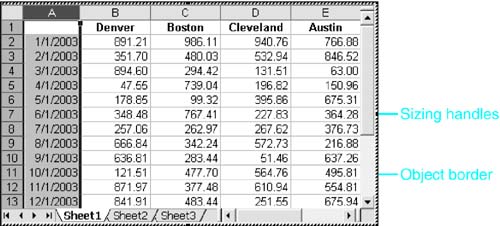
Drag one of the sizing handles inward or outward to adjust the proportions of the worksheet.
Click outside the worksheet; the new proportions appear in your Word document.
NOTE
Note that when you single-click an Excel worksheet in a Word document, and drag its borders to change its shape, the existing cells are stretched or squeezed. However, when you double-click an Excel worksheet to edit its contents, you can change the number of rows and columns displayed, or the height and width of individual rows and columns.
Inserting a Range of Cells
Most of the time, you won't need to insert an entire Excel workbook into your Word document, just a specific range of cells. The process for doing this is one you're familiar with: cut and paste. As noted previously in the discussion of inserting a workbook, you can achieve three different results when you insert a range of Excel cells: They can appear as a Word table, as a worksheet object, or as a hyperlink. The following sections cover each of these alternatives.
Pasting Cells as a Word Table
The simplest method of transferring data is to select and copy it from Excel and paste it into Word by clicking the Paste button on the Standard toolbar or pressing Ctrl+V. Cutting and pasting is a good alternative for simple, fixed data when there is little or no chance of the former formulas needing to be recalculated.
Your pasted entry is converted into a Word table. By default, numbers are right-justified and formulas become values. Most formatting is retained, with the exception of spanned columns, which can be simulated by selecting the cells in question and choosing Table, Merge Cells.
You can use Word's Paste Options button to control how information from an Excel spreadsheet is pasted into your document. Click the Paste Options button (see Figure 29.8) and choose the option you prefer. For example, if you are pasting Excel cells into an existing table that uses a Word table style, you can match the Excel cells to the formatting in the table style by choosing Match Destination Table Style and Link to Excel. If you want none of the formatting to import, you can choose Keep Text Only.
Figure 29.8. Using Paste Options to control how Excel cells are pasted into a Word document.
Pasting Cells as a Worksheet Object
If you think it's even remotely possible that you'll need to update your numbers and recalculate your formulas, it's best to paste the Excel data as an object. The process is basically the same as regular cutting and pasting, with one little twist: You use Edit, Paste Special instead of the Paste command. Follow these steps to insert Excel information as an object:
From Excel, select the range of cells you want to insert.
Click the Copy button on the Standard toolbar.
Switch to your Word document.
Place the insertion point where you want the data to appear.
Choose Edit, Paste Special. The Paste Special dialog box opens, as shown in Figure 29.9.
Figure 29.9. Paste Special enables you to maintain all your Excel data's formulas and formatting.
From the As list, select Microsoft Excel Worksheet Object.
If you want to establish a link to your source document, click the Paste Link option button; otherwise, leave the Paste option button selected.
If you want to display the worksheet as an icon, check the Display as Icon check box.
Click OK to insert the object.
TIP
You can also create a link using Paste Options. Paste the Excel cells into Word; then click the Paste Options button at the lower right of the pasted cells and choose either Keep Source Formatting and Link to Excel or Match Destination Table Style and Link to Excel.
Inserting Worksheet Cells as a Word Hyperlink
If you click Paste Link in the Paste Special dialog box, Word displays a new set of options for the kind of links you can create. One of these is a Word hyperlink.
If you paste the worksheet cells as a Word hyperlink, the worksheet cells appear in your document at your insertion point, with blue underline formatting. When you press Ctrl and click on any of these cells, you're taken directly to the worksheet in Excel.
NOTE
To paste a spreadsheet into a document as a hyperlink, you can also select Paste as Hyperlink from the Edit menu.
Working in a Worksheet You've Inserted
Unless you insert your worksheet as an icon, the worksheet cells appear and are selected after you insert it. While the worksheet is selected, the standard Word menus and toolbars change to Excel menus and toolbars, as shown in Figure 29.10.
Figure 29.10. Word displays Excel's menus, toolbars, and other controls, and embeds a row-and-column worksheet within your document.
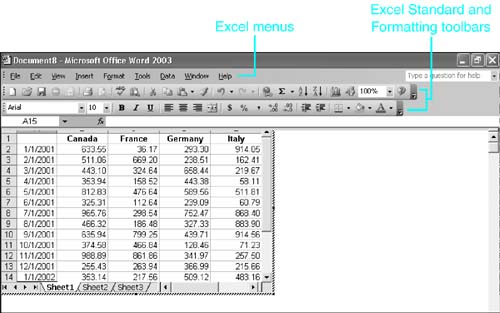
After you insert your worksheet, you'll notice the typical Excel layout with alphabetic column headings and numeric row headings. You can now enter and format your data and formulas in the worksheet's rows and columns as you would if you were working in Excel. You can also resize the columns just as you can in Excel?by moving your mouse pointer over the boundary of a column and then clicking and dragging the boundary to a new width.
NOTE
For all practical purposes, you are working in Excel?you just happen to be looking at it through a narrow portal that Word has provided.
TIP
You can move among multiple worksheets in an Excel workbook by clicking sheet tabs at the bottom of the Excel window.
When you finish editing inside the worksheet, click anywhere outside it, and your menus and toolbars return to their usual appearance, displaying Word commands. The borders of each cell are displayed in light, nonprinting gray. You can work inside the worksheet again at any time by double-clicking on it, or by right-clicking and choosing Worksheet Object, Edit from the shortcut menu.
If you've inserted the Excel worksheet cells with a link to an Excel workbook elsewhere, the changes you make to the worksheet cells are saved to the original workbook when you save your Word document. If you've inserted a new Excel workbook, the changes are saved only as part of the Word document, not as part of a separate workbook.
Deleting an Excel Worksheet from a Word Document
To delete an Excel worksheet from your Word document, first make sure that you're in Word editing mode (if the Excel layout is active, click outside the worksheet into the regular document). Then select the object by clicking it once, and press Delete.
If you have inserted a workbook with several worksheets, you can delete a single worksheet from within Word. Double-click on the worksheet to select it for editing, and right-click on the worksheet tab you want to delete. Choose Delete from the Excel shortcut menu that appears.
Creating Charts in Excel
In Chapter 15, "Visualizing Your Message with Graphs, Diagrams, and Org Charts," you learned how to create charts in Microsoft Word, using the Microsoft Graph applet. However, you may have already built your charts in Excel. Word makes it easy to insert these charts into Word documents:
Starting in Excel, click on the chart to select it.
In Excel, click the Copy button on the Standard toolbar to copy the chart to the Clipboard.
Switch to Word and place your insertion point where you want the chart to appear.
If you don't need a link to the original chart, click the Paste button on the Standard toolbar. Otherwise, choose Edit, Paste Special.
If you want a link, click the Paste Link button.
Click OK.
In the Paste Special dialog box, Word gives you two options for the type of chart object you can create:
Microsoft Excel Chart Object? This is the default setting, and it enables you to double-click on the chart to edit it in Excel.
Picture (Enhanced Metafile)? With this option selected, your chart is inserted as a bitmap graphic that can be edited using tools such as Microsoft Paint or Microsoft Photo Editor.


