Using Microsoft Office Document Imaging
Office 2003 comes with an applet, Microsoft Office Document Imaging, which provides basic scanning and optical character recognition (OCR) features. Microsoft Office Document Imaging makes it easy to use Word for editing documents you scanned from print sources or received as a fax and stored in TIFF format. Using Microsoft Office Document Imaging, you can perform these and other tasks:
Read and search for text in a scanned document or received fax
Export some or all of a scanned or faxed document's text to Word
Archive text from a scanned or faxed document
Rearrange pages in a scanned or faxed document
Microsoft Office Document Imaging contains two components that work together: a simple Scanning applet that allows you to scan any document, whether or not Word (or any other Office application) is open; and an Imaging applet that allows you to work with?and run OCR on?any document you scan or receive by fax. We'll cover both components in the following sections.
Scanning a Document Using Microsoft Office Document Scanning
Assuming that you have a scanner connected to your computer and installed, you can scan a document using Microsoft Office Document Scanning. To do so, choose Start, Programs (or, in Windows XP, All Programs), Microsoft Office Tools, Microsoft Office Document Scanning (see Figure 29.32).
Figure 29.32. The Microsoft Office Document Scanning applet.
By default, Microsoft Office Document Scanning assumes that you are scanning a black-and-white document. If you are scanning a different type of document, choose it in the Select a Preset for Scanning box.
NOTE
Microsoft Office Document Scanning's four presets are designed to do a reasonable job with many kinds of documents. However, if you find that the results are not quite what you hoped for, you can adjust the program's settings.
To do so, click Preset Options. To adjust an existing preset, choose Edit Existing Preset. To create a new preset, choose Create New Preset.
NOTE
If you are connected to more than one scanner, click Scanner to choose the one you want to use.
If you are scanning a document with multiple pages, check the Prompt for Additional Pages check box; Word then prompts you when it's ready for a new page. (If you don't check this box, Word ends the scan and displays the scanned page.)
If you are using a scanner with an Automatic Document Feeder (ADF) that can read both sides of a page, check the Original Is Double Sided box. Make sure that you insert pages in your document feeder so that the fronts of pages are scanned first. If you do, Microsoft Office Document Scanning collates the finished scanned pages in correct order.
When you've established the settings you need, click Scan. Microsoft Office Document Scanning will scan your document.
Working with a Scanned Document Using Microsoft Office Document Imaging
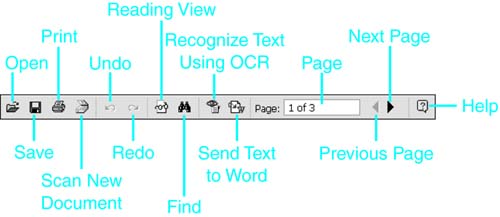
When Microsoft Office Document Scanning has completed scanning your document, it displays the finished scan in Microsoft Office Document Imaging (see Figure 29.33). Here, you can work with the scan you've created.
Figure 29.33. The Microsoft Office Document Imaging applet.
TIP
Sometimes you may want to open Microsoft Office Document Imaging without first creating a scan. For example, you may want to run optical character resolution on a fax you received through Microsoft Windows 2000 Fax Services.
To run Microsoft Office Document Imaging on its own, choose Start, Programs (or, in Windows XP, All Programs), Microsoft Office Tools, Microsoft Office Document Imaging.
To view a scanned document more closely, click the Reading View button, or choose View, Reading View. The document is displayed in full size against a black background, making it easier to read (see Figure 29.34). When you're finished with Reading view, press Esc.
Figure 29.34. Viewing a scanned document in Reading view.
To save a scanned document, click the Save button. The document is saved as a TIFF graphics file that can be opened with a wide range of graphics software. A filename is assigned based on the first few words of text on the first page of the document.
To find text within a scanned document, click the Find button and enter the text in the Find box. Microsoft Office Document Imaging searches for the first instance of the text and displays it in reverse type, with a red rectangle around it.
CAUTION
Because optical character recognition is not perfect, especially on printed documents of poor quality, such as second-generation photocopies or newspaper clippings, there is no guarantee that Find will locate every reference to specific text in a scanned document.
You can easily copy text from your scanned document into a Word document that can be edited. If you want to copy an entire file, click Send Text to Word, choose All Pages from the Send Text to Word dialog box (see Figure 29.35), and click OK. To copy only selected text, first select the text; then click Send Text to Word and click OK.
Figure 29.35. Choosing which text to send to Word.
Word opens, displaying a new, unsaved and unnamed file containing the text from the scanned document.


