Using PowerPoint with Word
Over the years, PowerPoint has developed into the multimedia center of Office. Not only can you use it to incorporate text and images in a slide format, but you can also add animation, sound, and movies to teach, explain, and persuade. Because both Word and PowerPoint are Office family members, you have a strong connection that enables you to share information in both directions.
Consider just a few of the ways you can use PowerPoint and Word together:
You can draft your outlines in Word and then import them into PowerPoint.
You can send presentation information from PowerPoint to Word, including outlines, notes, and handouts.
You can take quick notes and mark action items in PowerPoint while you are making a presentation in front of an audience and then publish them to Word for editing and refinement.
You can embed slides or an entire presentation into a Word document for inclusion in a report.
In the following section, you'll learn how you can use an outline from Word as the basis for a PowerPoint multimedia presentation.
Using Word Outlines in PowerPoint
Often, the impetus for a PowerPoint presentation is a report drafted in Word. If you use heading styles or outline levels in Word, you can build your presentation with far less effort.
To export a finished Word outline to PowerPoint, open the document and choose File, Send To, Microsoft PowerPoint. You'll see a brief progress bar and then the presentation appears in PowerPoint, as shown in Figure 29.22.
Figure 29.22. Build your presentation's "talking points" by sending your Word outline to a PowerPoint presentation.
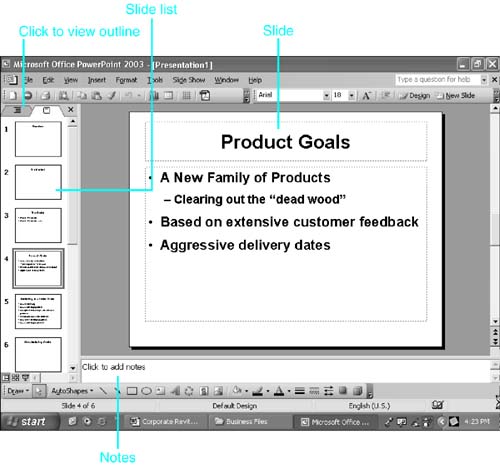
Each paragraph or title, formatted with Heading 1 style (or Outline Level 1), can automatically become the title of a new slide. Each paragraph or subtitle, formatted with the Heading 2 style (or Outline Level 2), is transformed into the first level of slide text. Subordinate heading or outline levels are translated to correspondingly lower levels of slide text in your PowerPoint presentation.
TIP
If you haven't used heading styles or outline levels in Word, but you have used tabs to indicate headings and subheadings, save your document as a text file. Then, in PowerPoint, choose File, Open. Change the file type to All Outlines, select your text file, and choose Open. Each first non-indented paragraph becomes a slide title on a new slide; paragraphs with one indent become first-level text, and so forth.
Exporting PowerPoint Files to Word
The slides are the flashy part of a PowerPoint presentation, but there's also a lot of supporting material: an outline, speaker notes, and handouts, for instance. PowerPoint makes it easy for you to export all this information and more to Word, where you can further modify it or incorporate it into an existing document.
When giving a presentation, it's useful to have a hard copy of your talk that tells you what slide comes next and what to say about it. After you've created your slide show, you can export it to Word so that you can further develop your speaker's notes. From PowerPoint's main menu, choose File, Send To, Microsoft Word. This opens the Send to Microsoft Word dialog box shown in Figure 29.23.
Figure 29.23. You can send your entire slide presentation along with any speaker notes to Word for further editing through the Send to Microsoft Word dialog box.
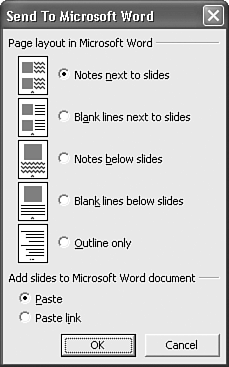
The Send to Microsoft Word dialog box comes with various layout options that govern not only how your notes will look but also what you are actually exporting. You can choose from the following options:
Notes Next to Slides? With this option selected, Word creates a three-column table showing the slide number, a small image of the slide, and speaker notes. Three slides appear per page.
Blank Lines Next to Slides? This option creates a three-column table showing the slide number, a small image of the slide, and a series of underscored lines for speaker notes. Three slides appear per page.
Notes Below Slides? When this option is selected, Word puts each slide on its own page with a slide number and the speaker text.
Blank Lines Below Slides? This option gives you each slide on its own page with a slide number and a series of underscored lines for speaker text.
Outline Only? This option gives you just the outline for the presentation without a picture of the slide. The text of the presentation appears in the form of a Word outline, with each slide's main heading corresponding to a first-level heading in Word.
You'll notice that Paste and Paste Link options are available for all but the Outline Only selection. As with all embedded objects in Word, choosing Paste Link causes the document to be updated whenever changes are made to the source material, in this case a slide or presentation.
After you make your selections about how you want the PowerPoint presentation exported to Word, click OK. PowerPoint converts the file, and Word opens, displaying the file in the format you requested.
Embedding a New PowerPoint Slide in a Word Document
PowerPoint comes with many templates and designs to give your message a professional edge. Word gives you full access to them: You can include slides in your documents at will, even if you have no intention of creating a full-fledged slide show. To insert a single PowerPoint slide as a graphic in a Word document, follow these steps:
In Word, position your insertion point where you want the slide inserted.
Choose Insert, Object to open the Object dialog box.
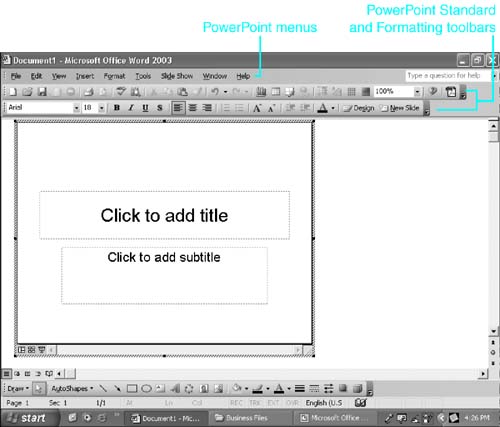
From the Create New tab, choose Microsoft PowerPoint Slide. The default slide appears as an object in your Word document.
In Word, whenever you double-click the slide, PowerPoint's menus and toolbars appear; you can now edit the slide using PowerPoint's menus and toolbars, as shown in Figure 29.24.
Figure 29.24. Word displays PowerPoint's menus and toolbars whenever you double-click on a slide embedded in your document.
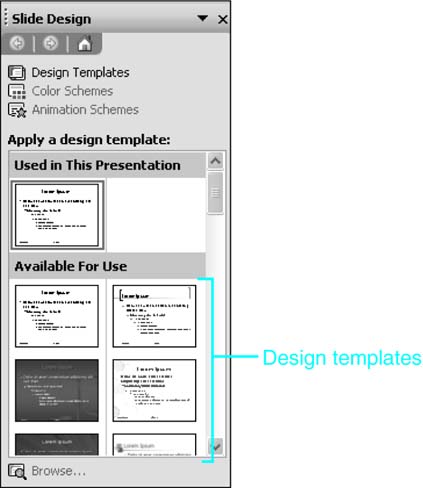
To quickly format the slide, right-click on it and choose Slide Design. In the Slide Design task pane (see Figure 29.25), choose the template you want to apply. (If you want larger previews, right-click on a design template and choose Show Large Previews.) When you're satisfied, click Apply.
Figure 29.25. Choosing a design template with which to format the slide.
You can now enter text in the slide. Editing text in PowerPoint slides is much like editing text in Word text boxes. You simply click next to a heading or bullet. A box that resembles a Word text box appears; start typing. When you're finished working in the slide, click outside it, and Word's menus reappear. You can work on the slide again by double-clicking it.
Embedding an Existing Presentation in a Word Document
You can also embed an entire PowerPoint slide presentation in a Word document. This works well for online training, manuals, and other documents that would benefit from a multimedia component.
Choose Insert, Object and click the Create from File tab. Next, browse to your existing presentation, select it, click Insert, and click OK. Word normally displays the first slide of the presentation in the document. To run the presentation, double-click the slide object.
NOTE
Of course, you can also incorporate any existing PowerPoint slide by using the Copy and Paste features. As with Excel and other objects, you can place a plain copy of your slide in your document by clicking the Paste button on the Standard toolbar.
You also can insert a linked copy of the slide by choosing Edit, Paste Special; selecting Microsoft PowerPoint Slide Object from the list; and then selecting the Paste Link option before you click OK. Now, whenever you update your PowerPoint slide, your Word document is also updated.
TIP
If you want to copy an entire PowerPoint slide into your Word document, make sure that you're in PowerPoint's Slide Sorter view (choose View, Slide Sorter).
If you're in Slide view (rather than Slide Sorter view), only the selected portion of your slide will be copied and pasted. You will lose formatting and text stored in the slide master (in other words, content that is applied to every slide in the presentation, not just a single slide).


