Setting Formatting Defaults for All Your Mail Messages
Earlier in this chapter, in the section "Setting Additional Message Options," you learned how to set options associated with a specific message. You can also set various options that control how all your messages are delivered. To do so, choose Tools, Options, General; then click the E-mail Options button. The E-mail Options dialog box appears, containing three tabs:
Signature. Allows you to create, and if you want, format, a "signature" that appears at the bottom of all the messages you send.
Personal Stationery. Allows you to establish visual formats and set fonts that will be used in all your messages.
General. Controls three aspects of how Word prepares HTML messages.
Each tab is covered in the following sections.
Creating and Selecting Email Signatures
Email signatures allow you to add a block of text?formatted or unformatted?to the bottom of all your email messages. This text can be used for various purposes; for example, it might be used to promote your company or its new product line.
To create and select an email signature, follow these steps:
In Word, choose Tools, Options, General, and click the E-mail Options tab. Make sure that the E-mail Signature tab is selected (see Figure 30.11).
Figure 30.11. The E-mail Signature tab of the E-mail Options dialog box.
Enter a name for your email signature in the Type the Title of Your E-mail Signature or Choose from the List drop-down box. Keep it concise, but make sure that it's descriptive?so you'll be able to recognize it at a glance if you create several distinct signatures over time.
In the large scroll box at the middle of the dialog box, enter the text you want to appear in your email signature. Note that you're not limited to text: You can copy images from your document and paste them in the email signature scroll box. Be careful, however, not to bulk up your messages to the point that they inconvenience their recipients!
If you want, use the Create Your E-mail Signature formatting tools to format your email signature. Note that you can select and format individual words, not just the entire block of text. Of course, formatting will be disregarded in any message sent as plain text.
When you've finished editing and formatting your signature, click Add. The signature's title now appears in the list of signatures.
Click OK.
You can create as many signatures as you want. Word 2003 and Outlook 2003 include an additional often-requested feature: the capability to specify different signatures for each mail account in your profile. After you have created a signature, choose the account you'd like to use the signature and specify whether you want the signature to be used for new messages, replies and forwards, or both. If you create more than one signature, you can choose different signatures for your new messages, and for your replies and forwards. This way, those you correspond with won't see the same message as your email conversation continues.
TIP
If you're running Outlook 2003, you may also want to add a virtual business card (vCard) to your emails. To do so, create your signature in Outlook instead of Word. Sending a vCard with your signature ensures that everyone you correspond with can have all of your updated contact information when they receive your email. However, this process also increases the size of your email message, so think carefully about whether you want to do this.
First, create a contact entry with all your personal information. With the Contact displayed, choose File, Export to vCard File; enter a name in the VCARD File dialog box; and click Save.
Save and close your contact; then choose Tools, Options, Mail Format, and click Signatures. Click New to create a new signature. In the Create New Signature dialog box, enter a name for the signature and choose Next.
Enter your signature text and choose the vCard you created from the Attach This Business Card (vCard) To This Signature drop-down box. Finally, click Finish.
Creating Personal Stationery
Word gives you extensive control over the appearance of your HTML and rich text emails. To take advantage of these features, choose Tools, Options, General; click E-mail Options; and choose the Personal Stationery tab (see Figure 30.12).
Figure 30.12. Establishing standard formatting for all your email messages.
CAUTION
As mentioned earlier, remember that heavily formatted emails can take longer to upload and download, drain system resources, and cause problems for email users who cannot display formatted email, or simply prefer plain text.
To attractively format your email in "one fell swoop," choose a theme, and Word takes responsibility for formatting fonts, bullets, background colors, horizontal lines, and images in all your messages.
Click Theme to display the built-in Web page and E-mail Themes Word provides (see Figure 30.13). Themes marked as (Stationery) are especially designed for email, but other themes can be used as well.
Figure 30.13. Choosing an email theme.
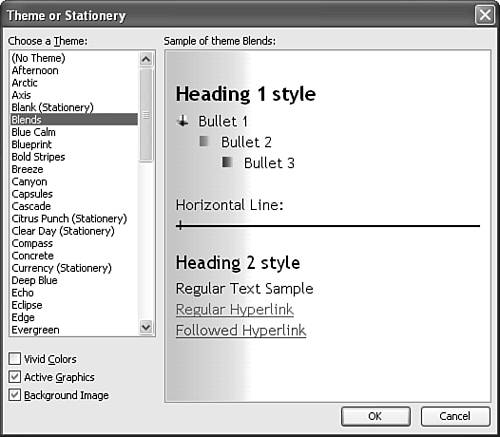
When you select a theme, it is previewed at the right. When you've chosen the theme you want to use, click OK to return to the Personal Stationery tab. The theme you chose will be listed, and fonts may have been adjusted accordingly.
If you prefer not to choose a theme, you can set fonts for New Mail Messages and for Replying or Forwarding Messages.
If you do choose a theme, you have a choice: You can use the fonts Word provides in the theme; disregard Word's fonts and choose your own; or compromise by specifying your own fonts only for replies and forwarded messages. After you choose a theme, these choices are available from a new Font drop-down box (see Figure 30.14).
Figure 30.14. Choosing whether you want to supersede the font choices made in one of Word's themes.
The Personal Stationery tab allows you to control two other aspects of how your messages are formatted:
Mark My Comments With allows you to enter text that always appears at the beginning of comments you make within an email.
Pick a New Color When Replying or Formatting makes it easier for recipients to tell replies from the original message.
Finally, even if you prefer to send and receive plain text mail, you can control the default font Word displays while you're editing and reading it. By default, that font is Courier New, but many Word users prefer to set this font to Times New Roman for improved readability.
Setting Additional Options for HTML Mail
The General tab of Word's E-mail Options dialog box contains three additional options for controlling the formatting of HTML email (see Figure 30.15).
Figure 30.15. Controlling additional aspects of HTML-formatted email.
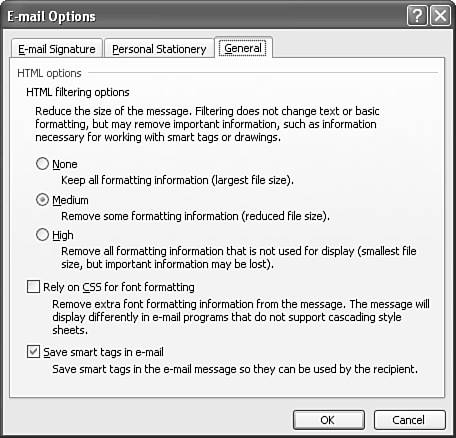
These settings are irrelevant if you send all your messages using plain text or rich text formats:
Filter HTML Before Sending. Set to Medium by default, this group of options instructs Word to strip out some of the unique HTML/XML coding it otherwise sends with HTML messages to support advanced Word formatting and features. This reduces the size of messages and may avoid problems in how certain email editors display them. You can choose three levels of filtering: None, Medium, and High.
Rely on CSS for Font Formatting. Turned on by default, this instructs Word to use Cascading Style Sheets for font formatting. This results in smaller messages but causes compatibility problems if you are sending to older email clients that do not support CSS.
Save Smart Tags in E-mail. Turned on by default, this instructs Word to retain Smart Tags in email so that recipients who read the messages in Word 2002 or Outlook 2002 can use the Smart Tags. Of course, the Smart Tags will simply appear to be extraneous code to users of other email software.


