Adding, Renaming, and Deleting Custom Toolbars and Menu Bars
Until now, you've worked on toolbars and menu bars that already exist. However, one of the most common ways to customize your user interface is to create your own custom toolbar or menu bar.
That way, you can leave the existing interface alone and avoid confusing people who don't understand why the buttons on the toolbars don't match the ones on their computer at home?or in the books they've purchased.
You can add sets of commands to custom toolbars or menu bars associated with specific tasks or clients. You can even store them in custom templates so that they appear automatically when you create documents based on those templates. For example, you can
Create a toolbar associated with invoicing and attach it to your invoice template
Create a "long document" toolbar with buttons for inserting bookmarks, index entries, tables of contents, and other elements
In a law firm, create a special menu containing AutoText entries that insert contract boilerplate text and attach it to a contract template that all your lawyers, paralegals, and legal secretaries use
Create a unique Company menu that contains forms, useful documents, and macros associated with your organization
Adding a New (Custom) Toolbar
To create a new custom toolbar, first make sure that the template where you want to store it is open. Then, follow these steps:
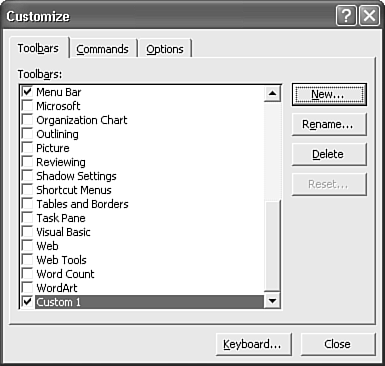
Choose Tools, Customize.
Choose the Toolbars tab.
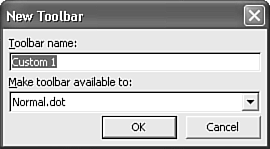
Click New. The New Toolbar dialog box appears (see Figure 31.11).
Figure 31.11. Enter the name of your new toolbar in the New Toolbar dialog box.

In the Toolbar Name text box, type the name of your new toolbar.
In the Make Toolbar Available To drop-down list box, decide whether to store the toolbar in Normal.dot, where it will be available at all times; in a different open template (a template must be open for you to assign a new toolbar to it); or in the current document.
Click OK. Word displays a new, empty toolbar (see Figure 31.12). Now you can add any buttons you want using the techniques described so far in this chapter.
Figure 31.12. Word displays an empty toolbar; you can now move or copy buttons into it.

TIP
If you later decide you want to move a toolbar from one template to another, you can do so, using the Toolbars tab of the Organizer dialog box. You can get there by choosing Tools, Templates and Add-Ins; clicking Organizer; and choosing the Toolbars tab.
If you want to copy a built-in toolbar between templates and the toolbar doesn't appear in the Organizer dialog box, see "What to Do If You Want to Copy a Customized Built-In Toolbar Between Templates," in the "Troubleshooting" section of this chapter. |

Adding Your Own Menus
To create a new custom menu, first make sure that the template where you want to store it is open. Then, follow these steps:
Choose Tools, Customize and select the Commands tab.
In the Categories list, choose New Menu (the last item on the list).
If you want to store the menu in an open template other than Normal.dot, or in an open document, choose the template or document in the Save In drop-down box. (As mentioned earlier, the template must already be open for you to customize it.)
Drag the New Menu command from the Commands scroll box to where you want it to appear on the menu bar. It appears, bordered in black.
Right-click your new menu (or choose Modify Selection from the Customize dialog box).
Enter a new name in the Name text box. If you want to have access to your new menu using a shortcut, don't forget to include an ampersand (&) before the letter with which you want to anchor the shortcut.
Press Enter.
After you've inserted a new menu, you can add menu items to it, as covered earlier in the "Adding Commands to a Toolbar or Menu Bar Using Rearrange Commands" section.
Renaming Custom Toolbars
You can't rename or delete any of Word's built-in toolbars. However, you can rename or delete a toolbar you've created. To rename a toolbar, follow these steps:
Choose Tools, Customize.
Choose the Toolbars tab.
In the Toolbars scroll box, click the toolbar you want to rename.
Click Rename. The Rename Toolbar dialog box opens.
Enter a new name and click OK.
Deleting Custom Toolbars
To delete a custom toolbar, follow these steps:
Choose Tools, Customize.
Choose the Toolbars tab.
In the Toolbars scroll box, click the toolbar you want to delete.
Click Delete.
Click OK to confirm that you want to delete the toolbar.
Renaming Custom Menu Bars
You can't rename or delete any of Word's built-in menu bars. However, you can rename or delete a menu bar you've created. To rename a menu bar, follow these steps:
Choose Tools, Customize.
Right-click on the menu bar you want to rename.
Enter a new name in the Name box on the shortcut menu.
Deleting Custom Menu Bars
To delete a custom menu bar, follow these steps:
Choose Tools, Customize.
Right-click on the menu bar you want to delete.
Click Delete.


