Changing Word Options
Word offers a wide variety of other customization options: options that can help you eliminate Word behaviors you might find annoying or insecure; options that allow you to work more effectively in specific documents; options that allow you to save and find files more effectively, and much more. Word brings together the following 11 categories of customizable behaviors in the Options dialog box (click Tools, Options).
NOTE
In the following list, items that include cross-references to other chapters are not covered in this chapter.
View. These options control aspects of Word's appearance.
General. This category includes options that Microsoft designers couldn't fit anywhere else.
Edit. These options control Word's behavior as you edit.
Print. These options control how and what Word prints. (See Chapter 6, "Printing and Faxing in Word.")
Save. These options control Word's save behavior, including how and when Word saves files and what gets saved in each file.
Security. These options control Word's features for password-protecting documents, using digital signatures, restricting macros, and eliminating document contents that you might not want others to see. (See Chapter 33, "Word Document Privacy and Security Options.")
Spelling & Grammar. These options control how Word checks spelling and grammar. (See Chapter 8, "Making the Most of Word's Proofing and Research Tools.")
Track Changes. These options control the formatting Word uses to represent revisions when it is tracking them. (See Chapter 26, "Managing Document Collaboration and Revisions.")
User Information. These options store the information Word uses whenever it needs your name, initials, and mailing address.
Compatibility. These options control aspects of how Word displays documents?allowing you to specify conventions that were used in previous versions of Word for Windows or Macintosh. Changes made in the Compatibility tab don't affect the document itself?only its appearance.
File Locations. These options specify where Word looks for documents, images, templates, and other files it needs.
Throughout this book, you've come across many of the options available here. This section takes a systematic look at options that have been covered briefly (or not at all) elsewhere.
Changing View Options to Control What Appears Onscreen
Chapter 2, "Navigating Word 2003," discusses several ways to change Word's appearance. For example, it covers how you can choose View, Full Screen to hide all Word's menus and toolbars except for a Close Full Screen button?thereby enabling yourself to see much more of your document.
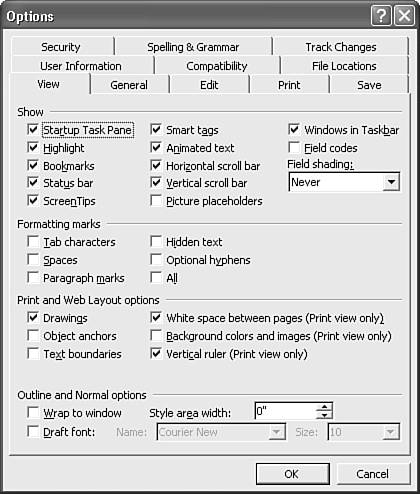
To control many other aspects of Word's appearance, choose Tools, Options, View. Figure 31.20 shows the default settings for View options.
Figure 31.20. The View tab of the Options dialog box brings together various adjustments to Word's appearance.
Choosing Which User Interface Elements Appear
The selections in the Show category of View options control both document-specific features and user-interface features. For example, to make more space in your editing window, you can clear check boxes that control the display of the following:
Startup Task Pane. The Startup Task Pane that appears at the right of Word's editing window when you first load Word and displays options for loading recent and new documents.
Status Bar. The Status Bar at the bottom of Word's editing window.
Horizontal Scroll Bar. The Horizontal Scroll Bar that is used to scroll left and right. (If you use the Wrap to Window option, you'll rarely need the Horizontal Scroll Bar.)
Vertical Scroll Bar. The Vertical Scroll Bar that scrolls up and down through documents.
You can also control several other aspects of Word's user interface:
Highlight. To make a heavily marked-up document more readable, you can temporarily hide highlighting by clearing the Highlight check box.
Bookmarks. Checking the Bookmarks check box adds gray brackets at the beginning and end of any text you've bookmarked. Displaying bookmarks can make it easier to build index entries, cross-references, and other automated features based on them.
Smart Tags. To hide the Smart Tags dotted-line indicators (which alert users that they can perform tasks such as sending email to an individual named in your document), clear the Smart Tags check box.
Picture Placeholders. To make Word run a bit faster, especially when you're focused on editing text and don't care about images, you can check Picture Placeholders. This instructs Word to display an empty box wherever you've inserted an image. When Picture Placeholders is turned off, Word spends time processing images for display, even if you're merely scrolling past them to another destination. The more images your document contains, the slower Word becomes.
TIP
Because the placeholder boxes are the same size as the original images, you can use Picture Placeholders in Print Layout view to evaluate layouts more quickly when you don't need to view the pictures themselves.
Checking the Animated Text check box enables Word to display animation created in the Animation tab of the Format, Font dialog box, such as sparkle text. When this box is cleared, the animation disappears and the text appears as it will when printed (that is, without animation).
Clearing the ScreenTips check box turns off ScreenTips that appear when you hover the mouse pointer over a comment, a tracked change, a footnote, or an endnote.
NOTE
To turn off the AutoComplete ScreenTips that appear when you start typing text that matches an AutoText entry, clear the Show AutoComplete Tip for AutoText and Dates Entry check box in the AutoText tab of the AutoCorrect dialog box. To turn off ScreenTips that appear on toolbar buttons, choose Tools, Customize, Options and clear the Show ScreenTips on Toolbars check box.
 For more information about using AutoComplete with AutoText entries, see "Entering AutoText Entries Even Faster with AutoComplete," p. 303.
By default, Word displays each document in a separate box on the Windows taskbar. If you prefer to use only one taskbar box for Word, leaving the rest for other programs you may have open, clear the Windows in Taskbar check box.
Checking the Field Codes check box causes field codes to be displayed throughout your document, rather than the results they generate. You might use this when you're troubleshooting fields, such as cross-references or index entries that aren't delivering the results you expect.
TIP
Whether you've checked this box or not, you can still toggle selected field codes on and off by selecting them and pressing Shift+F9 (or Alt+F9 toggles all the field codes in the document). However, as long as the check box is turned on, new fields you enter will appear as field codes rather than results.
In the Field Shading: drop-down box, you can tell Word how to inform you of the presence of field codes in your document. The default option, When Selected, tells Word to display field codes in gray only when you've selected or clicked within them.
The Always option tells Word to show field codes and field results in gray all the time. Marking field codes in gray shows you where they begin and end and reminds you which information is being generated in your document automatically. However, you (or a colleague unfamiliar with Word field codes) might find the gray formatting distracting. If so, choose Never.
CAUTION
If you choose Never, you'll never know when you're typing text over a field code result. Thus, you could make changes to a document that will be overridden the next time field codes are updated; say, the next time the document is printed.
Controlling the Display of Nonprinting Characters
By default, when you click the Show/Hide Paragraph Marks button on the Standard toolbar, Word displays much more than paragraph marks; it also shows
Tab characters
Spaces (places a dot everywhere you typed a space)
Hidden text (displays all hidden text, including hidden fields)
Optional hyphens (shows where hyphens may appear in an automatically hyphenated document)
At times, this may give you more information than you want. For example, you might want to see all the paragraph marks in your document because you know they contain important paragraph formatting. However, you might not want to see an obtrusive dot between every single word on your page.
You can control whether each type of formatting mark appears by clearing the All check box and then checking each check box in the Formatting Marks area that correlates to marks you want to see.
TIP
Clicking the Show/Hide Paragraph Marks button does the same thing as checking the All box in the View tab of the Options dialog box.
All supersedes the settings in any of the other check boxes. This is a convenience; you can set up Word to display the nonprinting characters you want to see most of the time and then simply toggle All on or off when you need to see the rest of them, rather than adjusting each setting individually.
Controlling Print and Web Layout Options
The Print and Web Layout Options area controls six elements that can help you manage the way your document appears in print or when displayed in a Web browser:
Clearing the Drawings check box hides any drawings you've placed in your document using Word's drawing tools?which are any drawings that "float above" the document in the drawing layer. (Drawings are already hidden when you work in Normal or Outline view.)
Checking the Object Anchors check box displays object anchors so that you can see how drawings and other document elements are linked to specific paragraphs or other elements on your page.
Checking the Text Boundaries check box displays your current margins with a thin dotted line. It also places dotted lines at column and object borders?giving you more visual feedback about where text can be placed.
Clearing White Space Between Pages (Print View Only) hides the top and bottom margins of pages in Print Layout view (and also hides headers and footers). As a result, you can view more text.
Checking Background Colors and Images (Print View Only) tells Word to print page backgrounds it would normally ignore in the interests of readability.
Clearing the Vertical Ruler (Print View Only) hides the ruler that appears to the left of the editing window.
Controlling Text with the Outline and Normal Options
The Outline and Normal Options section of the View tab gives you control over certain aspects of how Word displays text.
In documents with narrow left and right margins, you may find that some text stretches past the far-right edge of the screen?requiring you to scroll back and forth on every line. Wrap to Window tells Word to make sure that all text appears within the width of your screen. Although this slightly reduces the "what you see is what you get" accuracy of Word's display, it eliminates the horizontal scrolling.
Because Wrap to Window tells Word to display widths inaccurately, it's unavailable in Page Layout and Web Layout views.
Draft Font enables you to display all the text in your document in a single font, with accurate spacing and paragraph indents.
If you have a slower computer, Draft Font may significantly improve Word's performance. You might consider using it for original writing and then turning it off when you need to work with formatting.
You can also control which font and font size to use as a draft font. The default setting is Courier New, 10-point, but you can choose a new font from the Name drop-down box and a new size from the Size drop-down box.
TIP
If you choose Print Layout or Web Layout view while Draft Font is turned on, Word displays all the correct fonts and formatting. But if you switch back to Normal view, the draft font is shown again. You can use this feature to quickly toggle back and forth between editing and formatting.
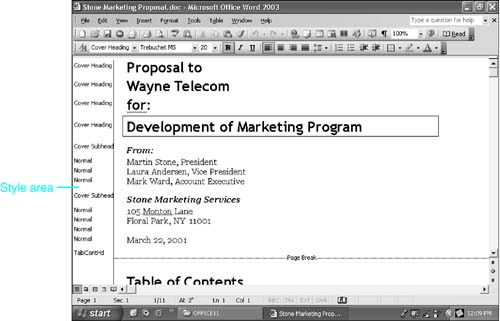
Style Area Width enables you to display the styles associated with each paragraph in a column to the left of your document text (see Figure 31.21). This makes it more convenient to identify and work with heavily styled documents. By default, this is set to 0" ?in other words, no Style Area Width. If you set it to a higher number, such as 0.8" , you see the style information.
Figure 31.21. A document displaying styles in use at the left edge of the editing window.
Changing General Options
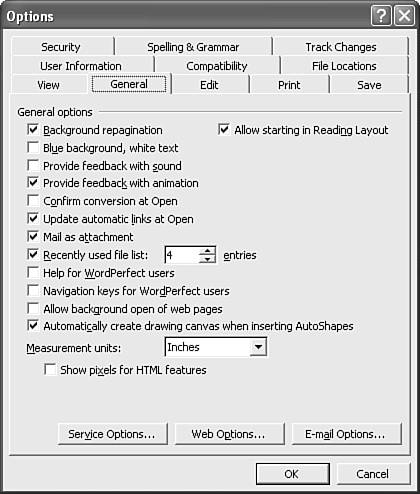
Quite simply, the General tab of the Options dialog box is where Word collects options that don't fit anywhere else. You can see its default settings in Figure 31.22.
Figure 31.22. The default settings for the General tab of the Options dialog box.
The options shown here include the following:
Background Repagination. This option controls whether Word keeps track of page numbering continuously while you work. By default, it does. Like all of Word's automatic, on-the-fly features, this one takes a little bit of processing power. So if you're finding that Word runs too slowly on your computer, you might try turning off Background Repagination.
TIP
Background Pagination is always on in Print Layout view; otherwise, how could Word show true page layouts?
If your computer is running Word too slowly, try working more in Normal view and less in Print Layout view.
Blue Background, White Text. This option is designed to help WordPerfect users feel at home. It displays text in white against a blue, WordPerfect-like background. Some people who have never used WordPerfect still find this to be softer on their eyes; it's a matter of personal taste.
Provide Feedback with Sound. This option tells Word to play sounds in response to specific actions or events, such as error messages. You need three things to play sounds: a sound card, speakers, and the sound files themselves. These files are not automatically installed as part of the Microsoft Office installation. You can use your own sound files if you have some, or you can follow Word's prompts to connect you to the Office Update Web site to download some basic sounds.
Provide Feedback with Animation. This option is turned on by default and uses special animated pointers to tell you that certain automated procedures are in progress, such as AutoFormatting, background saves, and background printing. If you are running Word on an older computer (for example, a PC based on the original Pentium processor), turning off this option may slightly enhance system performance.
Confirm Conversion at Open. This an option may come in handy if you often work with files in other formats. In general, Word is capable of recognizing the source word processor of a document and using the appropriate converter to display it in Word. However, in rare instances, Word may choose the wrong filter, or you may want to choose a filter manually. If so, check this box. When you open a file in a different format, Word enables you to choose which converter to use.
Update Automatic Links at Open. This option is turned on by default and tells Word to automatically update any information in your document that is based on other files linked to your document. In general, you'll want to leave this enabled. However, if you prefer to see your document with the content it had the last time you worked with it, or if you suspect that the source document is no longer available, you can clear this check box to turn off automatic updating.
Mail as Attachment. This next option relates to the way Word integrates with MAPI-compatible email software (such as Microsoft Outlook) that may be installed on your computer. With this option turned on, if you choose File, Send to, Mail Recipient, Word opens an email message window and includes the formatted text of the document as the message. If you choose Mail Recipient (As Attachment), Word creates a new email message and attaches a copy of the current document to it. If you clear the Mail as Attachment check box, Word no longer offers a Mail Recipient (As Attachment) option; instead it offers Mail Recipient (as Text), which, as the name implies, copies the text of the document to the email message.
Recently Used File List. By default, Word displays the last four files you worked on at the bottom of the File menu. If you work on a great many files, you may want to increase the number of files displayed in this list. Conversely, if you have added custom items to the File menu, you might not even have room for four files. To make a change, click in the Entries scroll box and type a number from 1 to 9.
TIP
If you don't want any files listed in the Recently Used File List (possibly because you don't want others to know what you've been working on), clear the Recently Used File List check box.
Help for WordPerfect Users. When this option is turned on, Word's parallel help system for users transitioning from WordPerfect for DOS is also enabled (a common need in the mid-1990s). When you type a keyboard combination that corresponds to a WordPerfect feature, WordPerfect Help tells you how to perform the same task in Word and, in some cases, even demonstrates the feature.
Navigation Keys for WordPerfect Users. When this option is turned on, Word's Page Up, Page Down, Home, End, and Esc keys start behaving the way they would if you were running WordPerfect. For example, you would use Home, Home, Left arrow to move the insertion point to the beginning of the current line.
Allow Background Open of Web Pages. When this option is checked, Word can open linked Web pages in the background while still displaying a document. This setting is cleared by default.
Automatically Create Drawing Canvas When Inserting AutoShapes. Checked by default, this setting automatically inserts a Drawing Canvas whenever you select an AutoShape from the Drawing toolbar. Drawing Canvases make it easier to create drawings that will not move in unexpected ways as you edit text and page breaks surrounding them. However, many users find Drawing Canvases distracting. If you clear this check box, they will not appear by default; however, you can still display one by choosing Insert, Picture, New Drawing.
Measurement Units. Settings in this box tell Word which measurement system to use in its rulers and in some of its dialog boxes: Inches, Centimeters, Points, or Picas. Note that not every measurement changes when you change this setting. For example, font size is still measured in points no matter which setting you choose.
TIP
In general, you can enter margins and similar information in any system you choose by adding the appropriate prefix or suffix. For example, if you enter 1" as your top margin while Word is set to display centimeters, Word inserts the appropriate margin setting and converts it to 2.54cm automatically. Conversely, if Word is set to inches, you can enter centimeters by adding cm after the number, and Word converts it to inches.
Show Pixels for HTML Features. This option tells Word to display measurements in screen pixels rather than inches.
For information about Web options, accessed via the Web Options button in the General tab, see Chapter 24, "Using Word to Develop Web Content," p. 803.
For information about email options, accessed from the Email Options button within the General tab, see Chapter 30, "Using Word as an Email Editor," p. 999.
Controlling Service Options
Word 2003's new Service Options allow you to control how you interact with Microsoft and how you collaborate with other users via SharePoint services. To control these settings, display Tools, Options, General; then click Service Options. The Service Options dialog box opens (see Figure 31.23). |
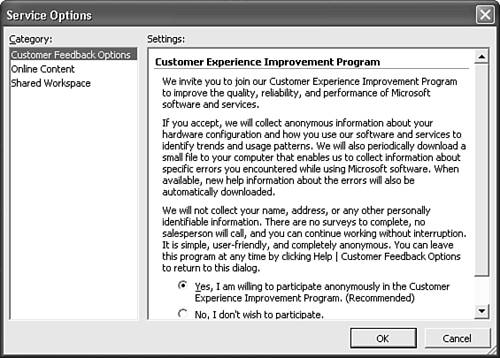
Figure 31.23. Setting Customer Feedback Options in the Service Options dialog box.
Joining or Avoiding Microsoft's Customer Experience Improvement Program
In the Customer Feedback Options tab, you specify whether you are willing to participate in Microsoft's anonymous "Customer Experience Improvement Program." If you choose to do so, Microsoft will collect information about your hardware configuration, how you use Microsoft's software and services, and the errors you encounter. Microsoft says it will do so anonymously; you will not be tied to the data it collects. |
To participate, click Yes, I Am Willing to Participate Anonymously in the Customer Experience Improvement Program. To decline participation, click No, I Don't Wish to Participate. When you first install Word or Office 2003, neither box is selected.
Controlling Your Access to Microsoft Office Online Content
By default, Word shows content and links from Microsoft Office Online whenever they are available. It searches Office Online for new content whenever you are connected to the Internet; shows Office Online help whenever you open an Office Online template; and shows "Spotlight Links" calling your attention to new content or Office information. |
To limit Word's use of Microsoft Office Online, display the Service Options dialog box, and choose Online Content from the list of categories. Here, you can take the following actions:
To stop showing content and links from Office Online, clear the Show Content and Links from Microsoft Office Online check box.
To show help for Word's online templates automatically whenever help is available, check the Show Template Help Automatically When Available check box.
To stop displaying updated "Featured Links," clear the Show Microsoft Office Online Featured Links check box.
Changing Editing Functions in the Edit Tab
If you're relatively new to Word, you may find some of its editing features, such as smart cut-and-paste, uncomfortable. In recent years, Word has also added new editing options associated with its newest features, such as the format checker. Editing behaviors such as these are controlled through the Edit tab of the Options dialog box (see Figure 31.24).
Figure 31.24. The Edit tab controls how Word responds as you enter and edit text.
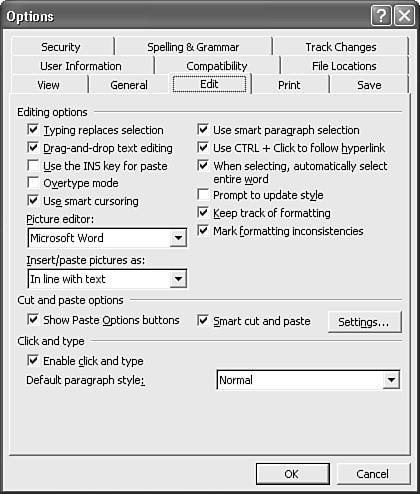
Controlling Editing Options
The first group of options found on the Edit tab lists a set of Editing Options:
Typing Replaces Selection. This option is on by default, which means that you can replace text by selecting it and typing over it. That makes editing faster, and most people like it. Others find themselves deleting text they meant to keep. If you find that happening, clear the check box.
Drag-and-Drop Text Editing. This option, which is also on by default, activates the Windows drag-and-drop feature. With this feature turned on, you can select text, click, and drag the text to a new location. Some people find drag-and-drop an especially intuitive way of moving text. Others find that they accidentally move text when drag-and-drop is enabled. If you want to turn it off, clear the check box.
Use the INS Key for Paste. If this option is checked, the Insert key pastes text from your Clipboard into your document.
Overtype Mode. By default, Word operates in Insert mode: It inserts text as you type and moves existing text to its right. In Overtype mode, Word instead replaces existing text, one character at a time, as you type "into it." You can turn on Overtype mode by double-clicking OVR in the status bar, or you can do it here by checking the Overtype Mode check box.
Use Smart Cursoring. By default, your insertion point moves as you scroll up or down: when you press an arrow key, the insertion point responds at the page you're currently looking at, not where it was before you began scrolling. If you don't like this behavior, clear the Use Smart Cursoring check box.
Picture Editor. This drop-down box enables you to choose which drawing or image editing program opens when you double-click an image in your document. The default choice is Microsoft Word, but other Microsoft picture editing software appears if you have any installed.
Insert/Paste Pictures As. This drop-down box allows you to control how pictures are inserted or pasted into Word documents. The default setting, In Line with Text, inserts the picture at the current cursor location and allows the picture to move as text around it is edited. Word allows you to choose among five additional layouts: Square, Tight, Behind Text, In Front of Text, and Through. These are the same settings provided through Format, Picture (covered in Chapter 13, "Getting Images into Your Documents"). When you choose one of them in the Options dialog box, you establish a default setting for all your documents based on the template you're currently using.
Use Smart Paragraph Selection. When this option is checked, if you select an entire paragraph, Word selects the paragraph mark at the end of the paragraph. This helps make sure that cutting a paragraph won't leave an extra paragraph mark behind. It also makes sure that the formatting associated with a paragraph moves with the paragraph?something you may or may not want.
Use CTRL + Click to Follow Hyperlink. By default, to follow a hyperlink in a Word document, you must press the Ctrl key as you click on the hyperlink. This makes it easier to edit hyperlinked text. If you prefer for Word to jump to the hyperlinked document when you click on the hyperlink (without pressing Ctrl), clear this check box.
When Selecting, Automatically Select Entire Word. This option is a shortcut designed to make it easier to select large blocks of text. You don't have to precisely start at the beginning of a word to select the whole word. Rather, as soon as you select the space after a word, the program assumes that you intended to select the whole word. It works backward too; with this box checked, Word selects the word ahead of the selection if you have already selected one word and are starting to select another. Some people don't like Word to make assumptions about what they intend to select. If that's you, clear the check box.
Prompt to Update Style. If you want Word to display a confirming dialog box whenever you change a style, check this box.
Keep Track of Formatting. If you want Word to track formatting as you write, much as it keeps track of spelling, check this box.
Mark Formatting Inconsistencies. If you have specified that Word should keep track of formatting, check this box to have Word mark formatting inconsistencies in your document (with blue wavy underlines) as you enter them. (If you leave Mark Formatting Inconsistencies turned off, you can still check formatting all at once after you run a spelling and grammar check, through the Tools, Spelling and Grammar dialog box.)
Changing Cut and Paste Options
Word provides several options for controlling cut and paste behavior:
Show Paste Options Buttons. By default, when you paste text into a document, Word offers options as to how you want it to be placed: whether the text should retain the formatting it had in its original document, match the formatting of the surrounding text, or be placed as text only. These options are accessible through a Paste Options button that appears in your document at the point where the item was placed. If you do not want the Paste Options button to appear, clear the Show Paste Options Buttons check box.
Smart Cut and Paste. Checking this option tells Word to eliminate any extra spaces you might leave when you delete text or extra spaces you might insert when you paste text. In effect, Smart Cut and Paste makes sure that there is exactly one space between each word in a sentence. It's another way in which Word acts as if it knows better than you do. The fact is, Word is almost always right, but some people find features like these a little presumptuous.
Settings. Clicking this button displays several additional cut and paste settings (see Figure 31.25). These include settings for how Word pastes tables, lists, and content from PowerPoint or Excel.
Figure 31.25. Additional cut and paste settings can be controlled from the Settings dialog box.
Adjusting Click and Type Options
The Click and Type options group contains just two options for controlling Word's editing environment:
Enable Click and Type. Without Click and Type, you can only click in a location where you've already placed text or graphics (the insertion point can't go beyond the end of the existing document). With Click and Type, you can double-click the insertion point anywhere. If you double-click beyond the end of the existing document, Word inserts paragraph marks in the intervening lines, and when it reaches the line where you double-clicked, it inserts a tab that extends horizontally across to where you double-clicked.
Default Paragraph Style. This option enables you to choose which style Word should use for new paragraphs created when you use Word's Click and Type feature. (Existing paragraphs aren't changed.) For example, if you start with a new blank document and double-click in the middle of the document, the first paragraph remains in Normal style, but all the paragraphs inserted by the Click and Type feature?including the one that includes the insertion point?are formatted with the style shown in this box.
NOTE
The Default Paragraph Style drop-down box does not automatically display every built-in style available to a document. Instead, it shows Normal, Heading 1, and every style that's being used in the document, as well as any user-defined styles that are available. (To see a list of user-defined styles, choose Format, Style and in the List drop-down box pick User-Defined Styles.)
Setting Save Options
In the Save tab of the Options dialog box (see Figure 31.26), you can control how Word saves files.
Figure 31.26. Use the Save tab of the Options dialog box to control Word's saving options.
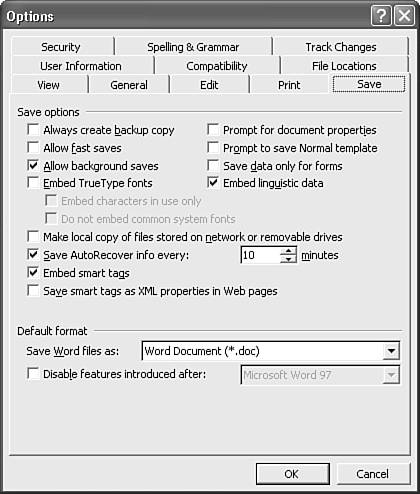
Using this tab, you can control the following options:
Always Create Backup Copy. Checking this box tells Word to rename the previous version of your document with a BAK extension and store it in the same folder as the new version it is saving.
For more information about automating backups of Word files, see "Creating Automatic Backups," p. 92.Allow Fast Saves. Checking this option enables Word to save time on most saves by recording all the changes to your document together, at the end of the document file. On occasion, even when Fast Saves is turned on, Word performs a full save, integrating all the changes throughout your document. You should clear Allow Fast Saves before saving a document file that will be used in another program, such as QuarkXPress or PageMaker.
CAUTION
Turn off Fast Saves if you're concerned about document security. With Fast Saves turned on, it's possible to use a text editor such as Notepad to read fragments of text that you thought you deleted from your documents.
Allow Background Saves. Checking this option enables Word to save "in the background" as you work. While Word is saving, a pulsating disk icon is displayed in the status bar.
Embed TrueType Fonts. Checking this box tells Word to embed the TrueType fonts you've used in your document. Check this box when you suspect that your file's recipients won't have access to the fonts you used to create your document. Keep a few things in mind, however. First of all, embedding fonts can dramatically increase file size. It's probably not a good option if your documents have many fonts and you're planning to send multiple copies across a network. Second, not all TrueType fonts can be embedded; font manufacturers have the power to prevent their fonts from being embedded as an anti-piracy measure, and some companies such as émigré have exercised that option. Third, PostScript fonts can't be embedded with this feature.
Embed Characters in Use Only. Occasionally, you might want to embed a font you've used in only one or two document headlines. To save space, Word provides this option, which enables you to embed up to 32 individual characters from a font without embedding the entire font. If you've used more characters than this, Word embeds the entire font. Stay away from this option if you expect your recipients to edit the headline because they will not have access to other characters they may need.
NOTE
You can find out whether a font you own can be embedded?and more about your TrueType fonts?by using Microsoft's free Font Properties Extension, available for download at http://microsoft.com/typography/property/property.htm.
TIP
If you have a complex, heavily formatted document that you want others to read but not edit, consider using a program such as Adobe Acrobat to save relatively compact versions of your file, which can then be read and printed with fonts and formatting largely intact.
Do Not Embed Common System Fonts. Even if you choose to embed fonts, you may not want to embed fonts virtually every Word user has, such as Courier New and Times New Roman. To instruct Word not to embed such fonts, leave this check box checked.
Make Local Copy of Files Stored on Network or Removable Drives. If this box is checked, whenever you save a file across a network or to a removable drive, Word automatically stores a duplicate copy of that file on your computer's local hard disk.
Save AutoRecover Info Every. The entry in this scroll box tells Word how often to create a document recovery file. You can set intervals from 0 to 120 minutes?if it's set to 0, Word saves AutoRecover information every time you pause typing.
Embed Smart Tags. If you clear this check box, Word does not store Smart Tags in your documents.
Save Smart Tags as XML Properties in Web Pages. If you check this box, when you save a document containing Smart Tags as a Web (HTML) page, Word creates an XML document header containing smart tag information.
Prompt for Document Properties. Selecting this option causes the Properties dialog box to open whenever you save a document for the first time.
Prompt to Save Normal Template. With this box checked, you are given a chance to abandon changes to default settings, AutoText entries, and macros before Word saves them to the Normal template at the end of your editing session.
Save Data Only for Forms. With this option checked, Word saves only the text entered by the person filling out the electronic form, not the surrounding form itself. This information is stored in a tab-delimited, text-only format that is easy to import into databases.
For more information about saving only the data in forms, see "Saving Only the Data in a Form," p. 957.Embed Linguistic Data. If this option is checked, Word stores audio or handwriting input it received for purposes of voice or handwriting recognition. This can significantly enlarge your files, but it allows you to right-click on an error later, hear what was originally said or written, and help Word improve its recognition performance.
Save Word Files As. In this box, you can specify a default format other than Word 2003 in which to save your files. You can choose any format for which you have installed an export filter.
Disable Features Introduced After. If you check this box and choose either Word 97 or Word 6.0/95 from the drop-down box, you prevent Word from saving formatting, graphics, and text attributes that cannot be used in the older version of Word you specify. This is a helpful feature if you plan to share documents with users of older versions of Word. Before Word removes these features from a document, it warns you about what it will delete.
NOTE
The only way to eliminate formatting that older versions of Word (such as Word 6) cannot read is to save files in those versions of Word.
Setting User Information
Word uses your name, initials, and address in various ways. It stores your name as the Author in the Properties dialog box of any new document you create. It includes your name automatically in letters and envelopes you create using Word's wizards and templates; your initials are also included in letters. It attaches your name and initials to any changes or comments you insert using Word's Track Changes or Comments features.
To set or change your name, initials, or address, display the User Information tab of the Options dialog box (see Figure 31.27).
Figure 31.27. Use the User Information tab of the Options dialog box to change your personal information settings.
Enter your Name, Initials, and Mailing Address as you want them to appear when Word uses them. (For example, your initials don't have to correspond precisely to the name you enter in the name box?it's up to you.)
NOTE
Word also tracks your Company Name as you entered it during installation, but this information cannot be permanently changed from inside Word.
Setting Compatibility Options
You might be accustomed to working with a different version of Word, or a different brand of word processor, such as WordPerfect. Or you may have documents that originated on a different system, such as a Macintosh running Microsoft Word 5.1. These programs differ subtly in the ways they display text.
These subtleties are almost all minor, but they can occasionally cause significant problems. For example, Microsoft 5.1 for the Macintosh uses larger Small Caps than Word 2003. This minor difference could conceivably affect where lines, or even pages, break?throwing off carefully created page layouts.
Using the Compatibility tab of the Options dialog box (see Figure 31.28), you can adjust Word to display your document as it would look if opened in a different program.
Figure 31.28. In the Compatibility tab, you can adjust Word's behavior to match that of older versions of Word for Windows, DOS, and Macintosh, as well as WordPerfect.
NOTE
These Compatibility settings don't actually change the contents of an existing file. They change only its appearance so that you can accurately format your document to reflect the software and computer from which it will eventually be used and printed.
If you know the program that created a file, the quickest way to ensure compatibility is to choose that program name in the Recommended Options For drop-down list box. Word has built-in options designed to reflect differences in appearance for the following:
Word 2002
Word 2000
Word 97
Word 6.0/95
Word for Windows 1.0
Word for Windows 2.0
Word for the Macintosh 5.x
Word for MS-DOS
WordPerfect 5.x for DOS
WordPerfect 6.x for Windows
WordPerfect 6.0 for DOS
You can also choose Custom from the Recommended Options For drop-down box to create custom settings if you need them.
NOTE
For detailed information on most Word compatibility options, see Microsoft Knowledge Base article KB288792 (go to http://support.microsoft.com and search for this article number).
Using Font Substitution
If you've been asked to edit a file created with another word processing program, or on another type of computer, such as a Macintosh, you may find that you don't have all the fonts used in the original file. Word automatically substitutes fonts it does have for those it can't find.
In some cases, these font substitutions are no-brainers. For example, many Macintosh documents are created with PostScript fonts such as Times Roman and Courier. On standard Windows PCs that don't have Type 1 (PostScript) fonts installed, Word substitutes the TrueType equivalents, Times New Roman and Courier New.
Note that the substituted fonts are similar but not identical to the originals, so you might find unwelcome changes in line and page breaks. Also note that the original font names still appear in the Font drop-down box on the Formatting toolbar, so if you return the document to its source, the original fonts will automatically be in use.
Occasionally, you'll want to control the way Word substitutes fonts. For example, perhaps you've been handed a document formatted with the Eras Bold ITC font. You don't own Eras Bold ITC, and Word substitutes Lucida Sans Unicode, which looks quite different. However, you do have one of the many competitive "knockoff" fonts that resemble Eras Bold ITC. Your font has a name that Word doesn't recognize as being equivalent to Eras. You can tell Word to use that font rather than Lucida Sans Unicode whenever it comes across text formatted as Eras Bold ITC.
To use font substitution, click Font Substitution to open the Font Substitution dialog box (see Figure 31.29).
Figure 31.29. In the Font Substitution dialog box, you can control which fonts are used when you don't have the ones with which your document was formatted.
NOTE
If your document has no substituted fonts, Word won't display the Font Substitution dialog box. Rather, it displays a message telling you no font substitution is necessary.
The Font Substitution dialog box lists all the missing document fonts it has found and the fonts it has substituted. (Often, it simply substitutes a default font, typically Times New Roman.) To change a font substitution, select the row containing the missing document font and the font Word has substituted. Then in the Substituted Font drop-down box, select the font you want to use.
As you've already learned, when you substitute a font, Word displays and prints the document using the font you chose. However, the original font is still shown in the Font drop-down box. This is obviously welcome for documents that may be returned to their source. In other cases, however, it can be confusing. After all, the font you see onscreen no longer matches the font with which Word "says" the text has been formatted.
If you want to reformat the document using the fonts you've already chosen as substitutes, click the Convert Permanently button. Word pops up a quick confirmation dialog box, which only requires you to click OK to confirm the change. Wherever Word finds a substituted font in your document, it converts the document to use the substituted font name rather than the original one.
Setting File Locations
There's one final Options tab: File Locations (see Figure 31.30), which specifies where Word looks for the files and documents it needs. You might find that you're piling up all sorts of documents in your My Documents folder, when most of the documents ultimately need to be moved to another folder. In this tab, you can tell Word to use a different default.
Figure 31.30. The File Locations tab enables you to change where Word looks for documents, templates, and tools.
TIP
If you know you'll be working primarily in a specific folder for a week or two, change the document's location to that folder. When you start Word and display the Open dialog box, Word automatically displays the contents of that folder.
In the File Locations tab, you can also control where Word looks for clip art, templates, workgroup templates shared across a network, AutoRecover files, tools, and templates or add-ins that should run at Startup.
For more information on deploying and using workgroup templates, see "Using Workgroup Templates," p. 377.
To change the location associated with a file type, select the row containing the file type and location, and click Modify. The Modify Location dialog box opens, allowing you to browse to the folder you want to use for the new location. After specifying it, click OK to enable the change.


