Customizing Toolbars and Menus
You can thoroughly customize any menu or toolbar to include exactly the commands you want, and you can create new menus or toolbars for any purpose you choose.
NOTE
Throughout the Customize dialog box, Microsoft calls menus "menu bars." We'll use the same terminology throughout this section.
The techniques for customizing both menu bars and toolbars are very similar, though not always identical. This isn't surprising, because under the hood, Word menu bars and toolbars are interchangeable. (The proof? If you so desire, you can place buttons on menu bars and menu commands on toolbars.)
In the following sections, we introduce the techniques you need to know to customize any menu bar or toolbar. You'll first discover how to add commonly used buttons to any existing toolbar. Next, we'll introduce the Customize dialog box, showing how to use it to make a wide variety of changes to menu bars and toolbars, including these:
Adding commands
Creating toolbar or menu items that insert pictures or load hyperlinks
Removing commands
Rearranging and organizing menu bars or toolbars
Renaming commands or changing toolbar icons
Adding or removing new toolbars or menu bars
Adding or changing keyboard shortcuts associated with menu items
In particular, we'll introduce the new Rearrange Commands dialog box, which makes many interface customizations far more intuitive than they were in earlier versions of Word.
Adding a Commonly Used Command to a Toolbar
You may occasionally want to add a command to a toolbar that is closely related to the commands that are already present?or, perhaps, a command that appeared on that toolbar in an earlier version of Word but has since been removed. For example, you know that the Standard toolbar contains an Open command; why not a Close command? Or, perhaps, you often create superscript and subscript text; why not place those commands on the Formatting toolbar?
Word makes it easy to make changes like this. To add or remove a commonly used button from a toolbar, follow these steps:
Click the Toolbar Options down arrow at the right edge of the toolbar containing the button you want to remove.
Position your mouse pointer over the Add or Remove Buttons command; then select the toolbar name from the cascading menu that appears. A list of available commands appears (see Figure 31.2). All the commands currently on your toolbar appear checked; all the related commands that do not currently appear on your toolbar appear without a check mark.
Figure 31.2. Adding a command to the Formatting toolbar.
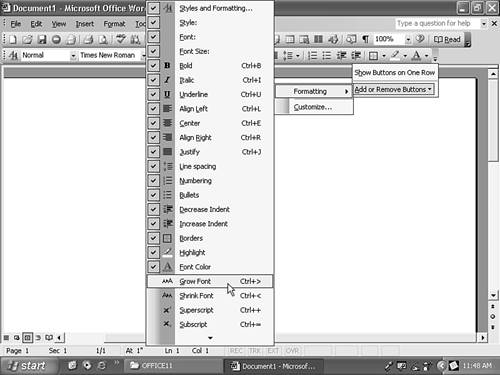
To add or remove a command, toggle the check mark next to the appropriate button.
To finish, click anywhere outside the list of commands.
 To learn how to reset a toolbar or menu item to its factory settings, see "Restoring Default Settings to a Menu Bar or Toolbar," p. 1040.
TIP
If you're responsible for managing Word in an organization, you might want to delete toolbar buttons associated with features you don't want your colleagues to use. For example, if you want people to use Word's Track Changes and Comments features rather than simply highlight text in documents they review, you might remove the Highlight button from the Formatting toolbar.
It's best to plan for these kinds of changes before you deploy Word 2003 throughout your company. If you plan in advance, you can create and install an official company template that reflects your changes to the Word interface, and you can train people based on your custom interface from the outset.
For more information about working with Word's workgroup revisions features, see Chapter 26, "Managing Document Collaboration and Revisions," p. 873.
For more information on administering Word installations throughout your organization, see Chapter 34, "Managing Word More Effectively," p. 1113.
NOTE
Toolbar and button customizations may be stored in either the Normal template or whichever document or template is currently open.
For more information about working with templates, see Chapter 11, "Templates, Wizards, and Add-Ins," p. 355.
Adding Commands to a Toolbar or Menu Bar Using Rearrange Commands
Often, you may want to add commands to a toolbar that Word does not provide in its list of alternatives. For example, if you are working in a legal firm or department, you might want to add the Legal Blackline command to your Reviewing toolbar. Or you might want to add commands to a menu. For example, you might like the File menu to include a Save All command. |
TIP
This command actually does appear on the File menu if you press Shift when you select that menu.
You can add any Word command to any toolbar or menu bar. To do so, first make sure that the toolbar or menu bar you want to customize is displayed. Then continue this way:
Choose Tools, Customize to open the Customize dialog box shown in Figure 31.3 (you can also click the down arrow to the right of any toolbar, click Add or Remove Buttons, and click Customize).
Figure 31.3. The Customize dialog box, with the Commands tab displayed.
Click Rearrange Commands to display the Rearrange Commands dialog box (see Figure 31.4).
Figure 31.4. From the Rearrange Commands dialog box, you can change the commands appearing on any menu bar or toolbar.
Using the Menu Bar drop-down box, choose the menu you want to add a command to.
If you want to add a command to a toolbar instead of a menu bar, click Toolbar. Then choose the toolbar from the Toolbar drop-down box.
Click Add. The Add Command dialog box appears (see Figure 31.5).
Figure 31.5. In the Add Command dialog box, you can choose which command to add to any menu bar or toolbar.
Click OK, and click Close to leave the Rearrange Commands dialog box.
When you're finished customizing toolbars and menus, click Close to leave the Customize dialog box.
Word places your new command at the end of the menu or toolbar.
If you want to move a command to a different location within the same toolbar or menu bar, see "Rearranging Commands on Any Toolbar or Menu," p. 1030.
It's worth taking a moment to look more closely at the Add Command dialog box, to see just how extensively you can customize Word. You can add commands from all the following Categories:
The categories File, Edit, View, Insert, Format, Tools, Table, Window, and Help correspond to Word's menus of the same names. However, they include many options that don't appear on standard Word menu bars. For example, the File category includes items such as Close All and Save All?items that "didn't quite make the cut" to be displayed on the standard File menu.
Several other categories, including Web, Drawing, AutoShapes, Borders, Mail Merge, Forms, and Control Toolbox, correspond to existing Word toolbars. Again, more options are typically available in the Customize dialog box than on the default Word toolbars. From the Commands tab, you can add these buttons to any toolbar you want.
The All Commands category lists more than 400 individual commands Word can perform?everything from ApplyHeading1 (format selected text with the Heading 1 style) to WordUnderline (apply underlining to all selected words but not the spaces between them).
The Macros category lists all currently available macros, allowing you to create a toolbar button or menu item for any existing macro.
The Fonts category lists all currently available fonts, making it possible for you to create a toolbar button or menu item that automatically formats any selected text in any font on your system.
The AutoText category lists all AutoText entries in all open templates, so you can create a toolbar button or menu item that inserts any AutoText entry you want.
The Styles category lists all available styles, including any custom styles you've created. You can create a toolbar button or menu item that applies any style you want.
NOTE
If you add commands to some of Word's longer toolbars?such as the Standard and Formatting toolbars?and your monitor displays at a low resolution, such as 640x480, you may not be able to see all the commands on these toolbars.
Consider using Add or Remove Buttons to remove commands you rarely use so that you can see all the commands you do use most. For example, if you use Word solely to write brief advertising copy, it's conceivable that you could live without the Insert Microsoft Excel Worksheet button on your Standard toolbar.
To create toolbar or menu items that insert pictures or load hyperlinks, see "Creating Toolbar Buttons or Menu Items That Insert Pictures" p. 1035, or "Creating Toolbar Buttons or Menu Items That Load Hyperlinks" p. 1036.
Dragging Commands to a Toolbar or Menu Bar
With Word 2003, Microsoft has introduced the Rearrange Commands dialog box to simplify interface customizations. However, if you have customized earlier versions of Word, the procedures you already know still work. For example, you can still add a command to a toolbar or menu bar as detailed here:
Choose Tools, Customize.
If you are customizing a toolbar that isn't already visible, choose the Toolbars tab and check the box associated with that toolbar.
If the toolbar is partially hidden behind the Customize dialog box, drag the toolbar to a location that's more convenient.
In the Categories box of the Commands tab of the Customize dialog box (refer to Figure 31.3), choose the category of the command you want to add.
In the Commands box, select the command you want.
Drag the command out of the Customize dialog box and drop it on the toolbar or menu bar you want, in the location where you want it to appear. If you are adding a command to a menu bar, the menu will open when you drag the new command over it; you can then drag the command to the appropriate location.
Release the mouse button.
Close the Customize dialog box.
CAUTION
Be careful not to drag built-in menu items off a menu, or to drag an entire menu off the menu bar by mistake. If you're not careful, it's easy to lose commands you really need.
Remember, Undo doesn't work on actions you take with the Customize dialog box open.
If you make an error and want to restore a toolbar or menu to its original conditions, see "Restoring Default Settings to a Menu Bar or Toolbar," p. 1040.
If you associate a button with a macro, and the button doesn't work after you copy it to a new template, see "What to Do If You Copy Custom Buttons Between Templates, but the Buttons Don't Work in the New Template," in the "Troubleshooting" section of this chapter. |
Removing Commands from a Toolbar or Menu Bar
Some people find Word's menus cluttered; they like to remove menu bar or toolbar commands they know they'll never use. Word's Rearrange Commands dialog box makes this easy. First, make sure that the toolbar or menu bar you want to change is displayed. Then, follow these steps:
Choose Tools, Customize to open the Customize dialog box (refer to Figure 31.3).
Click Rearrange Commands to display the Rearrange Commands dialog box (refer to Figure 31.4).
Using the Menu Bar drop-down box, choose the menu you want to remove a command from. If you want to remove a command from a toolbar instead of a menu bar, click Toolbar. Then, from the Toolbar drop-down box, choose the toolbar that contains the command you want to delete.
From the Controls scroll box, select the command you want to delete.
Click Delete. The command is deleted.
CAUTION
There is no confirmation dialog box; the command is deleted immediately. If you found you've made a mistake, click Reset to restore the menu bar or toolbar to its original ("factory") settings.
Click OK, and click Close to leave the Rearrange Commands dialog box.
When you're finished changing toolbars and menus, click Close to leave the Customize dialog box.
TIP
You can also remove a toolbar or menu item like this:
Open the Tools, Customize dialog box.
Move the mouse pointer to the toolbar or menu you want to change. If you move the mouse pointer to a menu, and then click on the menu, the menu will open.
Click the toolbar button or menu item you want to delete, and drag it off the toolbar or menu bar.


