Macros: The Basics
A macro is a sequence of operations that Word can execute whenever you tell it to, with a keyboard shortcut, toolbar button, or menu command, or by executing the macro from the Tools, Macro, Macros dialog box. Word's powerful macro facilities enable you to automate just about anything you would do manually in Word. There are two general approaches to creating Word macros:
Use Word's macro recorder to capture the steps in your macro as you perform them. After you save the macro, you can play it back at any time using one of the options listed previously.
Write the code of the macro yourself in the Visual Basic for Applications (VBA) programming language. Word comes with a complete programming environment, the Visual Basic Editor, that you use to enter and edit your code, as well as powerful tools to help you debug and test your macros.
This chapter focuses on recording and playing back a Word macro. If you'd like to learn the fundamentals of VBA programming with Word, there are a number of books and websites you can use. I suggest a good VBA book such as VBA Developer's Handbook available from Sybex.
What Tasks Should You Automate with a Macro?
The most common purpose for macros is to speed your work, by taking a set of operations that you perform repeatedly and turning them into a one-step operation. Anytime you find yourself doing the same set of actions over and over again, you might have found a good candidate for a macro. Macros also make your work more reliable by ensuring that the steps of the macro are performed exactly the same way, each time the macro runs. Of course, that does mean it is essential to record the macro properly. Otherwise, it performs the same wrong set of steps each time it runs.
Before you take the step of creating a macro, however, you might want to consider some of the other timesaving features in Word that you can use instead of macros:
If you often need to type the same text, such as your name or address, including formatting, you might want to use Word's AutoText feature, which lets you save named collections of text and formatting.
 To learn about AutoText and other Word features to speed your work, see Chapter 9, "Automating Your Documents," p. 287.
To quickly apply formatting in a consistent way through one or more documents, you can use styles.
To learn how to create and apply styles, see Chapter 10, "Streamlining Your Formatting with Styles," p. 329.To create neatly formatted standard documents, such as letters, rèsumès, or fax cover sheets, you can use one of the document templates or wizards that come with Word, or create your own template.
To learn about working with templates in Word, see Chapter 11, "Templates, Wizards, and Add-Ins," p. 355.
If none of Word's automated features alone will do the job for you, or if you want to use several of these features together, you can create a macro to carry out your commands. There is just about no end to the uses you might think of for macros. A few of the most common include the following:
Applying complex formatting that you can't easily capture in a style, such as a mixture of font and paragraph formatting.
Completing any task that takes several steps, such as creating a mail merge, applying complicated page setup, or requesting custom printing routines.
Performing repetitive tasks in a long document. This is especially useful for documents that you have imported from other programs, or that other users have created. You can record a macro that finds and replaces special characters, removes extra paragraphs, or applies formatting.
Performing commands normally found in Word's built-in dialog boxes. You might want to turn a display feature?such as the display of bookmarks?on or off as needed. Or you might want to quickly apply a format, such as strikethrough formatting.
Deciding to Use the Macro Recorder
When you need to create a new macro, you have a choice between recording the macro and typing the VBA code yourself. Of course, if you don't know the VBA programming language, your only option is to record the macro. You can even use the recorder as a teaching tool by recording the macro and then studying the resulting VBA code. As mentioned, this book focuses on using the macro recorder.
It's worthwhile to know a little about how the macro recorder works before recording a macro. After you turn on the macro recorder, it captures just about everything you do in Word, including typing text, applying formatting, and performing menu commands. The recorder is very literal: It picks up just about every detail during the recording session. Don't be surprised, if you look at the VBA code that results from recording a macro, if it seems that Word recorded a lot more than you had in mind.
If you are, or become, proficient with VBA, you'll probably find that it is often useful to record a macro and then edit the resulting code to get it to work exactly as you want. As your VBA skills improve, you might even find that it's sometimes quicker and more accurate to type the code yourself in the first place.
Planning to Record Your Macro
It's always a good idea to take some time to think about exactly what you want your macro to do before you begin recording. You might even want to take a few notes on paper that you can refer to while you record the macro. Think about several things before recording your macro:
Consider how your document should be set up before the recording begins. For example, if your macro is to apply font formatting to selected text, you need to have the appropriate text selected before you start recording the macro. On the other hand, you might want to record the actual selection of the text. In many cases, the first action you record will be moving to the beginning of your document. This can ensure that the steps that follow are applied to the entire document.
Make sure that you know your keyboard shortcuts, especially the ones for moving through the document and for selecting text. Word doesn't record text selections or navigation you perform with the mouse, but you can use keyboard shortcuts to perform the same tasks. (You can still use the mouse to select toolbar and menu commands while recording.)
TIP
If you want to record a macro that performs a series of actions to selected text, select some text before you begin recording the macro. Then record your macro as you normally would. For example, you could create a macro that makes selected text bold and italic. Select some text, begin recording the macro, click the Bold and Italic toolbar buttons, and stop recording. The resulting macro toggles the bold and italic setting for any selected text.
Think about the exact meaning of what you want to record. For example, to move to the beginning of the next paragraph while you are recording, press the shortcut key to move to the next paragraph (Ctrl+down arrow). If you simply use the arrow keys to move to the desired location, your macro records the arrow movements, not your intention to move to the following paragraph. When you run it in a different document, it replays the arrow movements, which may not have the same result in that document.
A good way to plan a macro is to take one or more "test runs" before turning on the recorder: Perform the commands and write down exactly what you did along the way. When you're satisfied that you've written down a workable list of steps, use it as a reference when recording the macro.
Recording Your Macro
To begin recording a macro, choose Tools, Macro, Record New Macro, or double-click the REC marker on the Word status bar. The Record Macro dialog box appears, as shown in Figure 32.1.
Figure 32.1. Enter the name and description of your new macro in the Record Macro dialog box.
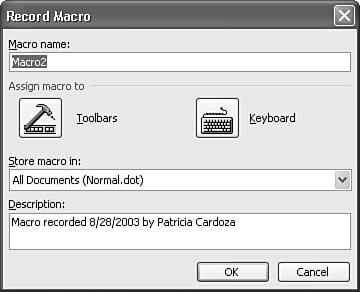
Before you can begin recording the macro, you must give it a name and decide where you want to store it. You can also assign the macro to a keyboard shortcut or a custom toolbar button. Although you can change all these items later, it's far more convenient to make these decisions up front and enter them correctly now.
Naming Your Macro
As you can see from Figure 32.1, Word suggests a name for your macro: Macro1, Macro2, and so on. It's usually much more useful to give your macro a more descriptive name so that it will be easy to identify when you want to use it later. Your macro name should describe the purpose of the macro and must follow these rules:
Macro names must begin with a letter but can include numbers.
Names can contain up to 80 letters and numbers. Spaces and other characters are not allowed.
NOTE
According to Microsoft documentation, only letters and numbers are permitted in macro names. You can create a macro name that includes an underscore (_) such as New_Letter, to simulate spacing. However, this is not documented and might not work correctly in future versions of Word.
For example, the following macro names are legal:
ApplyMyCustomFormatting
Insert5BlankParagraphs
TwoBOrNot2B
The following names are not legal:
Create Letter
2Spaces
New?Document
Word 2003 does not give you any warning that your macro name is invalid until you click OK to start recording your macro. If your macro name contains invalid characters, Word will display a dialog box indicating Invalid procedure name. Simply click OK and launch the Record Macro dialog box again. Edit the name until it conforms to the naming rules. When it does, Word allows you to proceed.
TIP
When you create a long macro name by running several words together, it's a good idea to begin each word with a capital letter. Then, if you assign the macro to a toolbar button, Word automatically creates the ScreenTip text by separating the macro name into its individual words, as defined by the capitalization. Naming a macro DeleteStrayCharacters, for example, produces the ScreenTip "Delete Stray Characters." Also note that embedded numbers generate an all-uppercase ScreenTip.
At the time you name your macro, you can also enter a description for the macro. Word's default description indicates the date the macro was recorded, and who recorded it. However, it makes sense to enter a more specific description for your macros. For example:
This macro goes to the top of the document and then performs a find and replace to eliminate the second space between sentences.
Deciding Where to Store Your Macro
Macros can be stored in templates and in individual documents. A macro is available for you to run only if the document or template that contains the macro is open. Macros can be stored in the following locations:
Normal.dot? The simplest way to create a macro that you can run at any time, in any document, is to store the macro in your Normal template. As you can see in Figure 32.1, the Normal.dot template is selected by default as the storage place for recorded macros.
Active Document? If you prefer to store the macro in the active document, click the Store Macro In drop-down list to select the document. The macro will be available for you to run only when this document is the active document.
Other Templates? If you store a macro in a template other than the Normal template, the macro is available only when that template is open or when a document based on that template is open. For example, suppose that you have created a template for writing sales proposals. If you want to record a macro that you will use only when you are working on these proposals, be sure to select the template name in the Store Macro In drop-down list. The template, or a document based on the template, must be the active document at the time you record the macro.
Assigning a Macro to a Keyboard Shortcut or Toolbar Button
If you expect to use your macro often, and you want to save time when you run it, you can assign a shortcut key, menu command, or toolbar button for running the macro. Then you can run your macro quickly by pressing the shortcut key, selecting the command on the menu, or clicking the toolbar button.
NOTE
Assigning a macro to a menu item is somewhat more involved than the process of assigning the macro a shortcut key or toolbar button. For that reason, it is covered later in this chapter.
Word does not require you to assign your macro to a shortcut key, menu command, or toolbar button: You can always run the macro using the Tools, Macro, Macros command. Although adding some form of shortcut can make a macro more accessible, you might prefer not to use up a key assignment or space on a toolbar for macros you use only rarely.
For commonly used macros, however, you probably should assign a keyboard shortcut or toolbar button. Several factors should enter into your decision, including these:
Keyboard shortcuts are a great convenience for macros that you use often. If you use a macro only occasionally, however, you might find it difficult to remember the shortcut key. Also, if you're creating macros for other users, some users prefer shortcut keys, whereas others don't want to memorize anything.
TIP
You can print a list of the custom key assignments associated with any document or template. To do so, choose File, Print; then choose Key Assignments from the Print What drop-down box and click OK. Word first prints all custom key assignments associated with the document itself, and then all custom key assignments associated with the template the document is based on.
A button on a custom toolbar makes a macro readily available for use at any time. Many people prefer not to memorize many shortcut keys but don't mind clicking on a button in a custom toolbar.
You can also add your macro commands to Word's menus. Internally, Word treats menus much like toolbars, and the customization process is also similar. You can add commands to the built-in menus, or add your own custom menus to Word's menu bar.
Assigning a Macro to a Keyboard Shortcut
To assign a keyboard shortcut to the macro you're about to record, follow these steps while the Record Macro dialog box is open:
Click Keyboard in the Assign Macro To group. The Customize Keyboard dialog box appears, as shown in Figure 32.2.
Figure 32.2. Use the Customize Keyboard dialog box to assign a key combination for your macro.
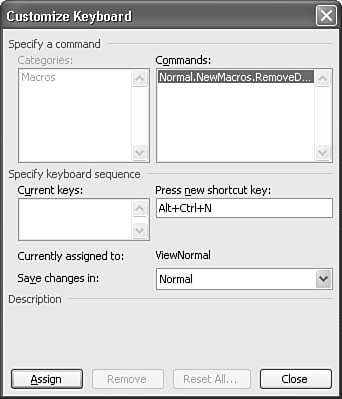
Make sure that the correct template or document is selected in the Save Changes In drop-down list. In nearly every case, you'll want to save the keyboard shortcut in the same template or document the macro will be stored in. (Word's default setting is to store the change in the Normal.dot template, not the current document.)
Press the shortcut key combination you want to use for the macro. You can create keyboard combinations that include function keys F1 through F12, the Ctrl key, the Alt key, and the Shift key (but not the Windows key). The key combination you choose is displayed in the Press New Shortcut Key text box. Under the text box, the current assignment for this key combination is displayed, or the combination is shown as [unassigned].
CAUTION
Word allows you to override default keyboard shortcut assignments. In fact, it doesn't even require you to confirm this with a confirming dialog box. As soon as you click Close to start recording your macro, the macro replaces the default key assignment.
You should be very reluctant to change default key assignments. For example, if you decide to assign Ctrl+P as the shortcut key for your macro, you can no longer use that keyboard combination to print. If you store your macro in a specific document or a template you've created, the change in keystrokes will affect only the document, or documents, created with that template. In other words, the same keystrokes will perform different tasks at different times, which can be terribly confusing?for you and especially for others who may use your macro.
If you store the macro in Normal.dot, the change will affect all documents?but now, Word will behave differently from the way its online documentation (and this book) says it will.
To accept the new keyboard assignment, click Assign. The new assignment appears in the Current Keys list. You can assign more than one key combination for each macro if you want to, but remember that a relatively limited number of key combinations is available for everything Word has to do.
To complete the assignment and continue with the recording process, click Close.
TIP
If you find it difficult to identify unused keyboard sequences, try sequences that begin with the Alt key; most of these are unassigned.
Alternatively, you can obtain a list of shortcut keys assigned to existing Word commands. Select Tools, Macro, Macros. From the Macros In drop-down list, select Word Commands. This presents you with a list of Word commands. Scroll down to and select the ListCommands entry. Click the Run button. From the List Commands dialog box, select Current Menu and Keyboard Settings. Click OK, and a new document is generated containing all the commands and associated shortcut keys and menu items.
Assigning a Macro to a Toolbar Button
To assign a toolbar button to run your macro, follow these steps when the Record Macro dialog box is displayed:
Choose Toolbars in the Assign Macro To group.
Make sure that the correct template or document is selected in the Save Changes In drop-down list. You will almost always want to save the toolbar assignment in the same template or document as that in which the macro will be stored.
The Customize dialog box appears, with the Commands tab selected, as shown in Figure 32.3.
Figure 32.3. The Commands tab of the Customize dialog box.
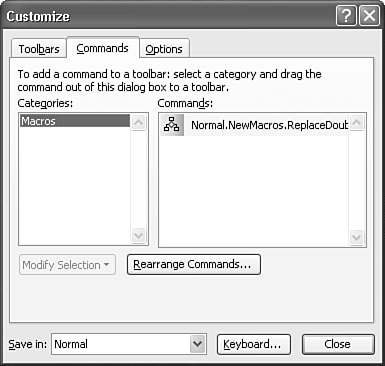
If the toolbar you want to customize is not visible onscreen, click the Toolbars tab of the Customize dialog box. Check the box next to the name of the toolbar you want to use in the Toolbars list. Click the Commands tab to return to the list of macros.
In the Commands list, click the name of the macro you want to add to a toolbar, and drag the name to the desired position on the toolbar. The full name of the macro, including the template and module name, appears on the button that is added to the toolbar.
To edit the name of the button, right-click the new button on the toolbar. Edit the button's name using the Name text box on the shortcut menu that appears.
To continue with the macro recording process, click Close.
You can also customize your toolbars and keyboard shortcuts later, using the Tools, Customize command as described later in this chapter.
Adding a Macro as a Menu Command
You can also add a macro to a menu as a separate menu command. Because Word considers menus to be simply a variant on toolbars (albeit one that happens to contain text), adding a menu command is similar to adding a toolbar button?but not identical. Follow these steps:
Choose Toolbars in the Assign Macro To group. The Customize dialog box appears.
Click the Commands tab. The command name associated with the macro you're about to record appears in the Commands scroll box.
Drag the command name all the way to the menu bar at the top of the screen; then drag it over the menu you want to add it to. That menu appears.
Without letting go, drag the command name down to the location on the menu where you want the new command to appear.
Release the mouse pointer; the command name appears on the menu.
To edit the command so that it contains a name users will understand, right-click on the command, and enter a new name in the Name box on the shortcut menu. (To specify a shortcut key, place the & symbol before the letter you want to use as a shortcut; make sure you don't duplicate another shortcut key on the same menu.)
Press Enter; then click Close.
Recording the Steps for Your Macro
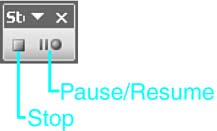
If you chose to assign a keyboard shortcut, toolbar button, or menu command to your macro, after you click Close, Word turns on the macro recorder and displays the Stop Recording toolbar, as shown in Figure 32.4. If you decided not to make a keyboard or toolbar assignment, click OK in the Record Macro dialog box to begin recording.
Figure 32.4. Use the Stop Recording toolbar to stop or pause your macro recording session.
When the macro recorder is active, you can perform most normal activities in Word, and those activities are recorded as part of your macro. Some examples of actions you can record in your macro include the following:
Typing and deleting text from a document.
Selecting text or navigating the document with keyboard shortcuts. You can't use the mouse to select text or navigate while you are recording. Instead, use the arrow keys to navigate, as well as the Home, End, Page Up, or Page Down keys, as needed. To select text, press and hold the Shift key while you use the arrow or navigation keys.
Choosing menu commands or toolbar buttons and filling out the dialog boxes associated with the commands.
Opening files, closing documents, or creating new documents.
Choosing options, such as those found in the Tools, Options command.
NOTE
You can still use the mouse to select menu commands and toolbar buttons while you're recording a macro.
Word displays the Stop Recording toolbar, shown in Figure 32.4, the entire time the macro recorder is on. When you have completed the steps of your macro, click the Stop Recording button.
If you want to pause your recording session and return to it later, click the Pause Recording button. Any actions you perform while recording is paused are not recorded. Click Pause Recording again when you're ready to resume your recording session.
Keep a few things in mind as you record your macros:
The macro recorder captures the actions you perform, not the keystrokes you use to complete them.
If you record a command that displays a dialog box, such as the Format, Font command, the dialog box doesn't appear when you run the macro. Rather, Word applies whatever settings you enter using the dialog box while you are recording the macro.
Word records everything in the dialog box, so if you only want to turn on italic, it's better to press Ctrl+I or click the Italic button on the Formatting toolbar than it is to use the Format, Font command. Otherwise, Word also records other text attributes that apply to the current text?attributes you might not want to apply every time you run the macro.
If you display a dialog box while you're recording, but you cancel the dialog box, Word doesn't record that command at all.
Word records your actions literally. For example, if you record the File, Open command and select a file, Word records the exact filename you opened. When you run the macro, Word attempts to open the same file. If the file is not found, an error occurs, and the macro stops running.
When you finish recording your macro, you can turn off the recorder in the following ways:
Click the Stop Recording button onthe Stop Recording toolbar.
Double-click the REC text area on the status bar.
Choose Tools, Macro, Stop Recording.
Making Sure Your Macro Is Saved
After you finish recording your macro, it is stored as part of the template or document in which you chose to save it. The macro is not actually saved, however, until you save that document or template. Because many macros are stored in the Normal.dot template, it's easy to forget to save your work. Of course, this template is saved when you exit Word, but you really should save your work more often that that, in case an application error or a power outage prevents you from safely exiting Word.
TIP
An easy way to save the Normal.dot template is to use the hidden Save All command. To see this command, hold down the Shift key and then select the File menu. The Save All command now appears on the File menu. Select this command to save all open documents, including any templates that are open, especially Normal.dot.
Of course, use the Save All command only if you want to save all the documents and templates that are open.


