Understanding and Using Word 2003's Privacy and Security Features
Companies and individuals are increasingly concerned about the security of their documents and computer systems. In this chapter, you'll learn about Word's many options for increasing document and computer security. If you store documents on network servers, you can combine Word's security features with the access restrictions built into your network operating system to tailor a security approach that meets the needs of your organization. Word's security features include
Password-protected encryption of various strengths
Privacy features that allow you to strip personal information and interim comments out of a document before you forward it to others
New Information Rights Management features that allow you to control who can read and edit your document, and even give documents "expiration dates" after which they cannot be read at all
Support for digital signatures that confirm the identity of individuals who have created a document
Limited macro virus protection, largely intended to supplement third-party antivirus software, not replace it
Improved document protection features that limit the changes that can be made to a document
Security begins, of course, with awareness?not just technology. If you are responsible for securing documents throughout a workgroup or an organization, you need to ensure not only that your colleagues understand Word's security features but that they understand the reasons to use them?and the limitations of these features, where they exist.
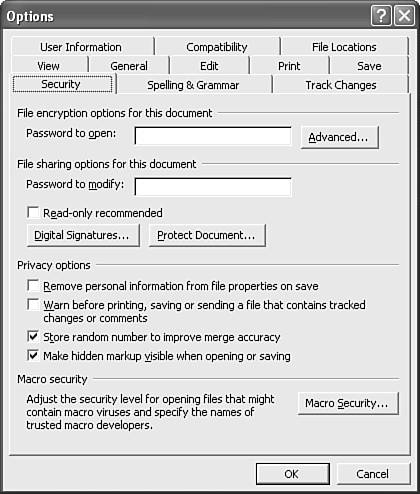
Word 2003 brings together its security features in a single location: the Security tab of the Options dialog box (see Figure 33.1). To display it, choose Tools, Options, Security.
Figure 33.1. The Security tab of the Options dialog box brings together security features formerly scattered throughout Word, as well as security features new to Word 2003.
Removing Personal Information from Word Documents
Unknown to many Word users, Word stores a wide variety of personal information about you in the files you create?information that can be used to trace a document to you (and/or your colleagues).
For example, the first time you ran Word, you were asked for your name and initials; if you provided them, they have been stored in the Author field of the Summary tab of the Properties dialog box in all your documents. By default, Word also stores this additional personal information:
The following Properties fields: Manager, Company, Last Saved By
The names of individuals who have reviewed a document using Word's Tracked Changes and Comments features
The names that appear on a routing slip when you forward a document to others using File, Send To, Routing Recipient
URLs stored in Smart Tags that can be used to download information from the Internet or corporate intranets
Email headers created when you use Word as an email editor
Information on who has saved each version of a document using Word's File, Versions feature
In Word 2003, you can strip all this personal information out of your documents whenever you save them. To strip the personal information out of an individual document, display the Security tab of the Options dialog box as described earlier, check the Remove Personal Information from This File on Save check box, click OK, and save the file.
Word removes all the individually identifiable Properties fields from the document. For document elements such as Tracked Changes, Word replaces individual names with the word "Author."
CAUTION
Checking the Remove Personal Information from This File on Save check box removes personal information only from your current document.
To remove personal information from all your new documents, you can record a macro named AutoNew, which checks the Remove Personal Information from This File on Save check box whenever you create a new document. Or, better yet, write a macro that creates this setting automatically, using VBA's New event. The VBA approach is more complex, requiring more coding, but it eliminates the risk that a different AutoNew macro stored with a different template might ever run in place of the macro you want. Either way, store the macro in the Normal template.
Unfortunately, because Remove Personal Information from This File on Save is associated with individual documents, you cannot use the Office 2003 Resource Kit's System Policy Editor document to ensure that this policy is applied to every user or computer.
Warning Before Sending a Document with Tracked Changes or Comments
If you ever use Word's Tracked Changes or Comments features, you may have noticed that it is all too easy to inadvertently leave interim notes and comments in your document that should be removed before they are saved, printed, or forwarded to a recipient by email. In Word 2003, you can set a warning to appear whenever you save, send, or print a file that still contains tracked changes or comments.
In the Security tab of the Options dialog box, check Warn Before Printing, Saving, or Sending a File That Contains Tracked Changes or Comments; then click OK.
After you check this box, you will be warned before you save, send, or print any files containing tracked changes or comments, not just the current file.
TIP
If you are responsible for administering Word 2003 or Office 2003 throughout an organization, you can use the Office 2003 Resource Kit's System Policy Editor to enforce this setting for all users whenever they log on to their computers.
The setting can be found in the Word11.ADM policy template, in the following location: Default User/Microsoft Word 2003/Tools | Options/Security/Warn Before Printing, Saving, or Sending a File That Contains Tracked Changes or Comments.
For more information about creating system policies, see the Microsoft Office 2003 Resource Kit.
Eliminating Traceable Random Numbers Word Stores in Documents
As covered in Chapter 26, "Managing Document Collaboration and Revisions," Word 2003 (and 2002) includes a powerful document comparison tool that is capable of identifying more changes than the comparable feature in earlier versions of Word. One way in which Word's new document comparison feature does this is by storing a random number in each document being compared. These numbers are hidden but can be uncovered and used to demonstrate that two documents were created by the same user or users.
You can instruct Word's document comparison feature not to store random numbers in your document?though this will sacrifice some accuracy in your document comparison. To avoid storing random numbers, follow these steps: In the Security tab of the Tools, Options dialog box, clear Store Random Number to Improve Merge Accuracy, and then click OK.
TIP
As discussed in the preceding section, you can use the Office 2003 Resource Kit's System Policy Editor to enforce this setting for all users whenever they log on to their computers.
The setting can be found in the Word11.ADM policy template, in the following location: Default User/Microsoft Word 2003/Tools | Options/Security/Store Random Number To Improve Merge Accuracy.
Leaving or Joining Microsoft's Customer Experience Improvement Program
With Word and Office 2003, Microsoft introduces the Customer Experience Improvement Program. Through this program, Microsoft collects information about your computer, your Office usage patterns, and errors you encounter running Word. Microsoft says it will use this information to improve Office's quality, reliability, and performance. |
According to Microsoft, all information collected through this program is anonymous: "We will not collect your name, address, or any other personally identifiable information." Nevertheless, if you are concerned about security, you may want to avoid participating in this program simply because it represents another potential vulnerability.
By default, you do not participate in the Customer Experience Improvement Program. If you want to check or change your participation status, follow these steps:
Choose Tools, Options, General.
Click Service Options.
Choose Customer Feedback Options from the Category box.
To participate, choose Yes, I Am Willing to Participate Anonymously in the Customer Experience Improvement Program. To avoid participation, choose No, I Don't Wish to Participate.
Click OK.
Controlling When Your Computer Connects to Office on Microsoft.com for Content
By default, when you run Word or any other Office application while you are connected to the Internet, Microsoft occasionally connects to your computer to display content and links from Microsoft Office Online. For example, Word's Getting Started task pane may display links to product news and new templates that have just been made available at Microsoft Office Online. |
Again, however, if you are in a high-security environment, you may want to disable Internet connections that are not essential to your business. To disable this connection to your computer, follow these steps:
Choose Tools, Options, General.
Click Service Options.
Choose Online Content from the Category box.
Clear the Show Content and Links from Microsoft Office Online check box.
Click OK.
Using and Managing Word Encryption
Word makes it easy for users to encrypt their documents, using various encryption schemes, ranging from weak encryption to strong 128-bit RC4 encryption.
NOTE
In France, 128-bit password protection is illegal. If Regional Settings are set to French in the Windows Control Panel, Word users cannot open 128-bit password-protected Word 2003 documents. If Regional Settings are reset to another locale, the files can be opened.
Follow these steps to encrypt a document:
Choose File, Save As.
In the Save As dialog box, click Tools, Security Options. The Security tab of the Options dialog box opens (refer to Figure 33.1).
In the Password to Open text box, enter a password. By default, passwords can be up to 15 characters long and can contain symbols and numerals as well as letters. For security reasons, Word displays asterisks onscreen as you type your password.
TIP
In Word 2003, you can create a password up to 255 characters in length if you choose an RC4 security scheme, as discussed next.
To control what form of encryption to use, click the Advanced button. The Encryption Type dialog box appears (see Figure 33.2).
Figure 33.2. In the Encryption Type dialog box, you can choose what form of security to use.
Select a type of encryption from the Choose an Encryption Type scroll box.
If you choose an RC4 encryption scheme, you can also choose a key length and specify whether to encrypt document properties.
Take into account the following considerations in choosing an encryption type:
If your document must be read on Office 97 or Office 2000 systems, you will typically need to select Office 97/2000 or Weak Encryption (XOR).
XOR weak encryption, which was once the only type of encryption available for Word documents, is exactly what it says it is: notoriously weak.
If you clear the Encrypt Document Properties check box, Word's Search feature will still be able to find files based on the contents of the Properties dialog box, though users without the correct password will not be able to open them.
Although RC4 encryption is relatively strong, the strength depends on the key length you choose. As computers have become more powerful, 40-bit key length encryption has become far less secure. Fifty-six-bit key lengths take 65,536 times longer to crack, but even these are increasingly vulnerable. Expert recommendations now range from 90-bit to 128-bit key lengths and beyond.
Click OK to return to the Security tab.
Click OK. Word displays the Confirm Password dialog box (see Figure 33.3).
Figure 33.3. Confirm your password in the Confirm Password dialog box.
Reenter the password exactly as you typed it the first time. (Use the same capitalization; passwords are case sensitive.)
Click OK.
Click Save. Word saves the file.
Encrypted files cannot be indexed by the Windows file indexing services that may be running on your computer.
CAUTION
If you save a password-protected Word 2003 document to an older version of Word, such as Word 6/95, password protection is lost, and you have to reapply it in the older version of Word. This is true even though Word 6 and Word 95 also offered password protection.
CAUTION
After documents are encrypted, Word contains no feature for decrypting them without a password. In other words, if you forget your password, you will not be able to be open your document.
Even more serious, if one of your colleagues forgets a password, or leaves the company and does not share the password with someone, you will not be able to open his or her documents. If your workgroup uses passwords, make sure that copies of these passwords are stored securely?ideally, in a locked, fireproof, waterproof safe?where the company can access them in an emergency.
Removing Password Protection from a File
If a file is encrypted using password protection, you can remove it. However, for obvious security reasons you have to open the file first (which requires entering the password). To remove a password from an encrypted file, take these steps:
Open the file and type the password when prompted.
Choose File, Save As.
In the Save As dialog box, choose Tools, Security Options.
In the Password to Open box, delete the asterisks corresponding to the existing password.
Click OK.
Click Save.
CAUTION
Clicking Cancel rather than Save in the Save As dialog box does not cancel the change to the password. It only cancels the Save operation. If Word should crash or if you close it without saving the file, the password protection remains in place.
Setting a File as Read-Only
Another way to secure a file from outside influence but still allow anyone to see it is to make it a read-only document. This way users can change a document only if they supply Word with the appropriate password. To do so, set the file to read-only as shown here:
Choose File, Save As.
In the Save As dialog box, choose Tools, Security Options.
In the Password to Modify text box, enter a password.
Click OK. Word displays the Confirm Password dialog box.
Reenter the password.
Click OK when asked to confirm your choice.
Click Save.
The Caution from the previous section also applies here: Cancel won't cancel the change of a password, and you can change the password in the Tools, Options, Security dialog box.
CAUTION
Users who open a file as Read-Only can save it under a new name in Word 6/95 format; the new file will not be restricted to read-only status.
TIP
You can also apply read-only status to a file from outside Word by setting the Read-Only attribute in the file's Properties dialog box. In Windows Explorer, right-click the file's icon and choose Properties from the shortcut menu. Then, click the Read-Only check box.
You can't apply password protection this way, though the permissions you've set up on your network can prevent a user from altering the file's attributes.
CAUTION
Unless you also use Word 2003's Permissions feature, nothing (other than perhaps limited network permissions) prevents a user from opening a read-only file, saving it under a new name, and changing it. The user can then close the new file, reopen it, and save it using the original file's name?thereby deleting the original file. The result is the same as it would be if the file had never been password-protected at all.
 For more information about using Permissions, see "Using Permissions to Restrict Who May Use Your Documents," p. 1096.
"Recommending" Read-Only Status
You've just seen that you can password-protect a file as read-only, enabling users to read a file without a password, but making it more difficult for them to edit it. Word provides an even weaker form of protection that might be useful in circumstances in which you would prefer that a file not be edited but recognize that it may have to be. You can set a file as Read-Only Recommended.
When you set a file as Read-Only Recommended, if a user tries to open it, he or she sees a message like that shown in Figure 33.4.
Figure 33.4. When a file is set as Read-Only Recommended, Word discourages?but doesn't prevent?users from editing a document.
If the user clicks Yes, the file opens as read-only. If the user clicks No, the file opens normally, and the user can edit it.
To set a file as Read-Only Recommended, choose Tools, Options, Security; check the Read-Only Recommended check box, and click OK.


