8.3 CDMA2000
Besides GSM, Code Division Multiple Access (CDMA) is also a popular cellular technology used in the U.S. CDMA uses Spread Spectrum Technology (SST), which allows a unique code to be attached to each conversation and to spread conversations across wide segments of the cellular broadcast spectrum. Each receiver decodes on the same frequency segment as the sender. Because multiple signals can be transmitted over the same spectrum, CDMA allows many more conversations to be possible compared to other cellular technologies.
CDMA is used by Sprint PCS, Verizon Wireless, and AT&T. CDMA2000 is the latest generation of CDMA technology and is used on Sprint's PCS Vision network and Verizon Wireless's Express Network.
8.3.1 Using the AirPrime PC3200 CDMA2000 PC Card
Sprint's AirPrime PC3200 PCMCIA card operates on the CDMA2000 network. This card dances on the edge of 2.5G and 3G, boasting typical data speeds of between 50 and 70 Kbps. It is capable of a peak speed of 144 Kbps.
8.3.1.1 Installing the AirPrime PC3200
Take the following steps to install the AirPrime PC3200:
Install the provided software using the installation CD.
Tips for Road WarriorsHere are some tips for road warriors: Use a wireless network whenever one is around. When you are traveling, such as on a train, you can manually switch to GPRS access. The downside is that GPRS access is slower and much more costly than wireless access. The theoretical speed of 40.2 Kbps is not achievable in practice. Expect performance of about 20+ Kbps. Since GPRS is much slower and costs more, turn off image loading in your web browser when surfing the Web. This causes the web pages to load faster and save you money. If your cellular provider supports a compressing proxy (See Section 8.4, later in this chapter), be sure to install and configure the software according to the instructions. Such a proxy server can increase speed and reduce your bandwidth consumption. Speed for checking emails is acceptable when using GPRS. However, it is advisable to configure your email client to download message headers only; if someone sends you a multi-megabyte attachment or even a long message, it could take a long time to download and use up your bandwidth allotment. You can then decide on a message-by-message basis whether to view the message body and/or download attachments. You should also install a spam filter in your email application so as to avoid downloading huge junk emails just to delete them. Many email clients include some spam-blocking features, and typically analyze the email headers (rather than the body of the message) to determine whether a message is spam. Make full use of the SMS feature. Sending SMS messages may be cheaper than making a voice call. Use SMS instead of voice calls: you can type them with the keyboard on your notebook and they will be delivered quickly. |
Insert the card into a PCMCIA slot on your notebook.
Windows XP will search for the appropriate drivers using wizards. Select the option "Install the software automatically", and then select Continue Anyway to continue with the installation.
When the software installation is complete, you need to activate the card (see the following section).
8.3.1.2 Activating the AirPrime PC3200
Before you can use the card, you need to activate it, which connects your account to the card and allows it to get on the Sprint PCS Vision network. Unlike with GSM/GPRS adapters and phones, CDMA does not use a SIM card, so your identity is connected with the account information you supply during this procedure.
After the software installation is complete, the Activation Wizard appears and provides you with the following sequence:
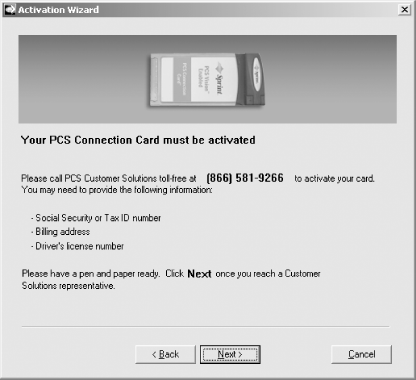
The first screen (Figure 8-20) provides you with basic information about the activation sequence. If you don't already have an activation code and phone number, follow the instructions on this screen to obtain them.
Figure 8-20. Sprint PCS Vision Activation Wizard
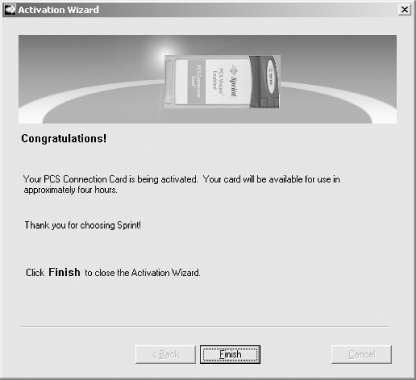
In the following screens, supply your activation code, phone number, and MSID (this may be the same as the phone number). When this sequence is complete, the final screen of the Activation Wizard appears (Figure 8-21).
Figure 8-21. The final step of the Activation Wizard
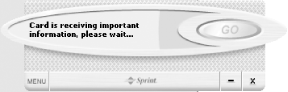
After the Activation Wizard is complete, the PCS Connection Manager appears and begins the process of provisioning (Figure 8-22), which supplies your adapter with a valid IP address and whatever credentials are necessary to make future connections to the network. This is a one-time operation, and may take 15 minutes or more.
Figure 8-22. The PCS Connection Manager during provisioning
8.3.1.3 Making the connection
After you've activated the card and gone through the provisioning process, the PCS Connection Manager will prompt you to "Click `GO' to connect...". (If you get an error message, contact Sprint technical support.) To connect to the network, take the steps described next.
Click GO in the PCS Connection Manager window.
After the connection is made, you will see a splash screen, which you can disable in future sessions by deselecting "Show welcome screen".
Dismiss the splash screen by clicking OK, and you will return to the PCS Connection Manager, which now shows some basic network statistics (Figure 8-23).
Figure 8-23. PCS Connection Manager showing network usage statistics
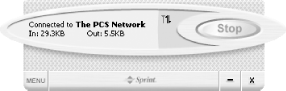
Click Stop to disconnect from the network (you can now unplug the card until you need to use it again).
Each time you log in, the PCS Connection Manager is started automatically. You can close the window and minimize it to the system tray by clicking the "x" in the lower-right corner. Click the tray icon (see Figure 8-24) to restore the PCS Connection Manager window.
Figure 8-24. PCS Connection Manager system tray icon

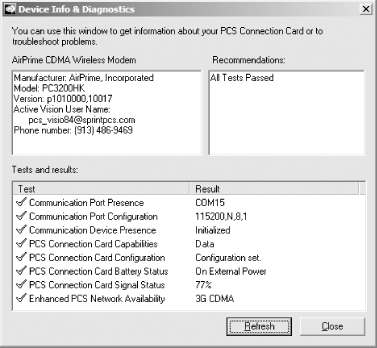
The PCS Connection Manager displays precious little information. To see extended information, such as signal strength, click MENU and select Device Info & Diagnostics. (This option is only available while you are disconnected from the network; see Figure 8-25.)
Figure 8-25. Device Info & Diagnostics showing device information and network signal status
8.3.2 Using the AirCard 555 CDMA2000 PC Card
Verizon offers the Sierra Wireless (http://www.sierrawireless.com/) AirCard 555 for notebook computer users of its Express Network service. As with the offerings from Sprint, you can expect between 50 and 70 Kbps with this card and Verizon's service, with a peak speed of144 Kbps.
8.3.2.1 Installing the AirCard 555
Follow these steps to install the AirCard 555:
Install the provided software using the installation CD.
Insert the card into a PCMCIA slot on your notebook.
Windows XP will search for the appropriate drivers using wizards. Select the option "Install the software automatically", and then select Continue Anyway to continue with the installation.
When the software installation is complete, you need to activate the card (see the following section).
8.3.2.2 Making the connection
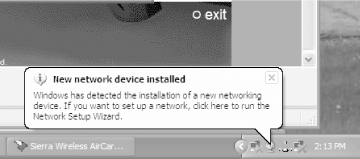
After you've installed the software, insert the AirCard into your PCMCIA slot. Windows XP detects the card and installs the drivers (you may need to click through some confirmation dialogs). When that is finished, your system tray will indicate that a new network device has been detected (see Figure 8-26). You can ignore this.
Figure 8-26. Windows XP detecting the AirCard
After a few seconds, things settle down, and the AirCard 555 Watcher icon appears in the tray (the left-most icon shown in Figure 8-27). This icon is only available when the AirCard is plugged into your computer. Click it to bring the Watcher window to the front (Figure 8-28).
Figure 8-27. The AirCard 555 Watcher icon appearing in the system tray
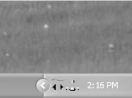
Figure 8-28. The AirCard 555 Watcher waiting for you to connect
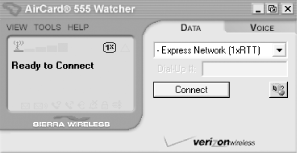
The AirCard 555 Watcher (Figure 8-28) shows the
signal strength (one out of five bars in this figure). To connect to
the network, click Connect. Within a few seconds, you should be able
to access the Internet. You can also send and receive SMSs using the
Watcher. Click Tools  Mobile Messenger to access this
feature (you do not need to be connected to send or receive an SMS,
but you must be in the service area).
Mobile Messenger to access this
feature (you do not need to be connected to send or receive an SMS,
but you must be in the service area).


