Additional Table Space Options/Parameters
When creating or altering a table space, there are a number of options or parameters that can be specified to control the placement and operation of the table space. The options that can be specified for a table space include:
Page Size: Specifies the size of the pages that will be used in the table space. The page size can be 4 KB, 8 KB, 16 KB, or 32 KB. In order to create a table space with a page size other than 4 KB, there must already be a buffer pool with the same page size.
The default page size is 4096 bytes (4 KB).
By default, a buffer pool with a 4-KB page size is created when a database is created.
Extent Size: Specifies the number of pages that will be written to a container before writing to the next container in the table space.
The default value is specified by the DFT_EXTENT_SZ database configuration parameter.
The default is good for most situations, but if using disk striping, try to match the extent size to the underlying disk or file system stripe size.
Prefetch Size: Specifies the number of pages that will be read from the table space when data prefetching is being performed. Prefetching reads data for an SQL statement from disk into the buffer pool before it is used so that the statement need not wait for the I/O to be performed.
The default value is provided by the DFT_PREFETCH_SZ database configuration parameter.
As a general rule of thumb, use the following formula to determine the prefetch size for the table space:
Prefetch Size = min (512, number of containers * extent size)
Buffer Pool: Specifies the name of the buffer pool used for manipulating data and index pages for tables in this table space. The buffer pool must exist, and the page size of the buffer pool must match the page size specified for the table space.
Overhead: Specifies the I/O controller overhead and the disk seek and latency time, in milliseconds. This number should be an average for all containers that belong to the table space (if it is not the same for all of the containers). This value is used to determine the cost of I/O during query optimization.
Transfer Rate: Specifies the time required to read one page into memory, in milliseconds. This number should be an average for all containers that belong to the table space (if it is not the same for all of the containers). This value is used to determine the I/O cost during query optimization.
Dropped Table Recovery: Specifies whether tables in the table space that have been dropped can be recovered using the RECOVER TABLE ON option of the ROLLFORWARD command. This option can be specified only for a REGULAR table space.
NOTE
Once a table space has been created, the page size and extent size cannot be changed.
Listing Table Spaces
Information about the table spaces within a database can be captured using the GET SNAPSHOT FOR TABLESPACES on <database name> command.
The basic information returned by the GET SNAPSHOT FOR TABLESPACES command includes the following:
Table space ID, the internal ID that DB2 uses for the table space
Table space storage type (DMS or SMS)
Table space contents, which can be Regular (any data), Large, or Temporary
Page size for the table space
Extent size for the table space
Prefetch size for the table space
Current buffer pool used by the table space
Buffer pool used at the next database startup
State, a hexadecimal value indicating the current table space state, as well as a description of the state
Size, in pages
Number of useable pages
Number of used pages
Minimum point in time for roll forward recovery
Number of table space quiescers
Number of containers
Container information, such as
Container name
Container ID
Container type
Total pages in the container
Number of useable pages in the container
Stripe set number
An indicator of whether the container is accessible
The table space map for DMS table spaces
An example of the output of the GET SNAPSHOT FOR TABLESPACES command for an SMS table space is below.
Tablespace Snapshot

First database connect timestamp     = 01-07-2003 15:26:42.235201
Last reset timestamp                 =
Snapshot timestamp                   = 01-07-2003 15:47:20.522435
Database name                        = W
Database path                        = C:\DB2\NODE0000\SQL00004\
Input database alias                 = W
Number of accessed tablespaces       = 3

Tablespace name                      = SYSCATSPACE
  Tablespace ID                      = 0
  Tablespace Type                    = System managed space
  Tablespace Content Type            = Any data
  Tablespace Page size (bytes)       = 4096
  Tablespace Extent size (pages)     = 32
  Tablespace Prefetch size (pages)   = 16
  Buffer pool ID currently in use    = 1
  Buffer pool ID next startup        = 1
  Tablespace State                   = 0x'00000000'
  Detailed explanation:
    Normal
  Total number of pages              = 0
  Number of usable pages             = 0
  Number of used pages               = 0
  Minimum Recovery Time              =
  Number of quiescers                = 0
  Number of containers               = 1
Container Name                       = C:\DB2\NODE0000\SQL00004\SQLT0000.0

Container ID                         = 0
Container Type                       = Path
Total Pages in Container             = 0
Usable Pages in Container            = 0
Stripe Set                           = 0
Container is accessible              = Yes
An example of the output of the GET SNAPSHOT FOR TABLESPACES command for a DMS table space is below.
Tablespace name                      = TS1
  Tablespace ID                      = 3
  Tablespace Type                    = Database managed space
  Tablespace Content Type            = Any data
  Tablespace Page size (bytes)       = 4096
  Tablespace Extent size (pages)     = 32
  Tablespace Prefetch size (pages)   = 16
  Buffer pool ID currently in use    = 1
  Buffer pool ID next startup        = 1
  Tablespace State                   = 0x'00000000'
  Detailed explanation:
    Normal
  Total number of pages              = 5000
  Number of usable pages             = 4960
  Number of used pages               = 160
  Number of pending free pages       = 0
  Number of free pages               = 4800
  High water mark (pages)            = 160
  Rebalancer Mode                    = No Rebalancing
  Minimum Recovery Time              =
  Number of quiescers                = 0
  Number of containers               = 1
  Container Name                     = d:\ts1
    Container ID                     = 0
    Container Type                   = File (extent sized tag)
    Total Pages in Container         = 5000
    Usable Pages in Container        = 4960
    Stripe Set                       = 0
    Container is accessible          = Yes

  Table space map:
  Range  Stripe Stripe  Max          Max  Start  End    Adj.  Containers
  Number Set    Offset  Extent       Page Stripe Stripe
  [   0] [   0]      0     154       4959      0    154   0    1 (0)
The LIST TABLESPACES command can also be used to list the basic or detailed information about the table spaces within a database. The syntax for this command is:
LIST TABLESPACES [SHOW DETAIL]
The basic information returned by the LIST TABLESPACES command includes the following:
Table space ID, the internal ID that DB2 uses for the table space
Table space name
Table space storage type (DMS or SMS)
Table space contents, which can be Regular (any data), Large, or Temporary
State, a hexadecimal value indicating the current table space state, as well as a description of the state
An example of the output of the LIST TABLESPACES command is below.
Tablespaces for Current Database

Tablespace ID                        = 0
Name                                 = SYSCATSPACE
Type                                 = System managed space
Contents                             = Any data
State                                = 0x0000
  Detailed explanation:
    Normal

Tablespace ID                        = 1
Name                                 = TEMPSPACE1
Type                                 = System managed space
Contents                             = System Temporary data
State                                = 0x0000
  Detailed explanation:
    Normal

Tablespace ID                        = 2
Name                                 = USERSPACE1
Type                                 = System managed space
Contents                             = Any data
State                                = 0x0000
  Detailed explanation:
    Normal
If the SHOW DETAIL option is specified, the following additional details will also be shown:
Total number of pages
Number of useable pages
Number of used pages
Number of free pages
High water mark (in pages)
Page size (in bytes)
Extent size (in bytes)
Prefetch size (in pages)
Number of containers
An example of the output of the LIST TABLESPACES SHOW DETAIL command for the USERSPACE1 table space is shown below.
Tablespace ID                        = 2
Name                                 = USERSPACE1
Type                                 = Database managed space
Contents                             = Any data
State                                = 0x0000
  Detailed explanation:
    Normal
Total pages                          = 100000
Useable pages                        = 999968
Used pages                           = 5740
Free pages                           = Not applicable
High water mark (pages)              = Not applicable
Page size (bytes)                    = 4096
Extent size (pages)                  = 32
Prefetch size (pages)                = 16
Number of containers                 = 1
This additional information is important in determining how full the table spaces are and whether any action is required, such as adding new containers, extending or resizing an existing container, sizing of database/table space backups, and so on.
NOTE
For SMS table spaces, the information does not indicate how full the table space is.
SYSCAT.TABLESPACES View
This view contains a row for each table space defined in the database. It has the following columns:
TBSPACE: The name of the table space
DEFINER: The authorization ID of the user who created the table space
CREATE_TIME: The timestamp when the table space was created
TBSPACEID: The internal table space identifier
TBSPACETYPE: The type of the table space:
S = System managed space
D = Database managed space
DATATYPE: The type of data (contents) that can be stored in the table space:
A = All types of permanent data
L = Large data only
T = Temporary tables only
U = Declared global temporary tables
EXTENTSIZE: The size of an extent, in pages
PREFETCHSIZE: The number of pages to be read for each prefetch operation
OVERHEAD: The disk controller overhead, seek time, and latency time, in milliseconds
TRANSFERRATE: The time required to read one page into the buffer
PAGESIZE: The size of the pages in the table space
DBPGNAME: Name of the database partition group for the table space
BUFFERPOOLID: ID of the buffer pool used by the table space
DROP_RECOVERY: Specification of whether the tables in the table space are recoverable after a DROP TABLE statement:
N = table is not recoverable
Y = table is recoverable
REMARKS: User-provided comments
NGNAME: For compatibility with scripts and tools written for previous versions of DB2, specification of the database partition group for the table space
SYSCAT.TABLES View
The SYSCAT.TABLES catalog view also contains columns that indicate which table spaces are used to store the different table objects. The columns of interest are:
TBSPACEID: The internal identifier of the table space where the table's data object is stored
TBSPACE: The name of the table space where the table's data object is stored
INDEX_TBSPACE: The name of the table space that holds all indexes for the table. If this is NULL, the indexes are stored in the TBSPACE table space.
LONG_TBSPACE: The name of the table space that holds all large/long data for the table. If this is NULL, the LOBs and Long Varchars are stored in the TBSPACE table space.
When Is a Table Space Full?
An SMS table space is considered full when any one of its containers becomes full.
To increase the amount of space allocated to an SMS table space:
Add space to the underlying file systems or drives, using operating system commands or utilities.
Perform a redirected restore, specifying more containers and/or larger file systems or drives.
A DMS table space is considered full when all of its containers are full and all of the extents within the containers have been used.
To increase the amount of space allocated to a DMS table space:
Add new containers to the table space.
Extend or resize the existing containers.
Perform a redirected restore, specifying more and/or larger containers.
Table Space Maps and Table Space Extent Maps
When a DMS table space is created, an associated table space map and a table space extent map are also created. In the table space map, all of the initial containers are lined up so that they all start in stripe 0. This means that data will be striped evenly across all of the table space containers until the individual containers fill up.
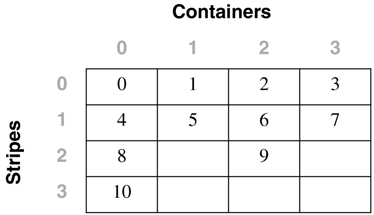
The following example will illustrate this in more detail. A DMS table space is created with four containers, as follows:
CREATE TABLESPACE spc1
  MANAGED BY DATABASE
  USING (FILE 'c0' 15)
  USING (FILE 'c0' 11)
  USING (FILE 'c0' 15)
  USING (FILE 'c0' 17)
  EXTENTSIZE 2
In DB2 Version 8, the container tag will now use one full extent by default instead of the one page it used in DB2 Version 7. Therefore, the containers will contain the following number of useable extents:
container number 0 (cont0):          6 extents   [ (15 ?2) / 2 ]
container number 1 (cont1):          4 extents   [ (11 ?2) / 2 ]
container number 2 (cont2):          6 extents   [ (15 ?2) / 2 ]
container number 3 (cont3):          7 extents   [ (17 ?2) / 2 ]
NOTE
The calculations above show the number of pages for the container, minus one extent for the container tag, divided by the extent size.
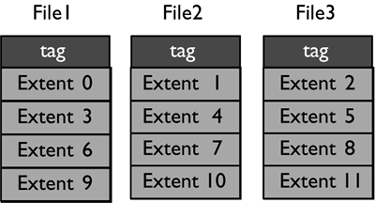
Before looking at the extent map for the table space, consider the following definitions:
Stripe: A contiguous number of extents spanning one or more containers without repeating
Range: A contiguous number of stripes sharing the same common set of containers
Stripe set: A contiguous number of ranges
Conceptually, the extent map would look like the following:
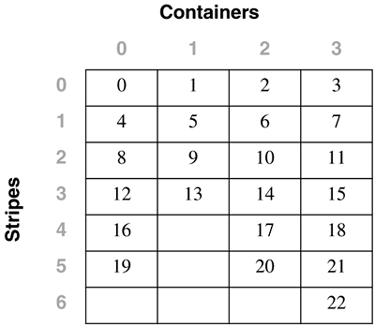
For example, Extent 0 can be found in Stripe 0 of Container 0, Extent 14 can be found in Stripe 3 of Container 2, and Extent 22 can be found in Stripe 6 of Container 3.
The table space map that would be created when the table space is created would look like:
Range   Stripe  Stripe  Max     Max    Start   End     Adj.   Containers
Number  Set     Offset  Extent  Page   Stripe  Stripe
[0]     [0]     0       15      31     0       3       0      4(0, 1, 2, 3)
[1]     [0]     0       21      43     0       5       0      3(0, 2, 3)
[2]     [0]     0       22      45     0       6       0      1(3)
As shown, there are three ranges in this table space map. The first range maps from Extent 0 to Extent 15. The second range maps from Extent 16 to Extent 21. The third range maps only Extent 22.
The fields defined in the table space map are:
Range: The range number. This always starts at zero (0).
Stripe Set: The stripe set number. This always starts at zero (0).
Stripe Offset: The extent number where the stripe set begins.
Max Extent: The maximum extent number found in the range.
Max Page: The maximum page number found in the range.
Start Stripe: The number of the stripe where the range starts in the map.
End Stripe: The number of the stripe where the range ends in the map.
Adj: This is known as the adjustment, and it specifies how far a range is shifted during a rebalance.
Containers: The array of containers that are part of the range.
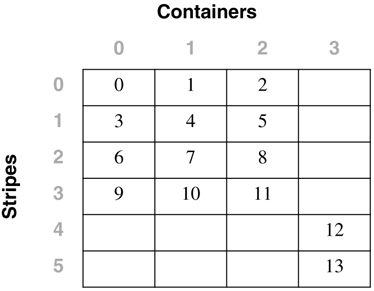
For the table space created using:
CREATE TABLESPACE dmsfiletbspc
MANAGED BY DATABASE
USING
  (FILE '/tbspcs/cont1' 50, FILE '/tbspcs/cont2' 50, FILE '/tbspcs/cont3' 50)
EXTENTSIZE 10
PREFETCHSIZE 30
the extent map would look like the following:
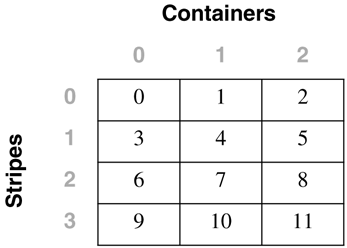
The table space map would look like the following:
Range   Stripe  Stripe  Max     Max    Start   End     Adj.   Containers
Number  Set     Offset  Extent  Page   Stripe  Stripe
[0]     [0]     0       11      119    0       3       0      3(0, 1, 2)
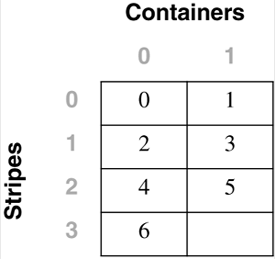
For the table space created using:
CREATE TABLESPACE dmsspc
MANAGED BY DATABASE
USING
  (FILE '/tbspcs/cont1' 50, FILE '/tbspcs/cont2' 30, FILE '/tbspcs/cont3' 40)
EXTENTSIZE 10
the extent map would look like the following:
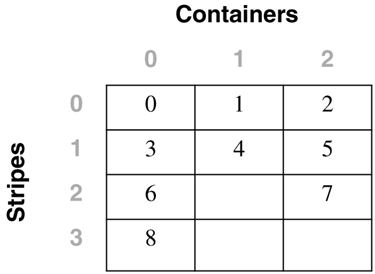
The table space map would look like the following:
Range     Stripe  Stripe  Max     Max    Start   End    Adj.   Containers
Number    Set     Offset  Extent  Page   Stripe  Stripe
[0]       [0]     0       5       59     0       1      0      3(0, 1, 2)
[1]       [0]     0       7       69     2       2      0      2(0, 2)
[2]       [0]     0       8       79     3       3      0      1(0)
Altering a Table Space
The ALTER TABLESPACE statement is used to modify the storage or I/O characteristics of an existing table space. Although the I/O characteristics can be modified for both SMS and DMS table spaces, the storage characteristics can generally be modified only for DMS table spaces.
The ALTER TABLESPACE statement can be used to add containers to existing DMS table spaces or to remove existing containers from a DMS table space. A container cannot be removed from an SMS table space and can be added to an SMS table space only on a partition where there are no existing containers for the table space using the system container clause.
With DMS table spaces, the containers can also be made larger or smaller using the ALTER TABLESPACE statement.
When a container is added to or removed from a table space, the existing data may need to be rebalanced among the new set of containers.
Alter Table Space Options
The following options can be used to alter a table space:
ADD: Used to add one or more containers to the specified table space. When adding a container to a table space, the container can be added to the last stripe set in the table space.
If the container is added to an existing stripe set, the stripe set can be explicitly specified using the ADD TO STRIPE SET option. Otherwise, it will be added to the existing table space, based on the size of the existing containers and the size of the new container. If the BEGIN NEW STRIPE SET option is specified, the container will be added to the end of the table space in a new stripe set. This will avoid any potential data rebalance.
Consider a table space created with the following statement:
create tablespace ts1 managed by database using
  (file 'cont0' 60,
  file 'cont1' 60,
  file 'cont2' 40)
  extentsize 10
Because each container will have a tag consuming one extent, the containers will then be able to hold five extents, five extents, and three extents of data, respectively, for a total of 13 extents.
The extent map for the table space would look like the following:
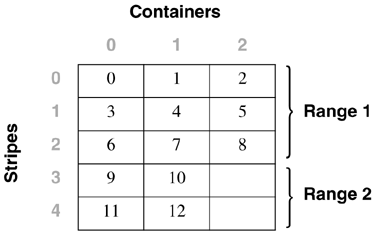
The table space map would look like the following:
Range    Stripe  Stripe  Max     Max    Start   End     Adj.   Containers
Number   Set     Offset  Extent  Page   Stripe  Stripe
[0]      [0]     0       8       89     0       2       0      3(0, 1, 2)
[1]      [0]     0       12      129    3       4       0      2(0, 1)
NOTE
The following examples show containers of different sizes within a table space for the purposes of illustration. For performance reasons it is recommended that containers within a table space be the same size.
Using the table space created above, a container can be added in the following three ways.
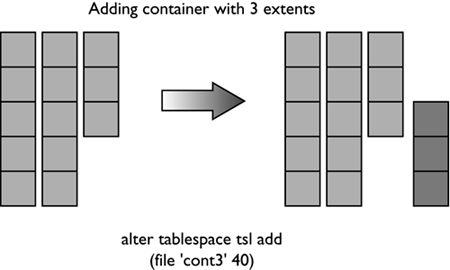
Because the new container is not large enough to go from Stripe 0 to the end of the existing table space, it is added such that its last extent lines up with the highest stripe currently in the table space.
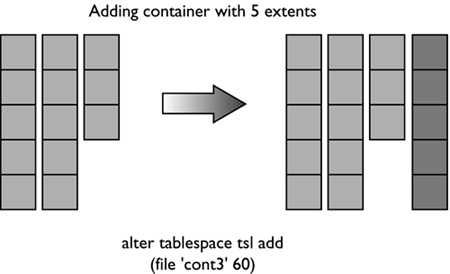
In this case, the container is just large enough to go from Stripe 0 to the end of the existing table space, so it will be added and begin at Stripe 0.
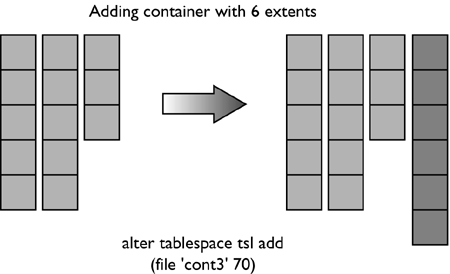
In this case, the container is more than large enough to go from Stripe 0 to the end of the existing table space, so it will be added to begin at Stripe 0 and extend past the current last stripe for the table space.
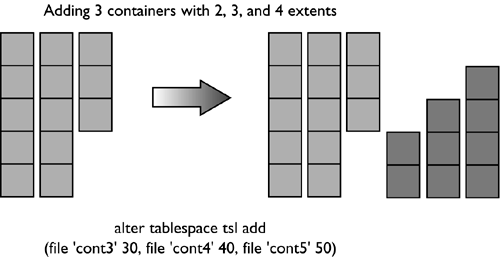
When adding more than one container in the same ALTER TABLESPACE statement, the rules are applied to each new container individually. For example:
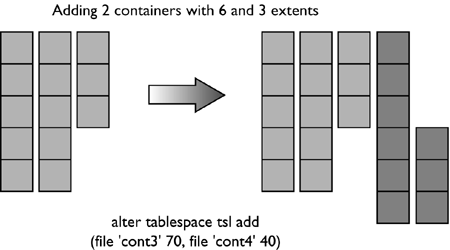
In this case, the first new container is more than large enough to go from Stripe 0 to the end of the existing table space, so it will be added beginning at Stripe 0 and will extend past the current last stripe for the table space. The second new container is not large enough to go from Stripe 0 to the end of the existing table space, so it will be added such that its last extent lines up with the highest stripe in the table space, which would be the top of the first new container.
In this case, none of the new extents are large enough to go from stripe zero to the end of the existing table space, so they will all be added such that their last extent lines up with the highest stripe currently in the table space.
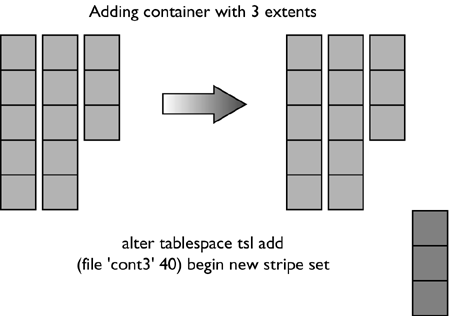
In the case where the BEGIN NEW STRIPE SET option is specified, the new container will be added to the table space, a new stripe will be created in the table space map, and the new container will start in this new stripe.
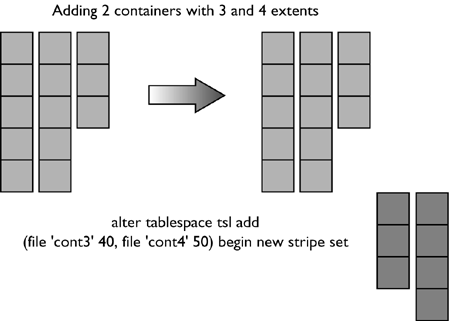
When the BEGIN NEW STRIPE SET option is specified and there are multiple containers added in the same ALTER TABLESPACE statement, a new stripe set is created in the table space map, and the new containers are appended to the existing map. Each of the new containers will be positioned such that they start in the same stripe, regardless of their size.
DROP: Used to drop or remove one or more containers from the specified table space.
EXTEND: Used to increase the size of existing containers within a table space by a specified amount. This can be applied to a specific container or to all containers, using the ALL CONTAINERS clause.
REDUCE: Used to reduce the size of existing containers within a table space by a specified amount. This can be applied to a specific container or to all containers, using the ALL CONTAINERS clause.
RESIZE: Used to change the size of existing containers to the specified size. This can be applied to a specific container or to all containers, using the ALL CONTAINERS clause. When resizing more than one container, they must all be increased or decreased in size. It is not possible to increase the size of some containers while reducing the size of other containers.
When altering a table space, it is possible to perform multiple operations within the same command. However:
The BEGIN NEW STRIPE SET clause cannot be specified in the same ALTER TABLESPACE statement as ADD, DROP, EXTEND, REDUCE, and RESIZE (unless those options are being directed to different database partitions).
The stripe set value specified with the TO STRIPE SET clause must be within the valid range for the table space.
When adding or removing space from a table space, the following rules must be followed:
EXTEND and RESIZE can be used in the same statement, provided that the size of each specified container is increasing.
REDUCE and RESIZE can be used in the same statement, provided that the size of each specified container is decreasing.
EXTEND and REDUCE cannot be used in the same statement, unless they are being directed to different database partitions.
ADD cannot be used with REDUCE or DROP in the same statement, unless they are being directed to different database partitions.
DROP cannot be used with EXTEND or ADD in the same statement, unless they are being directed to different database partitions.
Adding Containers to a Table Space
When a container is added to a table space, the existing data typically will need to be rebalanced among the new set of containers unless the BEGIN NEW STRIPE SET option is specified. The process of rebalancing involves the moving of table space extents from one container to another in an attempt to keep the data striped evenly within the table space.
Adding containers to a table space and any potential rebalance operation is an online, asynchronous operation, but it will impact the overall performance of the server.
As a graphical example of this, consider a table space initially defined with two containers, as follows:
CREATE TABLESPACE ts1
MANAGED BY DATABASE
USING (FILE 'FILE1' 50)
USING (FILE 'FILE2' 50)
EXTENTSIZE 10
This table space would be graphically represented as follows:

Adding a third container of the same size to the table space using the following statement:
ALTER TABLESPACE ts1
ADD (FILE 'FILE3' 50)
may cause the table space to be rebalanced, depending on the amount of data in the table space. If no tables had yet been created in the table space, there would be no need to perform a rebalance; however, the table space map for the table space would still be changed and would then look like the following:
To show how DB2 would modify the internal table space extent maps and space maps, the following example will add a container with a length of 30 pages to the table space dmsspc, created previously with the following command:
ALTER TABLESPACE dmsspc
ADD (FILE '/tbspcs/cont4' 30)
This would add the container to the existing stripe set (because BEGIN NEW STRIPE SET was not specified) and would produce an extent map as shown below. If there were data in Extents 3 or higher before the container was added, the data would need to be rebalanced.
The table space map would look like the following:
Range    Stripe  Stripe  Max     Max    Start   End     Adj.   Containers
Number   Set     Offset  Extent  Page   Stripe  Stripe
[0]      [0]     0       7       79     0       1       0      4(0, 1, 2, 3)
[1]      [0]     2       9       99     2       2       0      2(0, 2)
[2]      [0]     3       10      109    3       3       0      1(0)
ALTER TABLESPACE dmsspc
  ADD (FILE '/tbspcs/cont4' 30)
  BEGIN NEW STRIPE SET
Adding a 30-page container to the table space dmsfiletbspc, created previously, with the BEGIN NEW STRIPE SET option specified, as above, would produce the extent map below.
The table space map would look like the following:
Range     Stripe  Stripe  Max     Max    Start   End     Adj.   Containers
Number    Set     Offset  Extent  Page   Stripe  Stripe
[0]       [0]     0       11      119    0       3       0      3 (0, 1, 2)
[1]       [1]     0       13      139    4       5       0      1 (3)
Dropping Containers from a Table Space
In DB2 Version 8, containers can be removed, or dropped, from an existing DMS table space. This can allow unused space to be freed back to the system for other file systems, or can also allow the reuse of the space for containers in another table space.
A container cannot be dropped from a table space if there will not be enough space in the table space to hold the existing data. Therefore, before dropping a container from a table space, it is a good idea to examine the table space high water mark and also to determine how much space is used and how much space is available to ensure that there is enough free space on the remainder of the containers to hold the data.
For the table space created using:
CREATE TABLESPACE tblspc
MANAGED BY DATABASE
USING (FILE '/tblspcs/cont1' 50,
       FILE '/tblspcs/cont2' 40,
       FILE '/tblspcs/cont3' 40)
EXTENTSIZE 10
The extent map would look like the following:

The table space map would look like the following:
Range     Stripe  Stripe  Max     Max    Start   End     Adj.   Containers
Number    Set     Offset  Extent  Page   Stripe  Stripe
[0]       [0]     0       8       89     0       2       0      3 (0, 1, 2)
[1]       [0]     0       9       99     3       3       0      1 (0)
To free up disk space back to the file system, the third container in the table space could be dropped with the following command:
ALTER TABLESPACE tblspc
  DROP (FILE '/tblspcs/cont3')
This would remove the container from the existing stripe set and would produce an extent map as shown below.
If there were data in any of the extents in the container, the data would need to be rebalanced before the container can be physically removed from the table space. Once the rebalance has completed, the table space map would look like the following:
Range     Stripe  Stripe  Max     Max    Start   End     Adj.   Containers
Number    Set     Offset  Extent  Page   Stripe  Stripe
[0]       [0]     0       5       59     0       2       0      2 (0, 1)
[1]       [0]     0       6       69     3       3       0      1 (0)
For a table space with five containers created using the following command:
CREATE TABLESPACE 5contspc
MANAGED BY DATABASE
USING (FILE 'd:\cont0' 5000,
       FILE 'e:\cont1' 5000,
       FILE 'f:\cont2' 5000,
       FILE 'g:\cont3' 5000,
       FILE 'h:\cont4' 5000)
removing Containers 2 and 4 from the table space could be done in two ways. The ALTER TABLESPACE statement could be called twice, once for each container, as follows:
ALTER TABLESPACE 5contspc
DROP (FILE 'f:\cont2')

ALTER TABLESPACE 5contspc
DROP (FILE 'f:\cont2')
Or the ALTER TABLESPACE statement could be called once, specifying both containers in the same statement, as follows:
ALTER TABLESPACE 5contspc
DROP (FILE 'f:\cont2', FILE 'f:\cont4')
In the second case, calling the ALTER TABLESPACE statement once and specifying both containers to be dropped would be the best option because DB2 would need to do two complete rebalances if the containers were dropped one at a time. By dropping both containers in the same statement, DB2 builds a new extent map for the table space and has to do only one rebalance.
The table space high water mark
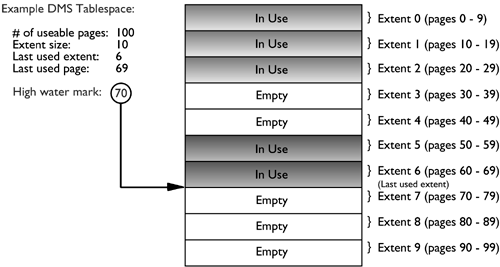
The table space high water mark is very important when dropping containers from a table space or shrinking the containers within a table space. The high water mark is relevant only for DMS table spaces, and it represents the first page after the highest page number that has been allocated within the table space. The high water mark is not necessarily the same as the number of used pages because some objects may have been deleted from within the table space, and these unused pages do not have an effect on the high water mark. To illustrate this concept further, consider the following example.
A table space has 100 useable pages, and its extent size is 10 (i.e., there are 10 extents available in the table space, not including the container tag).
By default, extents 0, 1, and 2 will be used for the table space overhead.
Create table T1.
Extent 3 will be allocated for the object map.
Extent 4 will be allocated for the table object.
Create table T2.
Extent 5 will be allocated for the object map.
Extent 6 will be allocated for the table object.
Drop table T1.
Extents 3 and 4 will be freed up for reuse.
There will be four extents in use, which means that the total number of pages used by the tables would be 40.
The highest allocated page number in this table space is 69, which means that the high water mark is 70 (69 + 1).
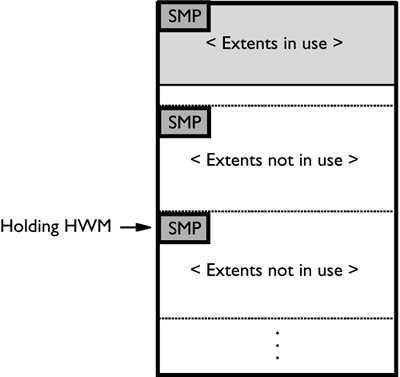
Figure 1.10 illustrates the example above and shows the high water mark for the table space. As shown, Extents 3 and 4 are empty because the table (T1) was dropped and its extents freed up to be reused within the table space. However, the extents for table T2 still occupy Extents 5 and 6, so the high water mark is page 70.
Figure 1.10. The table space high water mark.
Lowering the table space high water mark
If there are no unused extents below the current high water mark for a table space, the high water mark cannot be lowered without dropping one or more objects stored in the table space.
In the example in Figure 1.10, the high water mark is at page 70; however, there are 20 pages (two extents) of empty space below the high water mark. The table space high water mark could be lowered by reorganizing an existing table or by exporting an existing table, dropping it, recreating the table, then importing or loading the data into the new table. However, in both of these cases, it is important to know which object is holding the high water mark so that it can be reorganized or unloaded/dropped/loaded. This information can be found using DB2DART with the /DHWM option. This option will provide the following information:
A map of the extents in the table space, showing the objects owning the extents
The object ID and object type of the object holding the high water mark extent
Information about the high water mark extent
The number of free and used extents below the high water mark
The /LHWM option of DB2DART helps in lowering the high water mark for the table space. When this option is specified, the table space ID and a desired high water mark for the table space must also be specified. Although there is no guarantee that the current high water mark will be able to be lowered to the desired value, using a value of zero tells DB2 to determine the lowest possible value. The output of the DB2DART tool will then be a list of the required actions that must be executed (i.e., reorg, export, load). For each step in the above list, there will be an estimate of the number of used and free extents below the high water mark so that a DBA can determine the benefit of each step in the process and determine whether to perform all of the steps. The DB2DART tool makes some assumptions about the affects of the suggested operations, so the resulting high water mark may be higher or lower than the specified value.
NOTE
For a partitioned database, DB2DART knows about the table space information and high water mark on only the partition where it is being run.
The /RHWM option of DB2DART can be used to remove space map extents within a table space that are no longer required. Within a DMS table space, DB2 places a space map extent at regular intervals in the table space to record the extent usage for a set of extents within the table space. If a table space has had a lot of data deleted from it, there may be space map pages that no longer point to used pages in the table space; however, they are not removed when the data is deleted. The /RHWM option of DB2DART will look for any unneeded space map pages and remove them from the table space to potentially reduce the high water mark.
Figure 1.11 shows a graphical example where there are two table space map extents that have been allocated but are no longer being used because the pages above the table space map extent are not in use. The /RHWM option of DB2DART would remove the last two table space map extents and, therefore, move the high water mark up to the end of the used space.
Figure 1.11. Space map extent holding high water mark.
The dropping of existing table space containers is only allowed if the number of extents in the container(s) being dropped is less than or equal to the number of free extents above the high water mark in the table space. The number of free extents above the high water mark in the table space is important because all extents up to and including the high water mark must be able to fit in the same logical position within the table space. The altered table space must have enough space to hold all of the data.
Extending/Enlarging Containers in a Table Space
Although an existing table space can be made larger by adding one or more containers, this may require a rebalance of the existing data. Another way to make the table space larger without adding containers is to make the existing containers larger. This can be done using the EXTEND or RESIZE options on the ALTER TABLESPACE statement.
Extending a table space container increases the size of the container by the specified amount. Resizing a table space container changes the size of the container to the specified size.
The EXTEND or RESIZE options on the ALTER TABLESPACE statement will not require a table space rebalance under the following conditions:
The existing containers are all the same size.
The existing containers are not the same size, but none of the existing containers have filled so that there is data in one or more containers above the highest stripe in any other container in the table space.
For the table space created using:
CREATE TABLESPACE tblspc
MANAGED BY DATABASE
USING (FILE '/tblspcs/cont1' 50,
       FILE '/tblspcs/cont2' 40,
       FILE '/tblspcs/cont3' 40)
EXTENTSIZE 10
The extent map would look like the following:

The table space map would look like the following:
Range     Stripe  Stripe  Max     Max    Start   End     Adj.   Containers
Number    Set     Offset  Extent  Page   Stripe  Stripe
[0]       [0]     0       8       89     0       2       0      3 (0, 1, 2)
[1]       [0]     0       9       99     3       3       0      1 (0)
To add more space to the table space, containers cont2 and cont3 can be increased in size by one extent. This adds space above the existing high water mark, coincidentally ensuring that no rebalance takes place. This could be done using either of the following statements:
ALTER TABLESPACE tblspc
EXTEND (FILE '/tblspcs/cont2' 10,
        FILE '/tblspcs/cont3' 10)

ALTER TABLESPACE tblspc
RESIZE  (FILE '/tblspcs/cont2' 50,
         FILE '/tblspcs/cont3' 50)
This would cause DB2 to build a new table space extent map, as shown below.

The new table space map would look like the following:
Range    Stripe  Stripe  Max     Max    Start   End     Adj.   Containers
Number   Set     Offset  Extent  Page   Stripe  Stripe
[0]      [0]     0       11      119    0       4       0      3 (0, 1, 2)
The following examples use the table space created by the statement:
CREATE TABLESPACE TS1
MANAGED BY DATABASE
     USING (FILE 'cont0' 1000,
     DEVICE '/dev/rcont1' 2000)
There are two ways in which to change the size of the file container (cont0) from 1,000 pages to 2,500 pages.
ALTER TABLESPACE TS1 EXTEND (FILE 'cont0' 1500)      [2500-1000=1500]

ALTER TABLESPACE TS1 RESIZE (FILE 'cont0' 2500)
To change the size of the device container from 2,000 pages to 3,000 pages, either of the following statements could be used:
ALTER TABLESPACE TS1 EXTEND (DEVICE '/dev/rcont1' 1000)[3000-2000=1000]

ALTER TABLESPACE TS1 RESIZE (DEVICE '/dev/rcont1' 3000)
To increase the sizes of both containers in the table space by 1,000 pages, any of the following statements can be used:
ALTER TABLESPACE TS1 EXTEND
     (FILE 'cont0' 1000,
     DEVICE '/dev/rcont1' 1000)
ALTER TABLESPACE TS1 EXTEND (ALL 1000)
ALTER TABLESPACE TS1 EXTEND (ALL CONTAINERS 1000)
ALTER TABLESPACE TS1 RESIZE
     (FILE 'cont0' 2000,                             [1000+1000=2000]
     DEVICE '/dev/rcont1' 3000)                      [2000+1000=3000]
To extend all of the containers in the table space by 100 MB, the following statement could be used:
ALTER TABLESPACE TS1 EXTEND (ALL CONTAINERS 100 M)
To change the size of both containers in the table space to 4,000 pages, any of the following statements can be used:
ALTER TABLESPACE TS1 RESIZE
     (FILE '/dir/c0' 4000,
     DEVICE '/dev/rdev1' 4000)
ALTER TABLESPACE TS1 RESIZE (ALL 4000)
ALTER TABLESPACE TS1 RESIZE (ALL CONTAINERS 4000)
ALTER TABLESPACE TS1 EXTEND
     (FILE 'cont0' 3000,                             [4000-1000=3000]
     DEVICE '/dev/rcont1' 2000)                      [4000-2000=2000]
To change the size for all of the containers in the table space to 100 MB, the following statement could be used:
ALTER TABLESPACE TS1 RESIZE (ALL CONTAINERS 100 M)
Reducing/Shrinking Containers in a Table Space
An existing table space may be made smaller by dropping one or more containers from the table space. However, for performance reasons, this may not be the best option. Normally, the containers in a table space are placed on separate physical disks to take advantage of the maximum amount of I/O parallelism. By removing a container, the underlying disk is no longer used by the table space, and the I/O is then spread over a smaller number of disks. This can adversely affect the performance of the database.
To overcome this, DB2 Version 8 allows containers within a table space to be shrunk. This can be done using either the RESIZE or REDUCE options on the ALTER TABLESPACE statement.
Reducing a table space container decreases the size of the container by the specified amount. Resizing a table space container changes the size of the container to the specified size, which can be larger or smaller than the original size.
For the table space created using:
CREATE TABLESPACE tblspc
MANAGED BY DATABASE
USING (FILE '/tblspcs/cont1' 50,
       FILE '/tblspcs/cont2' 40,
       FILE '/tblspcs/cont3' 40)
EXTENTSIZE 10
The extent map would look like the following:

The table space map would look like the following:
Range    Stripe  Stripe  Max     Max    Start   End     Adj.   Containers
Number   Set     Offset  Extent  Page   Stripe  Stripe
[0]      [0]     0       8       89     0       2       0      3 (0, 1, 2)
[1]      [0]     0       9       99     3       3       0      1 (0)
To reduce the size of the table space, containers cont2 and cont3 can be reduced in size by one extent. This could be done using either of the following statements:
ALTER TABLESPACE tblspc
REDUCE (FILE '/tblspcs/cont2' 10,
        FILE '/tblspcs/cont3' 10)

ALTER TABLESPACE tblspc
RESIZE  (FILE '/tblspcs/cont2' 30,
         FILE '/tblspcs/cont3' 30)
This would cause DB2 to build a new table space extent map, as shown below.

The new table space map would look like the following:
Range    Stripe  Stripe Max      Max    Start   End    Adj.   Containers
Number   Set     Offset Extent  Page    Stripe  Stripe
[0]      [0]     0      5       59      0       1      0      3 (0, 1, 2)
[1]      [0]     2      7       79      0       3      0      1 (0)
The following examples use the table space created by:
CREATE TABLESPACE TS1
MANAGED BY DATABASE
     USING (FILE 'cont0' 100 M,
     DEVICE '/dev/rcont1' 200 M)
There are two ways in which to change the size of the file container (cont0) from 100 MB pages to 50 MB.
ALTER TABLESPACE TS1 REDUCE (FILE 'cont0' 50 M)
ALTER TABLESPACE TS1 RESIZE (FILE 'cont0' 50 M)
To change the size of the device container from 200 MB to 100 MB, either of the following statements could be used:
ALTER TABLESPACE T


