Section 3.3. Your Blog, Quick Start
The best demonstration of the simplicity and ease of use of Blogger is to create a Blogger account, then create your first blog ? a process that takes five minutes from start to finish.
3.3.1 Creating Your Blogger Account
To set up a Blogger account, access the main Blogger web site at http://blogger.com. In the page that opens, there's a box in the center titled "Create your own Blog" and a button labeled Start Now!. Click the button to go to the signup page, shown in Figure 3-2.
Figure 3-2. Blogger account sign-up page
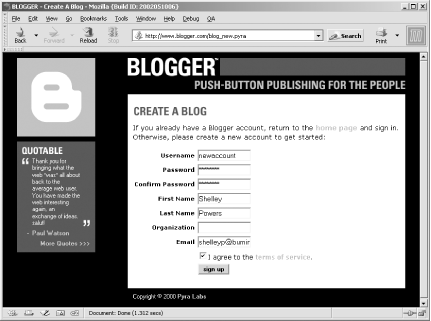
Enter your preferred username and password, your name and email address, and your organization, if any. Don't reuse a password from another system you have access too ? the web traffic between you and Blogger is not encrypted, and your password may be emailed to you in plain text. By picking a unique password, you ensure that a malicious packet sniffer can gain access only to your Blogger account and not your email, ISP account, etc.
If you don't see the Start Now! button on the Blogger main page, look for a form with the words "If you don't have a blogger account, sign up!". In the form, type in your Blogger username and password. When you submit the form, you are taken to a second page to type in the rest of the account information.
You only have to create a Blogger account once; you can use the one account to create many different blogs.
3.3.2 Creating Your First Blog
Once you have your Blogger account, you can log into your account and begin using the blogging tool by going to the Blogger main page and entering your username and password. At this point, you can also check the option box labeled "Remember me?" to have the web site remember your login information and log you in automatically every time you access Blogger.
Once logged in, click on the link labeled Create a New Blog, listed on the front page. In the page that opens, provide a title and description. As you'll see later in this chapter, this information can be printed on your blog page if you so choose. For the demonstration blog, we'll use "O'Reilly's Weblogging" as the title, and the following for the description:
All you ever wanted to know about starting and maintaining a Blogger weblog
You can also choose to publicize the blog through the Blogger Directory (http://www.blogger.com/directory/lastUpdateDirectory_1.pyra) by checking the Public Blog option. Because you're just starting the blog and trying out the tool, you won't want people coming around and peeking over your shoulder, so choose No for now ? you can change this later.
The next page asks if you want to host the blog on your own server or host it at BlogSpot. This option is covered in more detail in Section 3.9. For now, accept the default of hosting the page on BlogSpot, an option that can be changed later.
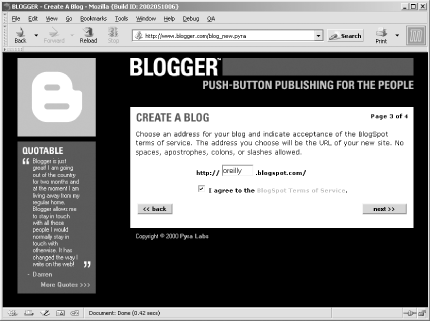
The third page that opens asks you to provide a physical name for the blog. It, combined with the blogspot.com domain, forms the URL by which your blog is accessed by your reading public. For example, choosing "hemp" here would give your blog the URL http://hemp.blogspot.com. Use a name you won't mind being publicly known by and one that is easily remembered.
In the example shown in Figure 3-3, I used "oreilly" as the name. I also checked the box agreeing with the Blogger Terms of Service required to use Blogger, which you'll want to take time to read ? carefully ? before proceeding with posting your first publicly accessible blog posting.
Figure 3-3. Providing a blog URL and agreeing to the Blogger TOS
After creating the URL, a template page opens, displaying a set of predefined blogging templates. Templates form the basis for how the content is displayed and organized within your blog. Pick one from the list in order to proceed; don't worry if you don't like the selection ? later in the chapter, we show you how to easily change the template.
Only a random sampling of the Blogger templates are shown on this page. For the demonstration blog, I've picked one of the most commonly used templates within Blogger, the Chroma template. For your own blog, if this template doesn't show, pick any of the others that are displayed. Click the Finish! button at the bottom of the page to finish the process of creating your default blog. You're now ready to starting posting.
3.3.3 Posting
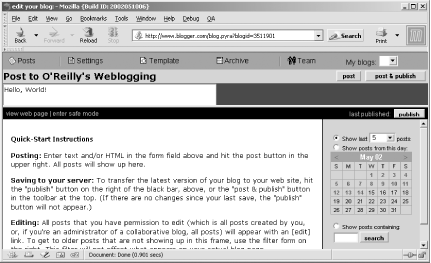
Once Blogger is finished creating the default blog, the Edit view page opens. The top part of the page is an open text box where you enter your content. This is headed by a toolbar containing content-formatting buttons, as well as buttons to Post or Post & Publish the content. The bottom part of the framed application page will usually contain previous postings but first contains posting instructions. To the right of this is a calendar with which to access specific day's postings and a search option with which to search among previous postings.
To add a post, type something into the text box at the top of the page. You don't have to use HTML ? the Blogger tool will generate enclosing HTML tags for your text. Type in the ubiquitous "Hello, World!" as shown in Figure 3-4.
Figure 3-4. Typing in your first posting
Once you've typed your test message, post and publish it to the blog by clicking the Post & Publish button. This not only stores the content you just typed into the Blogger-maintained databases, it also generates your first blog page.
Once you publish the content, you can view the blog page by typing the URL into your browser or clicking on the link labeled View Web Page, located in the bottom frame of the tool.
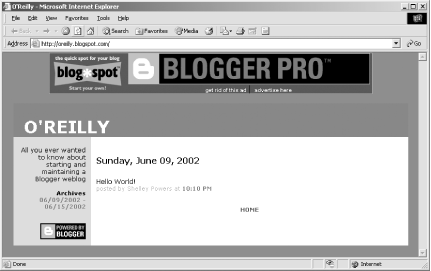
In the generated page, an ad is placed across the top. This is due because your blog is hosted on BlogSpot. The ad can be removed if you pay a set fee of $12 a year per blog. If you're content with the default implementation of the blog, as shown in Figure 3-5, you can continue adding new content to the existing blog, or you can customize your blog using techniques discussed later in the chapter.
Figure 3-5. Blog displaying your first posting