Section 6.4. Customizing the Archive
Take a look again at the blog page screen shot in Figure 6-11. Notice the format of the archive list ? a date range, with each archive accessible via a different hypertext link. Over time, this list can get quite large and take up considerable room in your page.
Rather than list each archive link within the main blog page, you can host a separate Archive index page that contains the list of archived items. Then, within the blog page, attach a link to this page rather than the individual archive items.
6.4.1 Creating a Custom Archive Page
To demonstrate how to create an Archive index page, within the Archive view, click the Archive template option in the upper righthand side of the page. A new page opens showing a small template used to print out the archive history links. As displayed in Example 6-3, the content doesn't contain any HTML elements.
Example 6-3. Blogger archive listing text
<Blogger>

    document.write("<a href='<$BlogArchiveLink$>'><$BlogArchiveName$></a><br>")

</Blogger>

if (location.href.indexOf("archive") != -1) {

document.write("<a href=\"./\">current >></a>")

}
The content of the Archive template is so simple because the content is normally opened within the template page, using JavaScript:
<script type="text/javascript" src="<$BlogArchiveFileName$>"></script>
When the file is opened in the blog page, JavaScript prints out the archive links.
To create a separate archive page, copy the blog template to the Archive template and then adjust the contents to display archive links rather than postings. The steps to do this are:
Open the Archive view and then the Archive template.
Make a backup of the template and then access the Template view.
Copy the template and then return to the Archive view.
Open the Archive template and paste the copied template text at the top of the file, being careful not to overwrite the existing text.
In the copied material, remove the left column by removing the leftmost td tag. You'll also need to remove colspan=2 from the top row of the table.
Modify the CSS for the page, changing the anchor tag style to:
A  {font-weight:bold;text-decoration:none; font-size:

smaller}
Replace the Blogger block within the copied template with the Blogger block of the Archive template.
Remove the reference to Home from the newly modified template syntax.
Save your changes and republish all the archive files.
Once you've adjusted the archive template, change the main blog template to remove the JavaScript surrounding the archive file call and replace it within a link to the archive filename:
<a href="<$BlogArchiveFileName$>"><b>Archives</b></a>
After saving the template changes, republish the archive files and then the blog page.
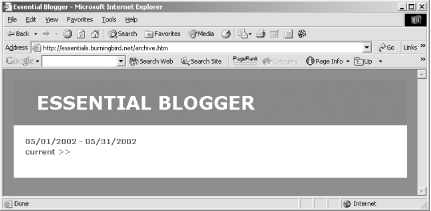
When you view the blog main page, you'll now have a link to the archive file rather than a list of archive files. Clicking on this link will open the Archive index file, which should look similar to Figure 6-12.
Figure 6-12. Blog archive index file
To make this transition easier, Example 6-4 contains the complete text of the Archive template.
Example 6-4. Complete example text
<!DOCTYPE HTML PUBLIC "-//W3C//DTD HTML 4.0 Transitional//EN">


<html>

<head>

  <title><$BlogTitle$></title>

<style>

body {background:#666666;margin: 0px;font-family: Verdana, Arial, sans-serif}

.blogtitle{font-family: Verdana, Arial, sans-serif;color: white;

    font-size:32px;margin-left:20px;margin-bottom:1px; text-transform:uppercase;}

A  {font-weight:bold;text-decoration:none; font-size: smaller}

A:hover {color:red;}

</style>

</head>


<body bgcolor="#666666" marginwidth="0" marginheight="0"

      link="#336699" vlink="#003366" alink="red">

<br>

<div align="center">

<table width="95%" align="center" border="0" cellspacing="0" cellpadding="20">

<tr>

<td bgcolor="#336699" height="65" valign="bottom">

<div class="blogtitle"><b><$BlogTitle$></b></div></td>

</tr>

<tr>

<td bgcolor="white">

<Blogger>

<script type="text/javascript">

     document.write("<a href='<$BlogArchiveLink$>'><$BlogArchiveName$></a><br>");

</Blogger>

if (location.href.indexOf("archive") != -1) {

document.write("<a href=\"./\">current >></a>")

}

</script>

<br>

<br>

</tr>

</table>

</body>

</html>
You can get more creative with this file if you wish. A good place to see variations of handling archive script is at Phil Ringnalda's Archive Script web site at http://www.philringnalda.com/archivescripts/.
6.4.2 Changing the Location of the Archive Files
Archive files are stored in the same directory as the blog files by default. If you prefer to have the archive files located in a subdirectory, such as one named archives, you'll need to change the archive file location and adjust the main blog page template.
Before proceeding with changes to the Blogger templates and settings, create an archives subdirectory. If you don't have one already created, you'll get an error when you attempt to generate the archive files. Once the subdirectory is created, open the Archive view, and then the archive settings.
Within the archive settings, change the FTP Archive path to add the new subdirectory. For instance, in the Essentials blog, we changed the path to:
/usr/local/www/vhosts/essentials.burningbird.net/htdocs/archives
Once you've made this change, save it and then open the Template view.
In the Template view, add the subdirectory in front of the Archive filename in the link:
<a href="/archives/<$BlogArchiveFileName$>"><b>Archives</b></a>
You'll also need to adjust the permalink for each posting. In the Template view, modify the permalink text to the following:
<span class="byline">posted by <$BlogItemAuthor$> at

<a href="/archives/<$BlogItemArchiveFileName$>#<$BlogItemNumber$>">

<$BlogItemDateTime$></a></span></div>
Once these changes are saved, republish all your archive files first, and then the main blog page. If all goes well, your archive files appear in the new subdirectory and you'll be able to access them from your blog page. You'll have to manually remove the previously generated archive files ? this action doesn't clean up the existing files. Additionally, don't forget to change the "current" reference in the Archive template to point to the main blog page directory.


