Section 7.2. Radio Techniques
This section explains some of the quick things you can do with Radio. Among the topics covered in this section are shortcuts, publishing to your blog via email, learning to use Radio's automatic updating, republishing your entire blog, and backing up your Radio data.
7.2.1 Shortcuts
Shortcuts are a unique feature in Radio that makes entering content into your blog postings easier, faster, and more accurate. Shortcuts replace quoted text (e.g., "tds") with other, generally longer, text ("The Daily Show with Jon Stewart"). The text in quotes is the shortcut's name.
Shortcuts can include full HTML content, such as an image reference, a URL, or both. When you are writing or editing a blog post, you see the name of the shortcut not its value. When Radio publishes your posting to your blog, the shortcut's name is replaced with its value. Shortcuts can be changed globally across all blog entries just by completely republishing your blog. Instructions on how to republish your entire blog are at the end of this section.
7.2.1.1 Automatic shortcuts
An automatic shortcut is created when you publish a blog entry with a title. Radio automatically takes that title and makes a shortcut out of it. For example, if you published a book review of Perl programming books that had a title of Perl Books you could always create a link to that post by putting "Perl Books" into a blog entry.
To prevent the "Perl Books" shortcut from being expanded, put backslashes in front of the quotes:
\"Perl Books\"
Radio treats backslashed quotes as literal quotes, so the string that appears in your final blog is simply "Perl Books" and not a link to the Perl Books post.
7.2.1.2 Creating your own shortcuts
You can also create your own shortcuts. Your own shortcuts can, for example, convert text into URLs, insert boilerplate, and even insert the HTML code for images. For example, my shortcut "virgil" inserts a picture of my cat Virgil and the shortcut "fuzzyweb" inserts a link to my web site, http://www.fuzzygroup.net/.
To create your own shortcut, click on Shortcuts in the Radio command bar. This displays the Radio Shortcuts screen, shown in Figure 7-1.
Figure 7-1. Adding shortcuts
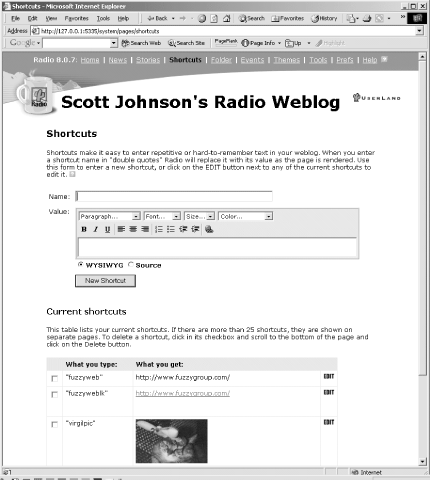
In the Name field, enter the name of the shortcut. This is the text you type, enclosed by quotation marks, that inserts the body of the shortcut in your web page when it is published. You do not need to type the quotes.
In the Value field enter the body of the shortcut. This can include URLs, pictures that you paste into the WYSIWYG editor, plain text, and more. You can also customize the HTML code for the shortcut by source editing the entry.
To save the shortcut, click the New Shortcut button. This saves your shortcut and displays the list of all shortcuts below the value field. If you need to change the shortcut, click the Edit button. If you need to delete a shortcut, select the checkbox on its left and click the Delete button.
A useful tip for creating shortcuts is using a consistent naming style. For example you might use "donkeypic" for a picture of a donkey and "donkeylk" for a link to the Donkey site.
7.2.2 Using Mail-to-Weblog to Post to Your Weblog
Mail-to-Weblog lets you update your blog by mailing in postings from any email account, or even a Yahoo! Mail or Hotmail account. Within corporations, many firewalls block FTP, so if your blog isn't hosted at radio.weblogs.com, your only option may be Mail-to-Weblog. Be careful with this, though, and make sure you understand it completely before you begin to use it with Radio ? if you configure Mail-to-Weblog incorrectly, you can lose email messages from your mailbox.
You need a POP compatible email account that can be dedicated to the Mail-to-Weblog feature. Radio retrieves and deletes any messages in the account that it monitors. If you use your main email account for Mail-to-Weblog, you will lose email messages (don't do that). Here's what you need to configure Mail-to-Weblog:
- The account name
-
This is usually either accountname or accountname@somedomain.com. We recommend that you call it something easy to remember like myblog@domain.com.
- The POP server
-
This is often something like mail.somedomain.com. Check with your ISP.
Once your mail account is set up, follow these steps to configure Radio to publish to your blog via email:
Click on the Prefs link in the Radio command bar.
Click on the Mail-to-Weblog option. You should see a screen like Figure 7-2.
Figure 7-2. Mail-to-weblog form
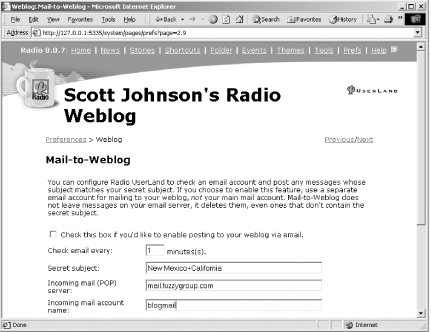
Check the checkbox to turn on this feature.
Security for Mail-to-Weblog is handled by a "Secret Subject" approach. What this means is Radio will only post your email to your blog if the subject line matches your "Secret Subject." Don't pick something obvious or anyone who knows the account name can publish to your blog.
Fill out your Radio password in both fields.
Click Submit.
To submit a blog entry via email, send a message to the account you set up. The subject line of the message must be your secret subject.
Until you have used this feature several times, you should check your blog carefully to ensure that the correct information and formatting is posted to your blog. Mail software can add footers and headers to messages, or even mangle them as attachments, so it pays to confirm that your blog isn't garbled.
7.2.3 Categories
The Categories feature, which is disabled by default in Radio, lets you segment and organize your blog into different types of content. For example, you might write a blog that mentions your work but also talks about your personal life and your hobbies. You could create categories for Work and Play, then assign each blog post to one category or the other. Radio then automatically creates separate index pages (which can be separately themed) for each category.
Although you can create your own categories, Radio includes several predefined categories: Home Page, My Hobbies, My Organization, My Friends, My Interests, and My Profession. By default, everything is tagged for Home Page. You can turn it off if you want, but the custom for categorized blogs is to have the home page include everything.
If you are trying to blog information that you don't want most people to see, turn off the Home Page category and send people that need the contents the URL of the category. These are some example category URLs:
- http://www.fuzzyblog.com/categories/
- http://www.fuzzyblog.com/categories/marketing101/
7.2.3.1 Enabling categories
By default, categories are turned off in Radio. The Prefs screen lets you turn them back on. Click on Prefs in the Radio command bar. Under the Blog grouping, click on Categories, then check the box for categories. Click Submit, then reload the new blog entry page.
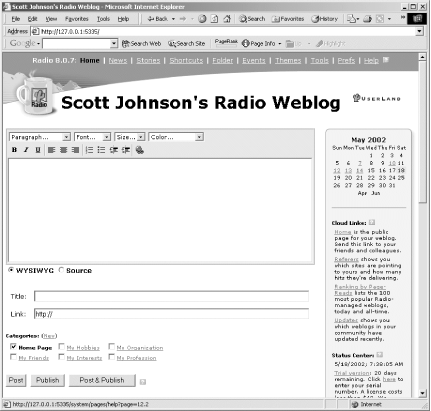
At the bottom of the editing area, above the Post to Weblog button, are six checkboxes that, when selected, assign something to one or more categories. You will also see that the Home Page category is selected by default. This is shown in Figure 7-3.
Figure 7-3. Categories for new blog entries
7.2.3.2 Creating your own categories
Although Radio has built- in categories, you probably want to create your own that are better suited to the needs of your blog. To create a new category, click on Prefs in the Radio command bar. Under the Blog grouping, click on Categories, and then follow the New Category link. This gives you the New Category options page shown in Figure 7-4.
Figure 7-4. Creating new categories
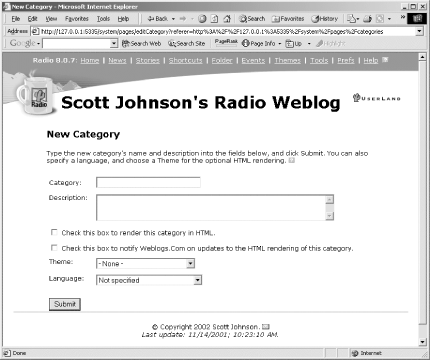
Enter the name of the category. This can be anything you like, including multiple words, provided that it doesn't conflict with an existing category. It is recommended that you use only letters, numbers, and spaces for category names. Fill out the category description.
Turn on the Render as HTML option as needed. This controls whether or not Radio builds a full home page and calendar entries for your category. This really treats your category as a blog within a blog. You generally turn this on only when you want people to go directly to your category and see the rolling group of entries. In other words, you turn this on when people use a category as a destination within your blog in and of itself. If you just want people to see your category from an RSS feed or linked to from your home page, leave this option off.
Turn on the Notify option as needed. Normally, whenever you post an entry to your blog, Radio notifies the central server at weblogs.com of your update, allowing others in the blogging community to see your update. If you are using categories to segment your blog so that material stays private, you want to leave this option off.
Select a theme for the category. Radio defaults all new categories to the default theme, so if you aren't using the default theme for your blog then you probably should select a theme for the category.
Select the language in which your blog is written. Click Submit to create the category.
When you refresh the New Blog Entry page, you should see a new category at the bottom of the screen listed with the other existing categories that Radio supplies by default.
|

7.2.3.3 Assigning posts to categories
If you have Categories turned on, before you publish your post, select the categories to which you want to assign the post and click Publish. Edit old posts to assign them to the new category.
7.2.3.4 Advanced categories
Although additional information on categories is beyond the scope of this chapter, you should be aware that Categories is a very powerful, very extensible feature. Categories are how you make multiple blogs from Radio. Each blog can be represented by a category, and postings can be routed to different blogs just by selecting the category that represents the destination blog. This is a powerful content management feature built into every copy of Radio.
7.2.4 Using the Blogger API in Radio
Radio fully supports the Blogger API standard so you can take advantage of any tool that supports it. Not only can you post to other blogs from Radio (see the Manila-Blogger Bridge tool describe in Chapter 2), but you can also use any of the desktop blogging clients in Chapter 2 to post to your Radio UserLand blog.
To use the Blogger API in Radio, click on the Prefs link in Radio's command bar. Under Internet and Server Settings, choose the Blogger API in Radio option. Turn on the checkbox to enable the Blogger API and click Submit. This allows your copy of Radio to accept data from a Blogger API-compatible tool. When you are using such a tool, you have to tell it where your blog is located on your local machine. Here are the normal settings: http://127.0.0.1:5335/RPC2/ (the destination to which the tool should post blog entries), your username and password, and a blog ID of "home" (no quotes; this is required).
Please note that Blogger API support in Radio provides both import and export support for moving your blog entries between systems. This is obvious when you think about it but not apparent when you are used to a file-based approach to importing and exporting.


