Network-Based Application Recognition
Network-Based Application Recognition (NBAR) was introduced in Cisco IOS 12.0(5)XE2. NBAR normally is used to implement QoS functions on a router. It ensures that critical applications receive the necessary bandwidth to function correctly. QoS parameters that NBAR can use when setting up QoS for a connection include bandwidth, delay, jitter, and packet loss. This is accomplished by identifying applications or connections and associating them with a class. The Cisco IOS then can use these classes to implement QoS.
Components of QoS
QoS includes the following six components:
Classification
Marking
Congestion management
Congestion avoidance
Link-efficiency mechanisms
Policy and shaping
Classification is used to separate different kinds of traffic into distinct groups. When dealing with QoS, like kinds of traffic typically are grouped together. For example, all voice connections would be placed in a voice classification group, all video applications would be placed in a video classification group, and so on. The traffic is marked based on the classification. For example, if the traffic was Layer 3 traffic, the (Type of Service [ToS]) field in the IP packet header is used to contain the packet's classification or grouping. This is done through the IP Precedence or DSCP method of marking.
When they are marked, this router and other devices beyond this router can use the marking to manage congestion (typically through the use of queuing), avoiding congestion (by dropping low-priority traffic), compressing traffic, and shaping traffic (by enqueuing traffic and sending it out at a constant pace). Obviously, there is a lot more going on with QoS than the brief description I have given.
NBAR and Classification
Classification is the first step in implementing QoS. NBAR can be used to implement classification. NBAR is a Cisco IOS classification engine that inspects packets and classifies them based on their application type. This can be something as simple as examining the TCP or UDP port numbers in the transport header of a segment, or it can as complex as examining information in HTML headers or web content. Basically, NBAR can inspect traffic from Layers 3 through 7. This inspection can look for the following types of information:
TCP and UDP port numbers in the transport-layer segment header
Dynamic TCP and UDP port numbers assigned for additional connections for an application, such as FTP (similar to the inspection process that CBAC uses when examining applications that open additional connections)
Subport information, which is information contained in the application layer data, such as application commands or data types
Layer 3 IP protocols (other than TCP and UDP)
Classification of traffic with NBAR can be done dynamically or manually. NBAR supports the Protocol Discovery feature, which allows NBAR to discover automatically application protocols that enter or leave an interface. This feature also maintains per-protocol statistics, such as the number of input and output packets and bytes, bit rates, and other statistical information. With manual classification, you define the traffic types that NBAR should examine.
After NBAR has identified an application, the appropriate classification can take place, marking the packet header with the corresponding IP Precedence or DSCP value.
Classification Process
Before I discuss how NBAR can be used for traffic filtering instead of QoS, I need to discuss how NBAR is used to classify traffic. As I already have mentioned, NBAR enables you to classify traffic from information found in Layers 3 through 7 of the OSI reference model. The first step in setting up NBAR is to create classes for traffic that you want NBAR to inspect. You can have NBAR examine many things, such as the application type, specific addresses for connections, data in a connection, and the length of a packet. Based on your matching criteria, NBAR places matching traffic into your specified class (or grouping).
When you have created your classification rules, you create a policy that marks the traffic. For IP traffic, you use IP Precedence to group (classify) the traffic. The IP Precedence standard (and DSCP) uses the bits in the ToS field in an IP packet to classify the traffic. Both of these functions are performed on the ingress interface (as traffic enters your router).
Then you define what action(s) will occur for marked traffic when it leaves a specific egress interface(s) on your router. Normally, with QoS, this affects how the packet is queued up before it is transmitted out the interface. However, you can define other policies for this traffic, such as limiting its bandwidth or even dropping the traffic, based on the classification, of course.
Figure 10-4 illustrates this process.
Figure 10-4. NBAR Classification Example
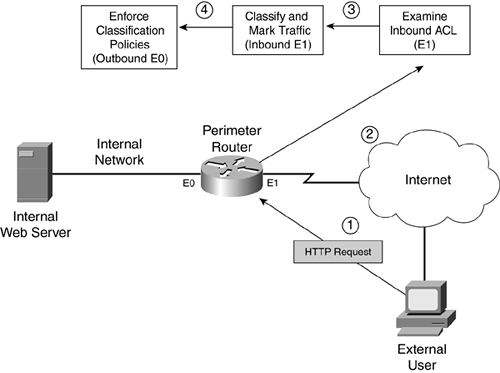
The following steps occur, with reference to the numbering in Figure 10-4:
- In this example, an external user generates an HTTP query to a web server located on the internal network.
- The router receives this traffic on its external interface. If an inbound ACL is applied on the external interface, the router processes the ACL.
- Assuming that the ACL permits the packet, the router uses NBAR to classify and mark the packet. This classification is done in the ingress direction of the external interface. In this case, you need an NBAR classification for HTTP traffic. For QoS purposes, you could classify all HTTP traffic into one grouping; however, if this was for security purposes, you might be looking for specific commands, filenames, or other data in the HTML query request to mark it, such as with a worm, a virus, or a Trojan horse attack. When used for security purposes, you would configure NBAR to drop unwanted or dangerous traffic. If the traffic does not match any of the classification rules, it is not marked (it is not dangerous).
- After NBAR processes the traffic, it is routed to the egress interface. In this example, this is E0. The router then processes any QoS actions on the packet. I use the term QoS loosely here because the Cisco IOS can take many actions when dealing with the packet, such as queuing it up with an appropriate queuing mechanism, shaping it, policing it, and even dropping it. For security purposes, you want to drop the marked traffic and, possibly log the transaction. If the traffic is not marked, it is treated normally. Finally, if there is an egress ACL on the router's interface, this affects what traffic can exit it.
A few important things must be pointed out about NBAR and classification:
When the Cisco IOS marks the packets' ToS field with the IP Precedence or DSCP value, this remains in the packet as long as the packet is being routed to the destination (unless another router modifies the ToS value).
For NBAR to process traffic, the traffic must be seen by two interfaces on your router: The ingress interface classifies and marks the traffic, and the egress interface enforces policies concerning the markings.
You can apply NBAR classification, marking, and policing in more than one direction of the router. For example, in Figure 10-4, you could set up two different policies: one for traffic entering the network (from E1 to E0) and one for traffic leaving the network (E0 to E1), giving you a lot of flexibility in enforcing security policies.
NBAR and Traffic Filtering
As I mentioned at the beginning of this section, NBAR normally is used to implement QoS policies; however, it easily can be adapted to enforce security policies. You can enforce three basic actions with NBAR when using it for security functions:
Filter traffic? With a filtering policy, NBAR uses an ACL to drop traffic on the egress interface. This requires an extended IP ACL to look for the ToS value marked in the IP header of the packet.
Reroute traffic? With a routing policy, NBAR uses route maps to match on marked traffic to determine how it should be routed. In the case of a security function, you typically route the packet to a null interface on the router, causing the router to drop the packet (I discuss this further in Chapter 15, "Routing Protocol Protection").
Log actions? You can have the router log the filtering action when it drops marked traffic
In this chapter, I focus on the first and third actions. Chapter 15 covers the second option.
Supported Protocols and Applications
NBAR supports the inspection and classification of many different protocols and applications. However, only TCP/IP protocols and applications are supported; protocols such as IPX, AppleTalk, and others are not supported. Table 10-1 lists the TCP/IP protocols that NBAR can classify. Table 10-2 lists the supported applications with static TCP and UDP port numbers. Table 10-3 lists the supported applications with dynamically assigned port numbers. These are applications that use a well-known port number for the control or management connection, but open other connections to deliver information, as FTP does with its data-transfer connection.
Protocol Parameter | Protocol Number | Description |
|---|---|---|
icmp | 1 | Internet Control Message Protocol. |
ipinip | 4 | IP in IP. |
egp | 8 | Exterior Gateway Protocol. |
ipsec | 50 and 51 | IP Security's Encapsulation Security Payload (ESP) and Authentication Header (AH). These two protocols are marked independently. |
Application Parameter | Protocol | Port Number | Description |
|---|---|---|---|
ssh | TCP | 22 | Secure Shell |
pcanywhere | UDP | 22 | Symantec PCAnywhere |
telnet | TCP | 23 | Telnet |
smtp | TCP | 25 | Simple Mail Transfer Protocol |
dns | TCP/UDP | 53 | Domain Name System |
dhcp | UDP | 67 and 68 | Dynamic Host Configuration Protocol and Bootstrap Protocol |
gopher | TCP/UDP | 70 | Internet Gopher Protocol |
finger | TCP | 79 | Finger User Information Protocol |
http | TCP | 80 | Hypertext Transfer Protocol |
kerberos | TCP/UDP | 88 and 749 | Kerberos Network Authentication Service |
pop3 | TCP/UDP | 110 | Post Office Protocol v3 |
nntp | TCP/UDP | 119 | Network News Transfer Protocol |
ntp | TCP/UDP | 123 | Network Time Protocol |
netbios | TCP/UDP | 137 and 139 | Microsoft NetBIOS over IP for Windows |
netbios | UDP | 137 and 138 | Microsoft NetBIOS over IP for Windows |
imap | TCP/UDP | 143 and 220 | Internet Message Access Protocol |
snmp | TCP/UDP | 161 and 162 | Simple Network Management Protocol |
bgp | TCP/UDP | 179 | Border Gateway Protocol |
irc | TCP/UDP | 194 | Internet Relay Chat |
ldap | TCP/UDP | 389 | Lightweight Directory Access Protocol |
secure-http | TCP | 443 | Secure HTTP |
syslog | UDP | 514 | System Logging Utility |
printer | TCP/UDP | 515 | Remote Printer |
rip | UDP | 520 | Routing Information Protocol |
secure-nntp | TCP/UDP | 563 | Secure NNTP |
secure-map | TCP/UDP | 585 and 993 | Secure IMAP |
secure-ldap | TCP/UDP | 636 | Secure LDAP |
secure-ftp | TCP | 990 | Secure FTP |
secure-telnet | TCP | 992 | Secure Telnet |
secure-irc | TCP/UDP | 994 | Secure IRC |
secure-pop3 | TCP/UDP | 995 | Secure POP3 |
socks | TCP | 1080 | Firewall Security Protocol |
notes | TCP/UDP | 1352 | Lotus Notes |
sqlserver | TCP | 1433 | Microsoft SQL Server |
rsvp | UDP | 1698 and 1699 | Resource Reservation Protocol |
l2tp | UDP | 1701 | L2F and L2TP tunneling protocols for VPNs |
pptp | TCP | 1723 | Microsoft Point-to-Point Tunneling Protocol for VPNs |
nfs | TCP/UDP | 2049 | Network File System |
novadigm | TCP/UDP | 3460 to 3465 | Novadigm Enterprise Desktop Manager (EDM) |
pcanywhere | TCP | 5631 and 65301 | Symantec PCAnywhere |
xwindows | TCP | 6000 to 6003 | X11 X-Windows |
cuseeme | TCP/UDP | 7648 and 7649 | CU-SeeMe Videoconferencing |
cuseeme | UDP | 24,032 | CU-SeeMe Videoconferencing |
Application Parameter | Protocol | Description |
|---|---|---|
citrix citrix app | TCP/UDP | Citrix ICA traffic |
ftp | TCP | File Transfer Protocol |
exchange | TCP | Microsoft RPC for Exchange |
fasttrack | TCP/UDP | P2P file-sharing programs, including Kazaa, Grokster, and Morpheus |
gnutella | TCP | P2P file-sharing programs, including BearShare, Gnewtellium, Gnucleus, Gtk-Gnutella, JTella, LimeWire, Morpheus, Mutella, Phex, Qtella, Swapper, XoloX, and XCache |
http | TCP | HTTP with inspection of URLs, MIME application types, and host information |
napster | TCP | Napster P2P file-sharing programs |
kazaa2 | TCP | Kazaa P2P file-sharing programs |
netshow | TCP/UDP | Microsoft Netshow multimedia program |
rcmd | TCP | UNIX R commands: rsh, rlogin, and rexec |
realaudio | TCP/UDP | Real Network RealAudio Streaming Protocol (RTSP) |
rtp | TCP/UDP | Real-time Transport Protocol |
sqlnet | TCP/UDP | Oracle SQL*Net Protocol |
streamwork | UDP | Xing Technology Stream Works audio and video application |
sunrpc | TCP/UDP | Sun Remote Procedure Calls |
tftp | UDP | Trivial File Transfer Protocol |
vdolive | TCP/UDP | VDOLive streaming video protocol |
The protocols and applications listed in Tables 10-1, 10-2, and 10-3 steadily have been added to NBAR since its inception. Therefore, to have NBAR classify a specific kind of traffic, you might have to either upgrade your Cisco IOS image or load a Packet Description Language Module (PDLM). A PDLM is a specialized module that you can have your Cisco IOS load from Flash to use with NBAR. One nice feature of PDLMs is that they do not require you to upgrade your Cisco IOS or reboot your router. Instead, the Cisco IOS calls them, when needed, from Flash memory. To download PDLMs, visit http://www.cisco.com/pcgi-bin/tablebuild.pl/pdlm; you need a CCO account to do this. Note that PDLMs are a temporary solution to upgrading your Cisco IOS. The newest Cisco IOS images have the necessary inspection function for NBAR built into them and, therefore, do not need PDLMs.
NBAR Restrictions and Limitations
NBAR requires the use of Cisco Express Forwarding. Therefore, only routers that support CEF can support NBAR. Even here, Cisco has not ported NBAR to all of its router platforms. As of this writing, here is a list of routers that support NBAR: 1700, 2600, 3600, 3700, 7100 and 7100 UBR, 7200 and 7200 UBR, 7500 with VIP, and the Catalyst 6500 with the FlexWAN module.
NBAR also has other restrictions, including the following:
The router cannot examine traffic if the router is either the source or the destination of the traffic.
The router cannot examine information in subsequent fragments of a packet; it can examine only the first fragment of a packet.
It can examine only the first 400 bytes of a packet payload.
It does not support examination of pipelined persistent HTTP requests.
It cannot examine encrypted traffic, such as HTTPS or IPSec (with IPSec, if the tunnel is terminated on the router but the router is not the endpoint of the traffic, the router can examine the unencrypted traffic using NBAR).
It can examine only TCP/IP traffic processed by CEF, which excludes IP multicast traffic.
It cannot examine more than 24 concurrent URLs, hosts, or MIME type matches.
It is not supported on logical interfaces, such as tunnels or Fast EtherChannels (dialer interfaces are supported in Cisco IOS 12.2[4]T).
With the 7500 series of routers, the router's processor requires a minimum of 64 MB of RAM.
NOTE
NBAR requires approximately 150 bytes of RAM for each connection that it inspects. To simplify the process for the Cisco IOS, when NBAR is enabled, the Cisco IOS automatically allocates 1 MB of RAM, which supports up to 5000 connections, to NBAR. The Cisco IOS periodically checks the memory usage. If more memory is required, the Cisco IOS dynamically assigns from 200 to 400 kB of RAM for additional connections. If you decide to use NBAR, you first should determine the number of connections that your router will need to support for examination and then make sure that your router has enough memory to hold the connection information.
Basic NBAR Configuration
NBAR is fairly simple to set up. The basic configuration requires you to enable CEF, monitor applications, and classify traffic. You need to perform the following steps:
- Step 1. Enable CEF (required).
- Step 2. Specify nonstandard ports (optional).
- Step 3. Classify traffic (required).
- Step 4. Download and install PDLMs (optional).
- Step 5. Define a traffic policy (required).
- Step 6. Activate the traffic policy on an interface (required).
- Step 7. Filter the marked traffic on the opposite interface (required).
The following sections cover the basics of setting up NBAR for traffic filtering.
Step 1: Enable CEF
Before you can use NBAR, your router needs to have CEF enabled. On some routers and switches, this is the default; however, on other devices, you must enable it manually. You use one of two commands to enable (or disable) CEF. For routers that do not support distributed CEF, such as the 1700 or 2600 series, use the following command:
Router(config)# ip cef
For routers that support distributed CEF (dCEF), such as the 7500 series with VIP modules, use the following command:
Router(config)# ip cef distributed
You also can disable CEF on an interface-by-interface basis by using this configuration:
Router(config)# interface type [slot_#/]port_#

Router(config)# no ip route-cache cef
TIP
Use the show ip cef command to verify that CEF has been enabled on your router.
NOTE
The operation and additional configuration of CEF is beyond the scope of this book. For more information about CEF, visit http://www.cisco.com/en/US/products/sw/iosswrel/ps1835/products_configuration_guide_chapter09186a00800ca7cc.html.
Step 2: Specify Nonstandard Ports
Tables 10-2 and 10-3 list the applications that NBAR examines, by default. However, NBAR assumes that these applications run on a specific port number, such as HTTP on port 80. NBAR does not, by default, examine nonstandard ports for applications. Just as with CBAC inspection and PAM, you can tell NBAR to examine applications that are on nonstandard ports. Use the following command to specify an additional port(s) for an application:
Router(config)# ip nbar port-map application_name [tcp | udp] port_#
Application names can be found in Tables 10-2 and 10-3. If you do not specify a transport layer protocol, it defaults to the ones listed in Tables 10-2 and 10-3. With one command, you can list up to 16 additional port numbers; just list the port numbers on the same command line, but put a space between each port number. Here is a simple example of configuring NBAR to examine for HTTP:
Router(config)# ip nbar port-map http tcp 80 8080 8090
In this example, I am having NBAR examine these three TCP port numbers for HTTP application information.
NOTE
The ip nbar port-map command specifies exactly what port numbers should be examined. Therefore, as with the previous example, if you want to add ports, include the previously examined ports as well as the additional ports that you want NBAR to examine. This command is optional: If all your applications run on the standard port numbers, the configuration of this command is not necessary.
In Cisco IOS 12.3(4)T, Cisco added the User-Defined Custom Application Classification feature to NBAR, which enables you to inspect the payload of packets for string patterns starting at a specified offset. This then can be associated with the ip nbar port-map command or the match protocol command (discussed in the next section). Here is the syntax for the configuration of this feature:
Router(config)# ip nbar port-map custom name payload_byte_offset

  [{ascii string_value | decimal number | hex hexadecimal_value}]

  {source | destination} {tcp | udp} [range] port_#_or_#s
You first must give the custom NBAR inspection configuration a unique name. Following this is the offset in the packet payload for the Cisco IOS to begin its inspection. After this you need to specify the type of value to look for: ascii indicates a specified string, such as cisco; decimal indicates a decimal number; and hex indicates a hexadecimal value, such as 0x60. Following the type of value, you need to specify the port information. The source and destination parameters specify whether the port examined is the source or destination port; this is followed by the protocol (tcp or udp) and the actual port or range of ports. Here is a simple example to illustrate the NBAR custom protocol configuration:
Router(config)# ip nbar port-map custom NewEmailAttack 40

  ascii addressbook destination tcp 25
In this example, I have created a custom NBAR inspection rule. This is useful if you are a target to a new type of attack and no patch is out yet to defeat it. In this example, a new e-mail attack has been discovered. In this attack, in the 40th byte of the packet payload is the string addressbook. By using this tool, you easily can look for specific values in the packet payload and then use NBAR to filter these packets.
To view your newly assigned port mappings, use the show ip nbar port-map command, as displayed in Example 10-9.
Example 10-9. Using the show ip nbar port-map Command
Router# show ip nbar port-map

<--output omitted-->

port-map gnutella             tcp 6346 6347 6348 6349 6355 5634

port-map gopher               udp 70

port-map gopher               tcp 70

port-map http                 tcp 80 8080 8090

port-map imap                 udp 143 220

port-map imap                 tcp 143 220

port-map irc                  udp 194

port-map irc                  tcp 194

<--output omitted-->
Step 3: Classify Traffic
The next step required to set up NBAR is to define a group classification. This classification tells NBAR which protocols and applications should be inspected. The class-map command is used to group your NBAR classifications:
Router(config)# class-map [match-all | match-any] class_map_name

Router(config-cmap)#
The class-map command takes you into a subconfiguration mode in which you specify the traffic that should be associated with this classification. When creating the classification, you optionally can specify the match-all or match-any parameters. The match-all parameter specifies that the traffic entering the router must match all of the classifications in the class map for the Cisco IOS to consider it a match. The match-any parameter specifies that the traffic has to match only one of the conditions within the class map. If you omit this parameter, it defaults to match-all. Following this parameter is the name of the class map. This name can be up to 40 alphanumeric characters in length.
As you can see from the class-map syntax, you are taken into a subconfiguration mode in which you specify your conditions for matching of traffic (Router(config-cmap)), specifying what traffic should be associated with this class map. Within the class map, you use the match command to specify what traffic should be included for NBAR examination. One of the nice features of the match command is that it enables you to match on all different kinds of things in a packet. Here is a list of some of the more common parameters used:
access-group? Specifies an ACL, where matches on permit entries in the ACL are included.
class-map? Specifies another class map to embed within this class map.
packet? Specifies a specific packet length that should be included in the examination. (I discuss how you can use this to detect certain kinds of DoS attacks in Chapter 17, "DoS Protection.")
protocol? Specifies the protocol that NBAR should examine. With some protocols, you can include data information, such as text that the user sends in the application request. This is the most common parameter used with NBAR for security functions.
In this chapter, I focus only on the match protocol class map command. The syntax of this command is as follows:
Router(config-cmap)# match protocol protocol_name [protocol_options]
With this command, you must specify the name of the protocol or application that will be included with NBAR examination; these names can be found in Tables 10-1, 10-2, and 10-3. For certain protocols, you also can include parameter options. If you created a custom NBAR inspection rule, specify the custom name for the protocol_name. In this chapter, I focus on just two uses of the match protocol command: using NBAR to filter P2P programs and HTML information.
P2P Programs
As I mentioned in Chapter 7, "Basic Access Lists," filtering P2P programs can be very difficult with the use of ACLs, especially because ACLs look at static configuration rules. One advantage of NBAR is that it performs a similar process to CBAC: It can examine the information that is transmitted across a connection, including information that would be used to set up additional connections. NBAR supports this facility for many P2P programs. You can specify a handful of match commands to look for P2P programs: match protocol fasttrack, match protocol gnutella, match protocol napster, and match protocol kazaa2.
Take a look at the fasttrack option first:
Router(config-cmap)# match protocol fasttrack

Router(config-cmap)# match protocol fasttrack

  file-transfer regular_expression
The first command matches on all FastTrack-related P2P programs, which includes Kazaa, Grokster, and older versions of Morpheus. This command can be used to classify and mark traffic as it leaves your network, allowing your external outbound ACL to drop this traffic. The second command enables you look for P2P connections that contain a specific string in the P2P request.
Here is the syntax to match on Gnutella P2P programs:
Router(config-cmap)# match protocol gnutella

Router(config-cmap)# match protocol gnutella

  file-transfer regular_expression
The P2P applications that this command can match on include BearShare, Gnewtellium, Gnucleus, Gtk-Gnutella, JTella, LimeWire, newer versions of Morpheus, Mutella, Phex, Qtella, Swapper, XoloX, and XCache.
When specifying the string, you can enter regular expressions. Table 10-4 lists some of the more common regular expressions used. These expressions can be used as a wildcard to match on a string of alphanumeric characters that appear in a character string in the application layer data.
Expression | Description |
|---|---|
* | Many zeros?any number of characters in this position. For example, *cisco* indicates that the Cisco IOS should look for the keyword cisco anywhere in the string. |
? | Match any single character in this position. For example, cis?o indicates that the Cisco IOS should look for three characters, cis, followed by any single character, and then immediately followed by the letter o in the string. |
| | Match the character either to the left or to the right of the vertical bar. For example, C|cisco indicates that the Cisco IOS should look for either Cisco or cisco in the string. |
( | ) | Match the characters to the left or right of the vertical bar. For example, destroy.(jpg | gif) indicates that the Cisco IOS should look for either destroy.jpg or destroy.gif in the string. |
[ ] | Match the range of characters specified in the range. For example, cisco[1-3] indicates that the Cisco IOS should look for either cisco1, cisco2, or cisco3 in the string. |
A few examples illustrate regular expression matching. In this example, I am matching on all Gnutella traffic:
Router(config-cmap)# match protocol gnutella file-transfer "*"
In this example, I am matching on any Gnutella traffic that references an MPEG file:
Router(config-cmap)# match protocol gnutella file-transfer "*.mpeg"
To match on Napster traffic, use the following command:
Router(config-cmap)# match protocol napster [non-std]
The non-std parameter enables you to look for nonstandard Napster port connections. For Kazaa P2P traffic, use the following command:
Router(config-cmap)# match protocol kazaa2
HTTP Traffic
With NBAR, you can match on HTTP traffic by URL, host name, or MIME type. This is done with the following command:
Router(config-cmap)# match protocol http [url URL_string |

  host hostname_string | mime MIME_type]
You can use the url keyword to match on a full or partial URL in an HTTP request. Take a look at a simple example:
Router(config-cmap)# match protocol http url */home/ind*
In this example, any URL that contains /home/ind in it would be considered a match.
Here is an example of matching on a host name:
Router(config-cmap)# match protocol http host www.quizware.com
In this example, if the URL contains www.quizware.com, the packet is considered matched. You can match on partial host names, just like URLs:
Router(config-cmap)# match protocol http host *quizware*
In this example, any host name with quizware in it would be considered a match.
Finally, you can match on a MIME type. MIME types are used to categorize the type of data, such as a text file, an image file, a video file, and so on. HTML uses these quite extensively to provide presentation layer functions. MIME codes are embedded within HTML text to help the web browser determine how the information should be displayed. With NBAR, you can match on the MIME types, as in this example:
Router(config-cmap)# match protocol http mime *jpeg
In this example, any MIME type ending in "jpeg" is considered a match. For a list of MIME types, visit ftp://ftp.isi.edu/in-notes/iana/assignments/media-types/media-types.
Step 4: Download PDLMs
When examining certain applications or protocols, you need the correct version of the Cisco IOS that contains the necessary NBAR code. However, if your router does not have the latest or necessary version of the Cisco IOS, you still might be able to use NBAR for the specific application, as long as Cisco has a corresponding PDLM file for it.
PDLMs are small executable code modules used by NBAR. See the "Supported Protocols and Applications" section to find out what PDLM files Cisco supports and where you can download them. The main advantage of using a PDLM is that you do not have to upgrade your Cisco IOS to use the specific NBAR examination feature: Just download the appropriate PDLM file to Flash and then reference it for use by NBAR. In this instance, no reloading of your router is required.
To use a PDLM, you must reference it so that NBAR knows of its existence. Use this command to make the appropriate reference:
Router(config)# ip nbar pdlm [location://]PDLM_name
In this example, specify the PDLM name. If the PDLM is not in the primary Flash partition, you must specify the optional location.
For example, if you want to examine traffic for Fasttrack applications, but your Cisco IOS version did not support this for NBAR, you could download this PDLM from Cisco into your router's Flash and reference it with the following command:
Router(config)# ip nbar pdlm flash://fasttrack.pdlm
To see which PDLMs you have enabled on your router, use the show ip nbar pdlm command.
Step 5: Define a Traffic Policy
After you have created your class map, you need to assign your policy to it. If you were using NBAR to implement QoS, you would be assigning your QoS policies to the classified traffic. However, because you are dealing with security, you will want to mark the offending packets that you have classified. This is done with a policy. Creating a policy is a three-step process:
- Step 1. Define the policy's name.
- Step 2. Associate your class map with the policy.
- Step 3. Mark the packets that are matched by the class map.
To perform these three steps, use the following configuration:
Router(config)# policy-map policy_map_name

Router(config-pmap)# class class_map_name

Router(config-pmap-c)# set [ip] dscp value
The last line can be substituted with the following if you prefer to filter on precedence instead of DSCP (for security filtering, this is a matter of personal preference):
Router(config-pmap-c)# set [ip] precedence value
The policy map name must be unique among all policies and can contain a maximum of 40 alphanumeric characters. W


