Configuring Reflexive ACLs
Now that you have a better understanding of reflexive ACLs, their operation, and their limitations, this section discusses how to configure them on your Cisco IOS router. Configuring your router to use RACLs involves three steps:
- Step 1. Create an internal named ACL that looks for new outbound sessions and creates your temporary RACLs.
- Step 2. Create an external named ACL that uses the RACLs to examine returning traffic to your network.
- Step 3. Activate the named ACLs on the appropriate interface or interfaces.
You must do three main things for your router to use RACLs. Some optional items, such as changing the idle timeout for sessions, also can be configured. The remainder of this section focuses on the configuration of RACLs on your router.
NOTE
It is important to point out that all ACLs used in this process are named extended ACLs?numbered ACLs and standard ACLs are not supported. Also, only TCP/IP supports reflexive ACLs; other protocols, such as IPX, do not support this feature.
Interface Selection
Typically, the configuration of RACLs is done on the perimeter router or firewall as traffic is entering and leaving your network. This can be a connection to the Internet or another network, such as a different company (extranet). One of the first things you need to decide is on what interface or interfaces you will be configuring your ACLs for RACLs. Take a look at two examples of where you can put your ACLs on your router's interface(s).
Two-Interface Example
Figure 8-7 illustrates how to use RACLs in a router that has two interfaces. Remember that you must set up two ACLs: one that builds RACLs as traffic leaves the network, and one that uses the RACLs to allow returning traffic into the network. When examining traffic as it leaves the network, you can apply the internal ACL in one of two ways:
Inbound on the internal interface (E0 in)
Outbound on the external interface (E1 out)
Figure 8-7. Two-Interface RACL Example
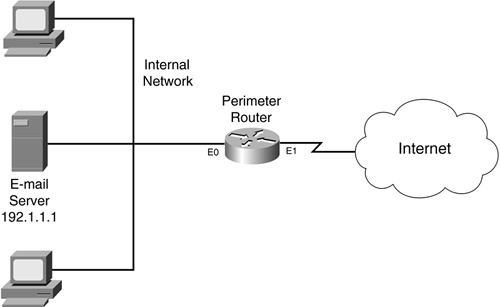
For the external ACL, because you typically configure RACLs on a perimeter router/firewall, you will be applying it inbound on the external interface (E1 in).
In this example, the network has two policies: allow Internet traffic to the internal e-mail server, and allow users access to the Internet. To accomplish this, you need an ACL configuration like the following:
Internal ACL (apply outbound on E1 or inbound on E0): Examine outbound traffic and build the RACL for new sessions.
External ACL (apply inbound on E1):
- Reference the RACL to allow returning traffic.
- Allow Internet traffic to the e-mail server.
- Deny all other traffic.
TIP
The most common way to set up RACLs on a two-interface router is to apply the internal ACL on the router's external interface in the outbound direction (E1 out), and to apply the external ACL on the external interface in the inbound direction (E1 in).
Three-Interface Example
Figure 8-8 illustrates how to use RACLs in a router that has three interfaces. This configuration is more difficult because of the policy rules defined by this company:
The Internet should be capable of accessing the DMZ e-mail server.
The Internet should be capable of accessing the DMZ DNS server.
The Internet should be capable of accessing the DMZ web server.
The Internet should not be capable of accessing the internal network.
The internal e-mail server should be capable of accessing only the DMZ e-mail server, nothing else.
The DMZ e-mail server should be capable of accessing the internal e-mail server to forward mail.
Internal users should be able to access the Internet and receive replies.
Internal users should not be able to access the DMZ e-mail server or any external e-mail servers.
Figure 8-8. Three-Interface RACL Example
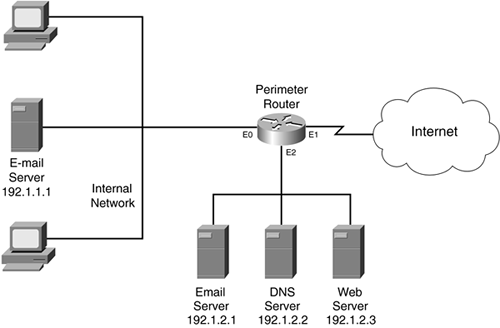
To accomplish these policies, you need three ACLs:
Internal ACL (apply inbound on E0):
- Allow the internal e-mail server to access the DMZ e-mail server.
- Deny internal users access to the DMZ e-mail server and other e-mail servers.
- Deny the internal e-mail server from accessing anything else.
- Examine outbound traffic and build the RACL for new sessions to the DMZ.
- Examine outbound traffic and build the RACL for new sessions to the Internet.
- Allow internal users to access all other services (DMZ and Internet).
DMZ ACL (apply outbound on E0)?this restricts traffic from the DMZ to the internal network:
- Reference the internal-to-DMZ RACL to allow internal users to get their replies from the DMZ.
- Reference the internal-to-external RACL to allow internal users to get their replies from Internet resources.
- Allow the DMZ e-mail server to send e-mail to the internal server.
External ACL (apply inbound on E1):
- Reference the internal-to-external RACL to allow internal users to get their replies from the Internet.
- Allow Internet users access to the DMZ e-mail server.
- Allow Internet users access to the DMZ DNS server for DNS queries.
- Allow Internet users access to the DNS web server.
As you can see from this list of policies, the setup of RACLs and ACLs is more difficult. One item that I want to point out is that I used two RACLs in this example:
One for traffic from the internal segment to the Internet
One for traffic from the internal segment to the DMZ segment
You actually could get away with using one RACL and reference the same RACL on interface E1 inbound and E0 outbound; however, this presents a security problem for the external interface. If a hacker knew which internal devices were constantly accessing the DMZ servers, he might be able to take advantage of this to try to spoof his way in through the RACL on the external interface; the same RACL is applied outbound on the internal interface. Therefore, I have created two RACLs. The first RACL allows traffic from the internal segment, when sent to the DMZ, to be returned to the internal segment. The second RACL is for traffic leaving the network and returning. By separating the sessions into the two locations that devices access, I am creating a more secure environment.
Configuration Commands
As mentioned at the beginning of this section, you need to configure two named ACLs: One builds the RACL or RACLs, and the other references them to allow returning traffic. You also need to activate them on your router's interface or interfaces. Optionally, you can configure other things, such as the timeout for the idle RACL entries. The following three sections cover the configuration of these components.
Building the RACL
This section focuses on the ACL that you create to build the temporary entries in a RACL. This typically is done when traffic is leaving your network. You build an extended named ACL that restricts what traffic is allowed to leave your network. In this ACL, you specify which traffic you want the Cisco IOS to examine and create temporary ACL entries for. This is done by using a permit extended ACL statement that matches on the traffic that you want to have temporary entries created for. In this statement, you add the reflect parameter. This statement creates the temporary entries in the specified RACL. Here is the syntax to accomplish this:
Router(config)#  ip access-list extended internal_ACL_name

Router(config-ext-nacl)#  --permit or deny specific connections--

Router(config-ext-nacl)#  permit protocol_name

  source_address wildcard_mask [protocol_information] destination_address

  wildcard_mask [protocol_information] reflect RACL_name  [timeout #_of_seconds]

Router(config-ext-nacl)#  --permit or deny other connections--
First, you need to create your extended named ACL with the ip access-list extended command.
TIP
When naming your ACL, I recommend using a descriptive name. With RACLs, I include either the placement location of the ACL, such as internal, or the direction of the traffic flow that is being filtered, such as internal-external.
Place your permit statement or statements that will match on traffic that you want to build RACL entries for within the ACL. For each of these permit statements, you must use the reflect keyword and the name of the RACL where the temporary entries will be placed. You also must specify the IP protocol that you want to create RACL entries for, as well as the source and destination: You can be as specific or permissive as you want.
NOTE
The permit/reflect statement serves two purposes. First, it builds temporary entries in the specified RACL. Second, it allows the specified traffic to flow through the interface. Remember that at the end of this extended ACL is an implicit deny statement.
Optionally, you can specify the idle timeout for these temporary RACL entries by using the keyword timeout followed by the timeout value in seconds. The default timeout is 300 seconds if you omit it. Valid timeout values are 0 to 2,147,483. Setting the value to 0 causes the entry to remain in the RACL list: I highly recommend that you do not do this because it creates a permanent security hole in your perimeter router. Likewise, I do not recommend setting values too high. For UDP and ICMP traffic, 30 to 60 seconds is a good value. However, you might have to tune this on an application-by-application basis. If this is the case, you need a separate permit/reflect statement for each unique idle setting. As an example, you might want to create a separate entry for DNS queries and set the timeout for these to a smaller value than other UDP traffic, such as 5 or 10 seconds.
NOTE
It is important to point out that the specified RACL in your extended named ACL does not exist yet. The Cisco IOS dynamically creates it and puts entries in it based on packets matching these permit/reflect statements. Plus, you can use the same RACL name for multiple permit statements. This places these temporary entries in the same RACL. Typically, I use different RACL names to view the information more easily when troubleshooting, but this is not required.
Restrictive Settings
You can be as specific as you want when matching your outbound session connections. For example, if you want internal users to surf the Internet only with a web browser and allow DNS responses back, you can enter the commands in Example 8-6.
Example 8-6. Simple RACL Example
Router(config)#  ip access-list extended internal-external

Router(config-ext-nacl)# remark --insert permit or deny specific connections--

Router(config-ext-nacl)# permit tcp any any eq 80 reflect web-only-RACL

Router(config-ext-nacl)# permit udp any any eq 53 reflect dns-only-RACL timeout 10

Router(config-ext-nacl)# remark --insert permit or deny other connections--
Example 8-6 instructs the Cisco IOS to create two RACLs that will maintain session information for outbound web connections (web-only-RACL) and DNS queries (dns-only-RACL). Also notice that I set the timeout for the DNS queries to 10 seconds.
Of course, I could have used the same RACL name and put all temporary entries in the same list, as in Example 8-7.
Example 8-7. Simple Combined RACL Example
Router(config)#  ip access-list extended internal-external

Router(config-ext-nacl)# remark --insert permit or deny specific connections--

Router(config-ext-nacl)# permit tcp any any eq 80 reflect user-RACL

Router(config-ext-nacl)# permit udp any any eq 53 reflect users-RACL timeout 10

Router(config-ext-nacl)# remark --insert permit or deny other connections--
In Example 8-7, both the HTTP and DNS queries will be placed in the same RACL (user-RACL).
Permissive Settings
If you want to allow all of your internal users to access the Internet and get returning traffic, you could do something like in Example 8-8.
Example 8-8. One RACL for All Returning Traffic
Router(config)#  ip access-list extended internal-external

Router(config-ext-nacl)# remark --permit or deny specific connections--

Router(config-ext-nacl)# permit ip any any reflect IP-all-RACL

Router(config-ext-nacl)# remark --permit or deny other connections--
In Example 8-8, all outbound IP traffic would create temporary entries in the reflexive ACL called IP-all-RACL. This is a good example of when troubleshooting might become difficult because many temporary entries would exist in this list. If I am allowing all outbound traffic, I typically use a different RACL for each type of traffic, as in Example 8-9.
Example 8-9. Multiple RACLs for Returning Traffic
Router(config)#  ip access-list extended internal-external

Router(config-ext-nacl)# remark --permit or deny specific connections--

Router(config-ext-nacl)# permit tcp any any reflect tcp-racl

Router(config-ext-nacl)# permit udp any any reflect udp-racl timeout 30

Router(config-ext-nacl)# permit icmp any any reflect icmp-racl timeout 10

Router(config-ext-nacl)# remark --permit or deny other connections--
In Example 8-9, I have separated the TCP, UDP, and ICMP traffic into three RACLs: tcp-racl, udp-racl, and icmp-racl, respectively. Therefore, if I am having a problem with a particular protocol, it will be much easier to view my RACL entries by displaying just one particular RACL that contains one protocol than to display one RACL that contains every protocol.
CAUTION
Placement of the reflect statements is very important in the processing of the internal ACL. For example, if you do not want users to access a specific resource, make sure that this deny statement appears before the corresponding reflect statement. Likewise, if you want to create a RACL for certain types of traffic, make sure that no deny statement precedes the reflect statement that would drop this traffic.
Referencing the RACL
After building your internal extended named ACL, which creates your RACLs, you are ready to reference these temporary entries as traffic flows back into your network. This is done by building a second extended named ACL. In this named ACL, you use the evaluate statement to reference your RACLs that were created from the previous internal ACL. Use the following syntax to create your external ACL:
Router(config)#  ip access-list extended external_ACL_name

Router(config-ext-nacl)#  remark --permit or deny specific connections--

Router(config-ext-nacl)#  evaluate RACL_name

Router(config-ext-nacl)#  remark --permit or deny other connections--
Before you can actually execute the evaluate command, you must create the RACL reference with the permit/reflect command in your internal ACL. The name of the RACL in the evaluate command must match the name of the RACL that you used in the permit/reflect command in your internal ACL. If you created multiple RACLs in your internal ACL or ACLs, you must configure a separate evaluate command for each RACL.
NOTE
You do not actually create and put entries in the RACL; the Cisco IOS does this automatically. You need to reference the RACL only so that the Cisco IOS processes these entries as traffic returns into your network. Basically, the evaluate commands point to the entries in the RACL that the Cisco IOS should use when processing the external extended ACL.
CAUTION
As with the internal ACL, the placement of the evaluate statement in the external ACL does matter. When the Cisco IOS processes inbound packets, it examines the first entry in the external ACL. If it does not find a match, it proceeds to the next statement. If the statement is an evaluate statement, the Cisco IOS begins processing the first statement in the RACL. If no statements match in the RACL, the Cisco IOS returns to the external ACL and processes the next statement in the extended ACL.
Therefore, if you have a RACL that permits returning traffic, but you place the RACL's evaluate statement after a deny statement that drops it, the traffic is dropped and the RACL never is processed. In this example, make sure that the evaluate statement for the RACL appears before the deny statement. Of course, you can use this to your advantage and prevent certain returning traffic by putting the deny statement before the evaluate command.
ACL Activation
After you have created your internal (permit/reflect) and external (evaluate) ACLs, you need to activate them by applying them to your router's interface(s). For a two-interface router configuration, this typically is done with the following syntax on the external interface:
Router(config)#  interface type port_#

Router(config-if)#  ip access-group  name_of_the_internal_ACL out

Router(config-if)#  ip access-group  name_of_the_external _ACL in
In this example, you apply both of these ACLs on the external interface of the router. In the "Reflexive ACL Examples" section later in this chapter, I go over the two-and three-interface router examples discussed earlier, including how to configure and activate the extended ACLs.
Optional Commands
By default, temporary RACL entries are removed from the RACL when they have been idle for more than 300 seconds. I already showed you how you can adjust this value on a RACL-by-RACL basis with the permit/reflect statement in the internal ACL. However, you also can adjust this globally with the following command:
Router(config)# ip reflexive-list timeout seconds
Valid timeout values are 0 to 2,147,483. Setting the value to 0 causes the entry to remain in the RACL list. Remember my previous warning about setting this value to 0 or to a large number. When you set this value, it affects all RACLs, excluding the ones for which you have configured specific timeout values.
CAUTION
Each temporary entry created in a RACL requires memory to store it. Therefore, you do not want to keep idle connections in there for a long period of time when they are not necessary. A good example of connections that are very brief are DNS queries, HTTP connections, and ICMP messages. I highly recommend that you set the timeout for these values to 60 seconds or less, even if this means creating extra reflect entries to accomplish this. For ICMP traffic and DNS queries, 10 seconds is sufficient; for HTTP connections, an idle time between 30?60 seconds is more appropriate.
RACL Verification
After you have configured and activated your extended ACLs, you can verify their operation with the show access-lists and show ip access-list commands. Example 8-10 shows an example of the output from the show access-lists command.
Example 8-10. Output from the show access-lists Command
Router#  show access-lists

Extended IP access list inbound_access

deny icmp any any

evaluate tcpstuff

evaluate udpstuff


Extended IP access list outbound_access

permit tcp any any reflect tcpstuff

permit udp any any reflect udpstuff


Reflexive IP access list tcpstuff

permit tcp host 200.5.5.5 eq telnet host 192.1.1.1 eq 10638

  (9 matches)  (time left 294 seconds)
In Example 8-10 are two extended named ACLs. inbound_access is an external ACL that filters returning traffic with two RACLs, specified in the evaluate commands. outbound_access is an internal ACL that has two reflect statements that build two RACLs: one for TCP traffic and one for UDP traffic. At the bottom of the display is the RACL for the TCP traffic, called tcpstuff. This ACL currently has only one entry, which allows returning Telnet traffic from 200.5.5.5 to the internal client (192.1.1.1). Notice that that the output from this display does not include the udpstuff RACL; this is because no internal UDP traffic has been examined leaving this network.


