Interior Gateway Protocol Security
If you need to have your perimeter router run an interior gateway protocol (IGP) to learn about internal routes, I highly recommend that, at a minimum, you configure authentication to protect yourself against spoofing attacks. In many cases, using an IGP is a better solution than using static routes, especially considering that IGPs dynamically learn the topology of the network, support multiple redundant paths (for load balancing), and can overcome route outages by learning about alternative paths to a destination.
Need for Routing Protocol AuthenticationI once had a contract job for a state government agency in the late 1990s in which I was redesigning the agency's network. It had a T1 line to provide for Internet access and was using RIPv1 as a routing protocol. Intermittently, part of the network lost the connection to the Internet, but the rest of the network still could access the Internet. This typically happened every day from around 10 A.M. to 2 P.M. After spending a few hours troubleshooting the problem, I determined that actually two default routes were being propagated: one from the T1 router and one from a different device. After careful tracking, I traced the default route back to a UNIX desktop device. Apparently, this user periodically dialed into their personal CompuServe service, which assigned a default route to the UNIX desktop. By default, RIP routing was enabled on the UNIX desktop, causing it to pass the default route to other internally connected routers. Because of the hop count assigned to the CompuServe default route, other internal routers eventually ignored it and used the T1 router's default route; however, routers close to the UNIX box were using the UNIX desktop. Most of the internal traffic was being routed correctly, but some was being routed to CompuServe, which then was dropped. After this experience, I quickly convinced the company to convert to RIPv2 and implement authentication to prevent this kind of problem from happening again. |
Authentication
The main purpose of authentication is to provide verification of the routing contents received by a neighboring router. Authentication enables you to verify whether the received routing update was sent by a valid neighboring router and was received without being tampered with. In other words, it prevents your router from accepting and processing unauthorized or malicious routing updates, which a hacker can use to create a DoS attack.
If you do not use authentication, you are opening yourself up to DoS routing attacks, in which a hacker injects bogus routing information into your router's routing table. A really good hacker could use this opportunity to reroute certain traffic back to him, to implement other kinds of spoofing attacks.
Supported Routing Protocols
Not all routing protocols support authentication. Supported protocols include these:
Border Gateway Protocol (BGP), which is discussed in the next section
Intermediate System-to-Intermediate System (IS-IS)
IP Enhanced Interior Gateway Routing Protocol (EIGRP)
Open Shortest Path First (OSPF)
Routing Information Protocol (RIP) version 2
As you can see from this list, RIPv1 and the Cisco IGRP are not included; therefore, I highly recommend that you not use them on your perimeter router.
Authentication Process
A router's routing protocol can employ two forms of authentication:
Plain text
Message Digest version 5 (MD5)
The basic difference between these is the same as PPP's PAP and CHAP: PAP sends its authentication information in clear text to a neighboring router and is susceptible to eavesdropping attacks. CHAP uses an MD5 hashing function to send a fixed-length hashed output, not the password, to the remote device.
CAUTION
Authentication with routing protocols is similar to PAP and CHAP. As with PAP, I highly recommend that you not use the plain text form of authentication because the password is sent to the remote router in clear text and is susceptible to eavesdropping attacks.
Plain-Text Process
When using plain-text authentication, the routing protocol used between two routers uses the same authentication key. Some protocols allow the use of multiple keys between the same or different peers, but this depends on the routing protocol. With multiple keys, each key needs a key number for identification purposes. Basically, with plain-text authentication, a router sends a routing update with the key (in clear text) and the key number (if multiple keys are used). When the remote router receives the update, it compares the received key with its own stored key: If the two keys match, the remote router accepts the update; otherwise, it ignores it. Protocols that support plain-text authentication include IS-IS, OSPF, and RIPv2.
MD5 Process
MD5 is a much more secure method of authentication. With MD5, a key also is used, just as with plain text. However, the key is never sent across the network to the remote router; instead, it is used to create a message digest, called a hash value. The key information about the router, such as its IP address, and the routing update are run through the MD5 hashing function, producing a fixed-length result. This result is included with the routing update. The remote peer uses the same key, stored locally; information from the received router; and the received routing update. It runs them through the MD5 hashing function. If its result matches that sent with the routing update, the router can be assured that the router sending the traffic is trusted (used the correct key) and that no one tampered with the packet (only a router with the same key could produce the same message digest). The key itself is never sent across the wire. Routing protocols that support MD5 authentication include IS-IS, OSPF, RIPv2, EIGRP, and BGP.
NOTE
Because of the weaknesses of using plain-text authentication, this book focuses only on using MD5 for authentication.
CAUTION
One word of warning concerning BGP: If a BGP update needs to access a device that performs packet manipulations, including NAT/PAT by an address-translation device, a PIX performing sequence number randomization for TCP, or another form of packet/TCP segment manipulation, this invalidates the MD5 signature and causes the remote BGP peer to ignore the routing update. Therefore, you need to verify that no packet manipulations are occurring between your two BGP peers. If manipulations are occurring, you can resort to using a VPN to tunnel the BGP information between the two peers. Note that you also can use a VPN to transport other routing protocols between peers, but this adds a lot more overhead on your router and should be used as a second solution.
RIPv2
RIPv2 supports both plain-text and MD5 authentication. However, I discuss only the use of MD5 in this book because it is much more secure. You need to configure these commands to implement RIPv2 MD5 authentication:
Router(config)# key chain name_of_key_chain

Router(config-keychain)# key key_#

Router(config-keychain-key)# key-string your_secret_key

Router(config-keychain-key)# exit

Router(config-keychain)# exit

Router(config)# router rip

Router(config-router)# version 2

Router(config-router)# exit

Router(config)# interface [slot_#/]port_#

Router(config-if)# ip rip authentication key-chain name_of_key_chain

Router(config-if)# ip rip authentication mode md5
The key chain command is used to group your keying information and is given a unique name. Executing this command takes you into a subconfiguration mode, where you enter the key number used to reference the key. Typically, you configure only one key, so most administrators use 1 as the number. This takes you into another subconfiguration mode, where you use the key-string command to configure the actual key. Note that you use multiple key numbers in one situation: when you need to change your old key to a new value, but you want to slowly migrate your routers to the new key value.
Within your RIP configuration, you must specify that your router is running version 2 with the version 2 command. Finally, on each interface on which your router is running RIP, you must activate authentication. This requires the use of two commands. The ip rip authentication key-chain command specifies what key to use, and the ip rip authentication mode md5 command specifies that MD5 authentication is used.
If you are experiencing authentication problems with RIP, use the debug ip rip command. After authentication, the show ip route command should show at least some of the routes from the neighboring router.
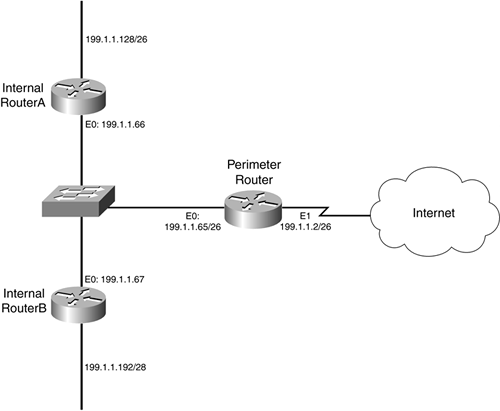
Example 15-4 displays a simple configuration for the perimeter router in Figure 15-1.
Example 15-4. Authenticating RIPv2 Updates
Perimeter(config)# key chain RIP-KEYS

Perimeter(config-keychain)# key 1

Perimeter(config-keychain-key)# key-string secret-key

Perimeter(config-keychain-key)# exit

Perimeter(config-keychain)# exit

Perimeter(config)# router rip

Perimeter(config-router)# network 199.1.1.0

Perimeter(config-router)# version 2

Perimeter(config-router)# exit

Perimeter(config)# interface ethernet0

Perimeter(config-if)# ip rip authentication key-chain RIP-KEYS

Perimeter(config-if)# ip rip authentication mode md5
Use the same configuration for RouterA and RouterB, making sure you that enable RIP authentication on the ethernet0 interfaces of both routers. One thing that can be different on both routers is the name of the key chain; however, the password needs to be the same.
NOTE
When you save your configuration, the keys are hashed and are not stored in clear text, protecting you from eavesdroppers when backing up your router's configuration remotely.
EIGRP
Unlike RIPv2, EIGRP supports only MD5 authentication. The configuration of EIGRP's MD5 authentication is similar to that of RIPv2. You use these commands to set up EIGRP authentication:
Router(config)# key chain name_of_key_chain

Router(config-keychain)# key key_#

Router(config-keychain-key)# key-string your_secret_key

Router(config-keychain-key)# exit

Router(config-keychain)# exit

Router(config)# interface [slot_#/]port_#

Router(config-if)# ip authentication key-chain eigrp AS_#

  name_of_key_chain

Router(config-if)# ip authentication mode eigrp AS_# md5
As you can see from the configuration, the first part, configuring the key chain, is the same as with RIPv2. On the interfaces that are participating in EIGRP, you need to enable authentication. The ip authentication key-chain eigrp command specifies the autonomous system (AS) number and the name of the key chain. You also must specify the use of MD5 with the ip authentication mode eigrp command. Use the debug ip eigrp command to troubleshoot authentication problems.
Example 15-5 shows the configuration of the perimeter router in Figure 15-1 (this example assumes that EIGRP is using AS 65,500).
Example 15-5. Authenticating EIGRP Updates
Perimeter(config)# key chain EIGRP-KEYS

Perimeter(config-keychain)# key 1

Perimeter(config-keychain-key)# key-string secret-key

Perimeter(config-keychain-key)# exit

Perimeter(config-keychain)# exit

Perimeter(config)# router eigrp 65500

Perimeter(config-router)# network 199.1.1.0

Perimeter(config)# interface ethernet0

Perimeter(config-if)# ip authentication key-chain

  eigrp 65500 EIGRP-KEYS

Perimeter(config-if)# ip authentication mode eigrp 65500 md5
As you can see, the configuration is straightforward. The same key and AS number need to be used on RouterA and RouterB.
OSPF
As with RIPv2, OSPF supports both plain-text and MD5 authentication. However, as recommended earlier, you should use MD5 authentication. You use these commands to set up MD5 authentication for OSPF:
Router(config)# router ospf process_ID_#

Router(config-router)# area area_# authentication message-digest

Router(config-router)# exit

Router(config)# interface [slot_#/]port_#

Router(config-if)# ip ospf message-digest-key key_#

  md5 key_value
As you can see from the configuration, OSPF's authentication configuration is different from that of RIP or EIGRP. The area authentication command is executed under the OSPF routing process (router ospf command). Then, for each interface on which you have enabled OSPF, you need to specify authentication with the ip ospf message-digest-key command. This command also specifies the key number and key to use with the MD5 algorithm (which allows for different keys for different peers). Use the show ip ospf neighbor, debug ip ospf adj, and debug ip ospf events commands to troubleshoot OSPF authentication.
Example 15-6 shows a simple example of the perimeter router, running OSPF in area 0, between RouterA and RouterB, in Figure 15-1.
Example 15-6. Authenticating OSPF Updates
Router(config)# router ospf 1

Router(config-router)# network 192.1.1.1 0.0.0.0 area 0

Router(config-router)# area 0 authentication message-digest

Router(config-router)# exit

Router(config)# interface ethernet0

Router(config-if)# ip ospf message-digest-key 1 md5 itsasecret
AS you can see from this example, the configuration of OSPF's MD5 authentication is simple.
IS-IS
As with OSPF, IS-IS supports clear-text and MD5 authentication to form a routing neighbor relationship and share routing updates. This section discusses only the use of MD5; however, MD5 authentication in the Cisco IOS is fairly new and requires Cisco IOS 12.2(13)T or later (plus, it is limited to only a few router platforms).
I have divided the configuration task into three groups of configuration tasks.
- Step 1. Define your authentication keys and allow receipt of unauthenticated updates.
- Step 2. Enable MD5 authentication for the IS-IS routing process.
- Step 3. Force IS-IS to use authentication for both sent and received routing updates.
If you have an existing network running IS-IS, it is important to follow these steps to allow uninterrupted transmission from the routers performing authentication to all routers performing (or not performing) authentication.
Group 1 Steps: Authentication Keys
On all your IS-IS routers, configure the following:
Router(config)# key chain name_of_key_chain

Router(config-keychain)# key key_#

Router(config-keychain-key)# key-string your_secret_key

Router(config-keychain-key)# exit

Router(config-keychain)# exit

Router(config)# router isis area_tag_#

Router(config-router)# authentication send-only [level-1 | level-2]
The first part of the configuration is the same as that used in RIPv2 and EIGRP, where the MD5 hash key is defined (key-string). Make sure that you use the same key on each IS-IS router. After you have defined your key, enter the IS-IS routing process and specify the authentication send-only command. This command specifies that only routing updates that the router generates will have authentication performed: Any received updates are not authenticated. This enables you to migrate all of your routers so that they all send IS-IS authenticated updates; then you slowly can change your routers over to send and receive authenticated updates. You can qualify authentication by specifying the IS-IS level: 1 or 2. However, if you omit the level specification, the Cisco IOS uses authentication for both levels.
Group 2 Steps: IS-IS Authentication
After you have completed group 1 steps for all your IS-IS routers, you are ready to proceed to the next part of the configuration. Perform the following configuration on all your IS-IS routers:
Router(config)# router isis area_tag_#

Router(config-router)# authentication mode md5 [level-1 | level-2]

Router(config-router)# authentication key-chain name_of_key_chain

  [level-1 | level-2]
These commands enable MD5 authentication for IS-IS on your router. The authentication mode md5 command specifies MD5 authentication. If you omit the IS-IS level number, both level-1 and level-2 are authenticated through MD5. The authentication key-chain command specifies the key to use for the MD5 hashing function.
Group 3 Steps: Using Authentication
You have one last command to complete on all your IS-IS routers:
Router(config)# router isis area_tag_#

Router(config-router)# no authentication send-only [level-1 | level-2]
In this syntax, you want to disable send-only authentication. In other words, you want your router to send authenticated updates as well as authenticate all received updates. The previous configuration performs this process. Make sure that you execute this command on all of your IS-IS routers.
To verify that IS-IS authentication is functioning correctly, use the show clns neighbors and debug isis adj-packets commands. With authentication functioning correctly, your router should see all IS-IS directly connected neighbors. If you do not see an IS-IS neighbor show up (and it was there before you enabled MD5 authentication), use the debug isis adj-packets command for detailed troubleshooting. For specific troubleshooting of IS-IS authentication, use the debug isis authentication information command.
IS-IS Authentication Example
Refer back to Figure 15-1 for this next illustration of an IS-IS MD5 authentication example. Example 15-7 shows the configuration steps to perform on the perimeter router.
Example 15-7. Defining Authentication Keys for IS-IS
Perimeter(config)# key chain ISIS-key

Perimeter(config-keychain)# key 1

Perimeter(config-keychain-key)# key-string secretkey1

Perimeter(config-keychain-key)# exit

Perimeter(config-keychain)# exit

Perimeter(config)# router isis 1

Perimeter(config-router)# authentication send-only
When you have completed the configuration in Example 15-7 on the perimeter router, duplicate it on RouterA and RouterB. After this, configure Example 15-8 on the perimeter router.
Example 15-8. Enable MD5 Authentication for IS-IS
Perimeter(config)# router isis 1

Perimeter(config-router)# authentication mode md5

Perimeter(config-router)# authentication key-chain ISIS-key
Again, when you are done with the perimeter router, repeat the Example 15-8 configuration on RouterA and RouterB.
Finally, perform the Example 15-9 configuration on the perimeter router, as well as on RouterA and RouterB.
Example 15-9. Authentication Both Sent and Received Updates for IS-IS
Router(config)# router isis 1

Router(config-router)# no authentication send-only
As you can see from this example, the configuration is more complex than for the other IGPs, but it not that much more difficult.
Other Tools
Besides using authentication, you can use other tools to help secure your routing protocol. This section discusses two tools: passive interfaces and ACL filtering.
Passive Interfaces
Classful routing protocols, such as RIPv1 and IGRP, and classless protocols built upon the foundations of a classful protocol, such as EIGRP, have a quirk in their configuration: You must specify a classful network number under the router process with the network command. All interfaces that have an address in this network number are included in the routing update. Note that in the newest versions of the Cisco IOS, EIGRP enables you to specify a wildcard mask to be more specific about participating interfaces.
Look at Figure 15-2 as an example. In this network, 191.1.1.0/24 has been broken into four subnets. Assume that the routers in this example are running EIGRP. Even though EIGRP is a classless protocol, it has its roots in IGRP, which is classful. Its configuration is essentially the same as that of IGRP: You configure the classful network number (I am assuming that the Cisco IOS on this router does not support subnet masks for the EIGRP network statement.
Figure 15-2. Classful Routing Example
However, in Example 15-10, this creates a problem for the perimeter router.
Example 15-10. Configuring EIGRP on the Perimeter Router
Perimeter(config)# router eigrp 65500

Perimeter(config-router)# network 192.1.1.0
As you can see from Example 15-10, both e0 and e1 are included in the EIGRP process. This creates a problem: You do not want to be advertising your internal routes out of e1 because the ISP?and possibly other devices?might see this information, especially in an ISP-bridged solution connection. Likewise, for RouterA and RouterB, you do not want to be advertising routes to the end stations for the top and bottom network segments. Remember that more attacks occur within than outside your network. Therefore, the less your internal users know about the structure of the network, the harder it becomes for them to mount various attacks.
To prevent your router from generating routing updates on an interface, use the passive-interface command:
Router(config)# router routing_protocol

  [routing_protocol_information]

Router(config-router)# passive-interface interface_type

  [slot_#/]port_#
CAUTION
One important thing to point out concerning the passive-interface command is that it prevents the local router only from generating routing updates on the specified interface; the router still will accept routing updates on the interface. Therefore, you need another solution, such as distribution lists or ACL filters, to block incoming routing updates. This is true for RIPv2, but for IS-IS, EIGRP, and OSPF, a neighbor relationship must be established first. Using the passive-interface command on interfaces with these routing protocols provides some protection.
Example 15-11 shows an example configuration for the perimeter router in Figure 15-2, assuming that the router is running EIGRP in AS 65,500.
Example 15-11. Using Passive Interfaces
Router(config)# router eigrp 65500

Router(config-router)# network 192.1.1.0

Router(config-router)# passive-interface e1
ACL Filters
As I explained in the last section, passive interfaces prevent the router only from advertising routes on the specified interface; the Cisco IOS still accepts routes on the interface for RIPv2 (however, I always play it safe and use ACLs to restrict updates from routing peers).
To prevent this, you need to configure an interface ACL that blocks routing updates.
Table 15-1 displays the IP protocols numbers for the routing protocols.
IP Protocol Number | IP Protocol | Other Protocol Information |
|---|---|---|
IP = 9 | IGRP | Destination address is 255.255.255.255 (IGRP uses broadcasts) |
IP = 88 | EIGRP | Destination address is 224.0.0.10 (EIGRP uses multicasts) |
IP = 89 | OSPF | Destination addresses are 224.0.0.5 and 224.0.0.6 (OSPF uses multicasts) |
IP = 124 | IS-IS | Destination addresses are 224.0.0.19, 224.0.0.20, and 224.0.0.21 (IS-IS uses multicasts) |
UDP = 520 | RIPv1 | Destination address is 255.255.255.255 (RIPv1 uses broadcasts) |
UDP = 520 | RIPv2 | Destination address is 224.0.0.9 (RIPv2 uses multicasts) |
TCP = 179 | BGP | Destination address is an address on the router (BGP uses unicast) |
Using Figure 15-2 as an example, assume that this network is using RIPv2. To prevent RIPv2 from accepting and receiving routing updates on the external interface (ethernet1), use the configuration in Example 15-12.
Example 15-12. Protection RIPv2 Routing Updates
Perimeter(config)# router rip

Perimeter(config-router)# version 2

Perimeter(config-router)# network 192.1.1.0

Perimeter(config-router)# passive-interface ethernet1

Perimeter(config-router)# exit

Perimeter(config)# ip access-list extended external-ACL

Perimeter(config-ext-nacl)# ! <--enter your other ACL commands here-->

Perimeter(config-ext-nacl)# deny udp any any eq 520

Perimeter(config-ext-nacl)# ! <--enter your other ACL commands here-->

Perimeter(config-ext-nacl)# exit

Perimeter(config)# interface ethernet1

Perimeter(config-if)# ip access-group external-ACL in
As you can see in this example, any RIP traffic that is trying to enter the external interface is blocked.
HSRP
HSRP is the Cisco proprietary default gateway protocol that allows redundancy of default gateways for clients without having to perform additional configuration on the clients. Even though HSRP is not a routing protocol, it serves a routing purpose, so I discuss how to protect HSRP from attacks by showing you how to configure authentication.
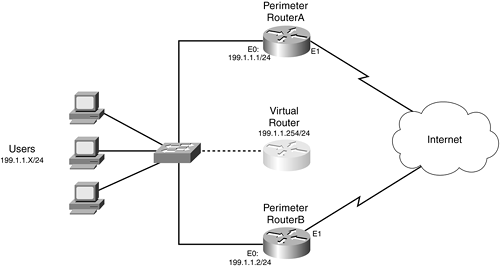
Figure 15-3 shows a simple HSRP example. In this example, the network has two perimeter routers, in which the internal users are using a default gateway address of 199.1.1.254, assigned by a DHCP server.
Figure 15-3. HSRP Example
As with the Cisco IOS routing protocols, HSRP supports MD5 authentication as of Cisco IOS 12.3(2)T. The use of authentication prevents spoofing attacks, which can result in a DoS attack. A hacker could subvert the HSRP operation and trick routers in the HSRP group into thinking that the hacker's "router" should be the active router. Thus, all traffic is redirected to the hacker's device, where he can examine it.
NOTE
Even though HSRP supports both clear-text and MD5 authentication, this book focuses only on the use of MD5.
I am assuming that you are already familiar with the configuration of HSRP, so I focus only on the MD5 authentication configuration. Here is the basic configuration of your HSRP router, using MD5 authentication:
Router(config)# interface type [slot_#/]port_#

Router(config-if)# ip address IP_address subnet_mask

Router(config-if)# standby [group_#] ip virtual_IP_address

Router(config-if)# standby [group_#] priority priority

Router(config-if)# standby [group_#] preempt

Router(config-if)# standby track interface_type[slot_#/]port_#

  decrement_value

Router(config-if)# standby [group_#] authentication md5 key-string key

  [timeout seconds]
The only new command I am introducing in this configuration is the standby authentication command. The key that you specify here must be configured on all HSRP routers in the same HSRP group. If you want to change the HSRP MD5 authentication key, first make sure that you configure the optional timeout parameter. This parameter specifies a time period that both the old and new keys are accepted, giving you enough time to configure all of your routers to use the new key.
Instead of configuring the key with the key-string parameter in the standby authentication command, you can use the following syntax:
Router(config)# key chain name_of_key_chain

Router(config-keychain)# key key_#

Router(config-keychain-key)# key-string your_secret_key

Router(config-keychain-key)# exit

Router(config-keychain)# exit

Router(config)# interface type [slot_#/]port_#

Router(config-if)# standby [group_#] authentication md5

  key-chain name_of_key_chain [timeout seconds]
When you are done with your configuration, use the show standby and debug standby errors commands.
Example 15-13 shows a simple configuration example, using Perimeter RouterA in Figure 15-3.
Example 15-13. Using Authentication with HSRP on RouterA
RouterA(config)# interface ethernet0

RouterA(config-if)# ip address 199.1.1.1 255.255.255.0

RouterA(config-if)# standby 1 ip 199.1.1.254

RouterA(config-if)# standby 1 priority 110

RouterA(config-if)# standby 1 preempt

RouterA(config-if)# standby track ethernet1 50

RouterA(config-if)# standby 1 authentication md5 key-string secret
Example 15-14 displays RouterB's configuration.
Example 15-14. Using Authentication with HSRP on RouterB
RouterB(config)# interface ethernet0

RouterB(config-if)# ip address 199.1.1.2 255.255.255.0

RouterB(config-if)# standby 1 ip 199.1.1.254

RouterB(config-if)# standby 1 priority 100

RouterB(config-if)# standby 1 preempt

RouterB(config-if)# standby 1 authentication md5 key-string secret
As you can see from this example, the configuration is straightforward.


