Basic Logging
Log messages commonly are referred to as system error messages in the Cisco IOS. Each of these messages has a severity level assigned to it, along with a description indicating the seriousness of the problem or event. The Cisco IOS sends logging messages, including output from debug commands, to a logging process. By default, this is only the console interface; however, you can log messages to the router's internal buffer; terminal lines, such as the auxiliary and vtys; a syslog server; and an SNMP management station.
Log Message Format
Log messages take the following format on a Cisco IOS device:
%<facility>-<severity>-<mnemonic>: <message_text>
Here is a simple example:
%LINK-5-CHANGED: Interface Ethernet1, changed state to

  administratively down
Assuming that you have enabled time stamps, as well as sequence numbers, for your log message, you will see the following, with the sequence number first, followed by the time stamp and then the actual message:
000022: Jan 02 15:42:11.048:%LINK-5-CHANGED: Interface Ethernet0,

  changed state to administratively down
Adding time stamps and sequence numbers to your router's logging output is discussed in the "Date and Time Stamps" section.
Basic Logging Configuration
You will want to do two basic tasks when setting up logging: enable logging and control the display of logging on your lines. The following two sections discuss these two configuration tasks.
Enabling Logging
By default, logging is enabled on your router for the console line only. Logging must be enabled and configured for any other logging destination. To enable logging, use the following command:
Router(config)# logging on
Using the logging on command, you enable any other configured destination for logging, such as a syslog server or the router's internal buffer, for logging. This command must be enabled before you can log system messages to locations other than the console port; however, you can control individually which processes will receive logging messages with other logging commands, as discussed later in the "Logging Destinations" section. For example, if you have configured commands for logging messages to a syslog server but you have not executed the logging on command, the Cisco IOS logs messages only to the console line.
Configuring Synchronous Logging
The main purpose of the logging synchronous command is to synchronize the logging output for messages and debug output to the router's lines: console, auxiliary, and VTY. For example, one annoying thing about logging events on your router's lines is that you might be typing in a command, and the router displays a message on the line right in the middle of your typing. This message has no bearing on the command that you are typing, and you can continue typing to complete your command; however, this behavior can be annoying.
The main purpose of synchronous logging is to control when messages are displayed on your router's lines. When it is enabled, synchronous logging causes the Cisco IOS to display the message and then perform the equivalent of a ctrl-R, which causes the router to redisplay the information that you have typed on the command line. Example 18-1 shows a simple example of the process without synchronous logging.
Example 18-1. Displaying Logging Information Without Synchronous Logging
Router(config)# end

Router# show ru

2w2d: %SYS-5-CONFIG_I: Configured from console by consolenning-config
Notice how the command show running-config was interrupted by a Cisco IOS log message. If you enabled synchronous logging, you would see the output in Example 18-2 instead.
Example 18-2. Displaying Logging Information with Synchronous Logging
Router(config)# end

Router# show run

2w2d: %SYS-5-CONFIG_I: Configured from console by console

Router# show run
In Example 18-2, in the middle of typing the show running-config command, a log message was placed on the screen. Then the information that you previously entered on the command-line interface (CLI) is redisplayed.
You can affect the displaying of log messages to your lines with the logging synchronous command, shown here:
Router(config)# line type #

Router(config-line)# logging synchronous

  [level severity_level | all] [limit #_of_lines]
The severity level refers to the severity level of logging messages that are printed asynchronously. Messages with a severity number higher than this value are displayed synchronously (less severe messages); messages with a lower number (more severe) are displayed asynchronously. The default severity level is 2. The all parameter causes all messages to be displayed asynchronously, regardless of their assigned security level.
The limit parameter specifies how many synchronous messages should be queued up before the router starts dropping new messages. The default value is 20 messages. If the router has to drop messages because it reaches this threshold, you will see the following log message indicating the number of messages that the router had to drop:
%SYS-3-MSGLOST #_of_messages due to overflow
NOTE
The main disadvantage of synchronous logging is that when your router is generating a lot of messages and you are typing slowly in the CLI, the router must drop any messages above this threshold. Thus, you never will see these messages on your lines. If it is critical that you see these kinds of events, I highly recommend that you log them to either the router's internal buffer, a syslog server, or an SNMP management station.
CAUTION
Be careful about setting large queue limits to nonconsole lines, such as VTYs. If a hacker has access to a VTY on your router and synchronous logging is enabled for your VTYs, the hacker could leave the VTY idle in the middle of a command in the CLI. This would cause the Cisco IOS to fill up the large queue with messages, possibly consuming your router's entire memory. In certain cases, the router stops handling other processes, such as traffic forwarding. In the worst case, the router might reload itself.
Logging Destinations
You can forward logging information to four basic destinations:
Lines
Internal buffer
Syslog server
SNMP management station
The following sections discuss how to set up logging using these destination options, after covering log messages and security levels.
Severity Levels
Before I discuss logging to the four destination types, I need to cover log messages and security levels. Each log message is associated with a security level, which ranks the seriousness of the message: The lower the number is, the more severe the message is. Severity levels range from 0 (the highest) to 7 (the lowest). Table 18-1 contains an overview of the severity levels. The Parameter column gives the name of the logging level. The Level column lists the corresponding severity level. With the logging commands, you can specify the severity by number or name.
Parameter | Level | Syslog Description | Description |
|---|---|---|---|
emergencies | 0 | LOG_EMERG | The system is unusable. |
alerts | 1 | LOG_ALERT | Immediate action is required on your part. |
critical | 2 | LOG_CRIT | A critical condition exists on the router. |
errors | 3 | LOG_ERR | An error condition exists on the router. |
warnings | 4 | LOG_WARNING | A warning condition exists on the router. |
notifications | 5 | LOG_NOTICE | A normal but significant event occurred on the router. |
informational | 6 | LOG_INFO | An informational event occurred on the router. |
debugging | 7 | LOG_DEBUG | This is output from debug commands. |
NOTE
If you use the log keyword in an ACL statement, this output will be displayed on the console only if the severity level is set to 6 or 7.
One thing that you can control for logging functions is which messages are logged for the four destinations. For example, on the console, you could limit logging to messages at severity level 4 (which displays messages from 0 to 4); but for a syslog server, you could set it to 6 (0 to 6).
Line Logging
Two commands are used for controlling logging messages sent to the router's lines:
Router(config)# logging console [severity_level]

Router(config)# logging monitor [severity_level]
It is important to point out that the logging console command refers to logging to physical TTYs, such as the console and auxiliary lines. The logging monitor command refers to logging to logical VTYs, such as Telnet sessions. By default, logging to the console is enabled for all levels; however, you can modify this by changing the severity level in the logging console command. Valid severity parameters are listed in the first column of Table 18-1.
Logging to VTYs and the AUX is disabled by default and requires that you either execute the privileged EXEC terminal monitor command, which duplicates console logging messages to the VTYs, or configure the logging monitor command. If you use the latter approach, you do not need to execute the terminal monitor command to see TTY line log output when you initially access a router's VTY. When configuring the logging monitor command, if you do not specify the severity level, it defaults to 7 (debug).
Note that, with both commands, you still must enable logging with the logging on command.
TIP
Because of the processing burden placed on routers to log messages to terminal lines, such as the console, I highly recommend changing the severity level to something higher than debug (lower number). If you need to see messages with lower severity levels, use either the router's internal buffer, a syslog server, or an SNMP management station.
CAUTION
If you disable the logging on command in the middle of a process generating error or debug messages, the router might slow down considerably until these messages are displayed on the line of the router. Therefore, be careful about the severity level assigned to logging messages displayed on the console line.
Internal Buffer Logging
One problem of logging messages to TTYs or VTYs is that if you are not actually looking at the screen for the attached line and the message scrolls past the screen and out of your terminal software's history buffer, there is no mechanism to see missed messages. This problem can be alleviated by logging the messages to a destination other than a line.
One solution is to log messages to the router's internal buffer, which is either enabled or disabled by default, depending on the router platform; in most platforms, it is enabled by default. To set up logging to the router's buffer, use the following command:
Router(config)# logging buffered [buffer_size | severity_level]
This command has two parameters. The buffer_size parameter refers to the size, in bytes, that should be allocated to the internal buffer. This can be from 4096 to 4,294,967,295 bytes. To set the buffer size back to the factory default, use the default logging buffered command. The severity_level parameter refers to the severity level of messages that should be logged, as discussed in Table 18-1. Note that the default size and severity level (typically 7) depend on the router platform model.
CAUTION
Be careful about setting the size of the buffer too large: With many messages, this can cause the router to run out of memory, possibly causing it to crash.
Syslog Server Logging
Enabling logging to a syslog server is slightly more complicated than setting up logging to a line or to the internal buffer, where either no configuration command or a couple of configuration commands are necessary. Here are the basic commands to set up logging to a syslog server:
Router(config)# logging on

Router(config)# logging host {IP_address | hostname}

Router(config)# logging trap severity_level

Router(config)# logging source-interface interface_type interface_#

Router(config)# logging origin-id {hostname | ip | string string}

Router(config)# logging facility facility_type
The logging on command allows logging to nonconsole destinations. The logging host command specifies either the IP address, the host name, or the fully qualified domain name (FQDN) of the syslog server. If you enter this command more than once with a different syslog server destination, you can build a list of syslog servers that the router can use. However, the more servers you list, the more duplication of log messages the router must process.
NOTE
Before Cisco IOS 12.2(15)T, trap logging was enabled using the logging {hostname | IP_address} command. Now, use the logging host command.
The logging trap command specifies the severity level of log messages to send to the syslog server. The default is informational; these parameters were discussed in Table 18-1.
By default, whichever interface the router uses to reach the syslog server is the IP address placed in the source IP address field of the IP packet header. To create consistent log entries so that the same address is used on a router, use the logging source-interface command. With this command, you must specify the name and number of the interface, as in ethernet 0. This command is necessary only if the router has two or more interfaces to reach the syslog server, but you want to ensure that, for consistency, the same source address is used in the syslog packets. This makes it easier to implement filtering rules to prevent unwanted log messages on the syslog server.
In 12.2(15)T, Cisco added the capability to insert information about the router's identity into the syslog message, making it easier to search for or separate information on the syslog server on a per-router basis. This is accomplished with the logging origin-id command, which is disabled by default. Your identification choices are hostname (the name configured with the hostname command), ip (the IP address of the sending interface), and string (a string you defined that is used to identify the router). If the string contains spaces, you must enclose it in quotation marks.
The logging facility command defines the facility to use on a syslog server running UNIX, where the log messages will be stored. The Cisco IOS supports the facility types listed in Table 18-2.
Parameter | Description |
|---|---|
auth | Authorization system |
cron | Cron facility |
daemon | System daemon |
kern | Kernel |
local0 through local7 | Locally defined messages (facilities 0 to 7) |
lpr | Printer system |
E-mail system | |
news | USENET news |
sys9 through sys14 | System use |
syslog | System log |
user | User process |
uucp | UNIX-to-UNIX copy system |
If you do not specify a facility, it defaults to local7. On a UNIX system, you can specify the location of the log file for the facility that you specify by editing the appropriate configuration file. For example, on a BSD 4.3 UNIX system, edit the /etc/syslog.conf file and create an entry for your facility. Here is a simple example:
local7.debugging /usr/adm/logs/router.log
In this example, the facility level is local7 and the debugging keyword specifies the syslog logging level. The syslog level affects which levels of messages are stored in the filename that follows: Any message at this severity level or higher is stored in the specified file (/usr/adm/logs/router.log).
To sum up the configuration of a syslog server, see the network shown in Figure 18-1.
Figure 18-1. Description
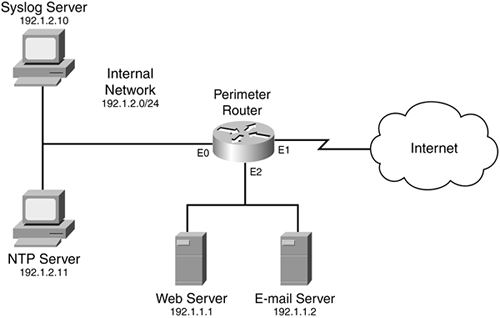
Example 18-3 shows the router's configuration.
Example 18-3. Setting Up Basic Syslog Logging on a Router
Router(config)# logging on

Router(config)# logging host 192.1.2.10

Router(config)# logging trap informational

Router(config)# logging source-interface ethernet 0

Router(config)# logging origin-id string Perimeter1
This example is straightforward. The first command enables logging. The second command specifies the internal syslog server, and the third command sets the logging severity level. The fourth command specifies that the source IP address of ethernet 0 should be used in syslog packets. The last statement sets the origin information to Perimeter1, which appears in the log messages, making it easier to search for log messages from this router.
SNMP Logging
The last location that you can have log messages sent to is an SNMP management station. I briefly discussed the configuration of SNMP in Chapter 3, "Accessing a Router." In this section, I focus only on the configuration of commands to log information to the management station. To enable log messages to be sent to an SNMP management station, you first need to execute the following command:
Router(config)# snmp-server enable trap syslog
After this, three commands control logging information to the management station:
Router(config)# logging on

Router(config)# logging history severity_level

Router(config)# logging history size number
I already discussed the use of the first command. The second command specifies the severity level of log messages that should be sent to the SNMP management station. The default level is warning (you can see the list of severity levels in Table 18-1). Because SNMP uses UDP, and UDP is unreliable, syslog traps are stored in a history table on the router. At least one syslog message, the most recent one, is stored in the history table (the default is one message). You can increase this up to 500 with the logging history size command.
NOTE
Starting with Cisco IOS 12.2(1.4), you can have the Cisco IOS log each NAT translation that it builds by using the ip nat log translations syslog command. This can be useful in troubleshooting address-translation problems.
Other Logging Commands
This section covers three miscellaneous logging commands: adding time stamps to log messages, adding sequence numbers to log messages, and rate limiting log messages.
Date and Time Stamps
By default, log messages do not include a date and time stamp. Having a date and time stamp included on each log message is useful in determining when events occurred, especially if you are not sitting in front of the console monitoring the events. To enable date and time stamps, use one of the two following commands:
Router(config)# service timestamps {debug | log} uptime
or:
Router(config)# service timestamps {debug | log} datetime

  [msec] [localtime] [show-timezone] [year]
Time stamps can be added to two types of messages: debug and logging messages. The debug parameter causes the Cisco IOS to include a time stamp in debug output. The log parameter causes the Cisco IOS to include a time stamp in any type of log message. The first command, with the uptime parameter, has the Cisco IOS include the amount of time since the router has been up in the message. Here is an example:
1w0d: %SYS-5-CONFIG_I: Configured from console by console
In this example, the router had been up 1 week and 0 days when this message was generated.
If you want an exact date and time, use the datetime parameter. This parameter causes the Cisco IOS to include the date and time along with the message (the date and time are in a UTC format). Here is the standard format: MMM DD HH:MM:SS. When using the datetime parameter, you have some optional parameters. The msec parameter causes the Cisco IOS to include milliseconds in the message. localtime causes the Cisco IOS to display the time based on the time zone configured locally on the router. By default, the year is not included in the time, but using the optional year parameter overrides this behavior. The show-timezone parameter causes the Cisco IOS to include the time zone name in the output of the date and time. Here is a simple example in which the log parameter was used with datetime, localtime, and show-timezone:
.May 23 11:13:25 UTC: %SYS-5-CONFIG_I: Configured from console by console
You will notice something interesting about the previous message: It begins with a period (.). A log message begins with one of three characters: a blank, an asterisk, or a period. Table 18-3 explains the use of these characters. In the previous example, the router's clock was in sync with an NTP time server, but it lost connectivity to the server, so the router's time might not be exactly correct. Basically, these parameters reflect the authority or reliability of the time source.
Parameter | Name | Description |
|---|---|---|
Blank | The router's clock has been set manually or is in synch with a Network Time Protocol (NTP) time server. (NTP is discussed at the end of this chapter.) | |
* | Asterisk | The router's clock has not been set or is not in sync with an NTP server. |
. | Period | The router's clock was in synch but has lost contact with an NTP server. |
Sequence Numbers
Besides adding time stamps to log messages, you can have the Cisco IOS display a sequence number in each message. This is accomplished with the following command:
Router(config)# service sequence-numbers
Here is an example with both sequence numbers and time stamps enabled:
000039: .Dec 30 11:38:541 EST: %SYS-5-CONFIG_I: Configured from

  console by console
In this example, the sequence number is 39, indicating the 39th message that was logged.
Rate Limits
Starting in Cisco IOS 12.1(3)T, you can limit the rate of logging messages on a per-second basis with the logging-rate command, shown here:
Router(config)# logging rate-limit

  {number | all  number | console number} [except severity]
By default, no limits are configured on the router. By specifying a number between 1 and 10,000, you are limiting the number of logging messages per second to this value. The all keyword, followed by a number, affects all logging and debugging messages. The console keyword limits the rate of logging messages to the console. The except parameter creates an exception for the messages at the specified severity level and higher.
Example 18-4 shows a simple example of configuring rate limiting for log messages.
Example 18-4. Configuring Logging Rate Limiting
Router(config)# logging rate-limit console 2 except 2

Router(config)# logging rate-limit 50 except 3
In this example, the first command limits logging of messages to two per second to the console, unless the message severity level is between 0 and 2. The second command applies to rate limiting of all other log messages to 50 per second, except for those with a severity level between 0 and 3.
TIP
I highly recommend that you use this command, especially on the console interface, to reduce the overhead that the router must deal with when a flood of messages occurs because of an attack. You can use this command without taking an adverse performance hit.
Logging Verification
After you have configured logging, you can use various show commands to verify your logging configuration and operation.
show logging Command
The show logging command displays the current state of syslog error and event logging, including any configured syslog server addresses, which types of logging are enabled, and logging statistics. Here is the format of the command:
Router# show logging [summary]
Example 18-5 shows sample output from this command.
Example 18-5. Using the show logging Command
Router# show logging

Syslog logging: enabled (0 messages dropped, 1 messages rate-limited, 0 flushes)

     Console logging: level debugging, 31 messages logged, xml disabled

     Monitor logging: level debugging, 0 messages logged, xml disabled

     Buffer logging: disabled, xml disabled

     Logging Exception size (4096 bytes)

     Count and timestamp logging messages: enabled

     Trap logging: level informational, 187 message lines logged

        Logging to 192.1.2.10, 187 message lines logged
In this example, syslog logging has been enabled and one log message has been rate limited. Console and monitoring logging are enabled and set to a severity of debugging. Time stamps also are enabled. At the bottom, you can see that the logging level for traps (syslog) is informational, with a total of 187 messages logged to the syslog server at 192.1.2.10.
If you have enabled logging to the router's internal buffer, you also can see logging messages with the show logging command, as in Example 18-6.
Example 18-6. Using the show logging Command to View Buffered Log Messages
Router# show logging

Syslog logging:enabled (0 messages dropped, 0 flushes, 0 overruns)

      Console logging: level errors, 32 messages logged, xml disabled

    Monitor logging:level errors, 0 messages logged

    Buffer logging:level debugging, 106 messages logged

    Trap logging:level debugging, 121 message lines logged

        Logging to 192.1.2.10, 121 message lines logged

Log Buffer (6144 bytes):

Dec 11 13:18:49 EDT: NTP: Maxslew = 189739

Dec 11 14:16:42 EDT:%SYS-5-CONFIG:Configured from

     tftp://192.1.2.9/perimeter.cfg

<--output omitted-->
To clear the log messages from the internal buffer, use the clear logging command.
The summary option in the show logging command displays counts of messages by type, as in Example 18-7.
Example 18-7. Using the summary Parameter with the show logging Command
Router# show logging summary

+-----+-------+-------+------+-------+-------+-------+------+-------+

 SLOT | EMERG | ALERT | CRIT | ERROR |WARNING| NOTICE| INFO | DEBUG |

+-----+-------+-------+------+-------+-------+-------+------+-------+

|* 0* |     . |     . |    . |     . |     . |     . |    . |     . |

|  1  |       |       |      |       |       |       |      |       |

|  2  |       |       |      |     2 |     5 |    48 |      |       |

|  3  |       |       |      |       |       |       |      |       |

|  4  |       |       |      |     1 |     5 |    58 |      |       |

|  5  |       |       |      |       |       |       |      |       |

|  6  |       |       |      |       |       |       |      |       |

|  7  |       |       |      |    19 |     5 |    52 |      |       |

|  8  |       |       |      |       |       |       |      |       |

|  9  |       |       |      |     2 |     5 |    55 |      |       |

| 10  |       |       |      |       |       |       |      |       |

| 11  |       |       |      |     8 |     5 |    67 |      |       |

+-----+-------+-------+------+-------+-------+-------+------+-------+
The first column, SLOT, indicates which slot in the chassis the log messages apply to.
NOTE
The show logging summary command is supported only for certain router models. In other router models, the show logging count command is used, as discussed in the next section.
show logging history Command
The show logging history command displays the syslog history table size, the status of the messages in the table, and the messages themselves. Remember that the history table is used to log messages to an SNMP management station. Example 18-8 shows sample output from this command.
Example 18-8. Using the show logging history Command
Router# show logging history

Syslog History Table: 1 maximum table entries,

  saving level notifications or higher

0 messages ignored, 0 dropped, 8 table entries flushed,

SNMP notifications not enabled

  entry number 9: SYS-5-CONFIG_I

  Configured from console by console

  timestamp: 1120
In this example, the table size is the default value, 1, and any event at a severity level of notification or higher is logged. Eight entries were flushed from the table to make room for new ones. Currently, the latest entry in the table is entry no. 9.
Logging and Error Counts
Starting with Cisco IOS 12.2(8)T, Cisco introduced the Error Log Count feature. This is a useful feature if you are using the router's internal buffer and older messages are being aged out. With this feature, the Cisco IOS still keeps track of the number of occurrences of a particular log message, as well as the last occurrence of the message. This can be useful if the internal buffer cannot hold all of your messages, but the same error or problem continually is recurring and shows up in the output of your error counts. This feature basically supplants the show logging summary command discussed in the last section.
Enabling this features is simple. From configuration mode, execute the following command:
Router(config)# logging count
This command causes the Cisco IOS to count each log message, including the time stamp of the last occurrence for each message type.
After enabling this feature, you can see the error count with the show logging count command, as in Example 18-9.
Example 18-9. Viewing Error Counts for Log Messages
Router# show logging count

Facility       Message Name                     Sev Occur   Last Time

=====================================================================

SYS            BOOTTIME                           6    1    00:00:15

SYS            RESTART                            5    1    00:00:14

SYS            CONFIG_I                           5    2    1d02h

-------------  -------------------------------  ---------------------

SYS TOTAL                                              5


LINEPROTO      UPDOWN                             5   13    00:00:21

-------------  -------------------------------  ---------------------

LINEPROTO TOTAL                                       13


LINK           UPDOWN                             3    1    00:00:20

LINK           CHANGED                            5   12    00:00:10

-------------  -------------------------------  ---------------------

LINK TOTAL                                            13

<--output omitted-->
In Example 18-9, you can see that the messages are broken down by category.


