Web Service Access from a Palm Device
Calling a Web Service Directly
In this option, the Palm calls the Web service directly as shown in Figure 8.7.
Figure 8.7. Accessing a Web service directly from the Palm device
We will need a SOAP client for J2ME. There are several popular clients available, such as kSOAP (http://www.ksoap.org) and Wingfoot (http://www.wingfoot.com). For this client, we will choose the Wingfoot SOAP client. It also has a J2SE version, which we will use for the PocketPC client.
Download the latest Wingfoot SOAP client from http://www.wingfoot.com/. Note that you will need to register by providing your email address and your name. The examples in this book use Wingfoot 1.03.
Unzip the downloaded ZIP file into a convenient location. The ZIP will contain two JAR files: one for J2ME named kvmwsoap_1.03.jar and the other for J2SE named j2sewsoap_1.03.jar. Copy the J2ME JAR to the ${palm-base}\lib directory.
In the example application, com.javaonpdas.webservices.clients.wingfoot. SOAPClient, the application has two buttons: one to retrieve the names and the other to retrieve the image, specified by a hard-coded name.
When the "Get Names" button is pressed, we create an Envelope object and use it to create a Call object. The Call object represents the service invocation we want to make, so we need to specify the name of the service to invoke and the service's method name.
Envelope requestEnvelope = new Envelope();
requestEnvelope.setBody("extension", ".png");
Call call = new Call(requestEnvelope);
call.setMethodName("getNames");
call.setTargetObjectURI("ImageService");
Next we set up the transport by telling it the SOAP endpoint. Note that the hostname in the URL is not localhost, as the Palm will interpret that as meaning the Palm device rather than the machine where the Web service resides.
[View full width]HTTPTransport transport = new HTTPTransport("http://192.168.0.1:8080/axis/servlet/|AxisServlet", null); transport.getResponse(true);
The transport object is used to invoke the call, and the result is assigned to an Envelope object.
Envelope responseEnvelope = call.invoke(transport);
Then the envelope is queried to process its contents. If an error occurred, isFaultGenerated will return true. In this case we need to retrieve the fault from the envelope and, in this case, display it on the screen. Otherwise, the response to the Web service invocation is in the 0th parameter, represented as an array of Object. These are the names of the images available on the server, so we insert them at the end of the text field and add a new line character.
if (responseEnvelope != null) {
   if (responseEnvelope.isFaultGenerated()) {
      Fault f = responseEnvelope.getFault();
      textField.insert("Error: " + f.getFaultString(), textField.size());
   }
   else {
      textField.setString(null);
      Object[] parameter = (Object[])responseEnvelope.getParameter(0);
      for (int i=0; i<parameter.length; i++)
         textField.insert(parameter[i] + "\n", textField.size());
   }
}
The code to handle the "Get Image" button press is similar but there are some important extensions. The first difference is in the set up of the envelope, where we set the parameter for the method we want to call.
Envelope requestEnvelope = new Envelope();
requestEnvelope.setBody("name", "kangaroo1.png");
When we set up the Call object, there are some other differences compared to the "Get Names" case above. In this case, the Web service method we want to invoke returns an object we defined, rather than a standard object (i.e., String) as was the case in "Get Names." The ImageService's getImage method returns an ImageValue, so we need to specify that in setting up the Call object using a TypeMappingRegistry. The TypeMappingRegistry tells the SOAP client how to deal with the ImageValue type returned by the getImage method.
[View full width]Call call = new Call(requestEnvelope); call.setMethodName("getImage"); call.setTargetObjectURI("ImageService"); TypeMappingRegistry registry = new TypeMappingRegistry(); registry.mapTypes("urn:BeanService", "ImageValue", new ImageValue().getClass(), new
The registry.mapTypes method creates a new entry in the registry that maps between the custom SOAP type ImageValue in the namespace urn:BeanService and the bean serializer and deserializer class ImageValue. The client then knows that the ImageValue class is used to serialize and deserialize the type ImageValue.
The transport is set up as before.
[View full width]HTTPTransport transport = new HTTPTransport("http://192.168.0.1:8080/axis/servlet/
And the service is invoked.
Envelope responseEnvelope = call.invoke(transport);
Next we process the response in a similar way to the "Get Names" case, except this time we are expecting an ImageValue instance.
ImageValue imageValue = (ImageValue)responseEnvelope.getParameter(0);
Now that we have the instance of ImageValue, containing the image in encoded form as received from the server, we need to decode the Base64-encoded string back into an image. The Wingfoot SOAP client JAR includes a Base64 encoder and decoder, so we will use that.
To decode the encoded string, we use the String constructor of the class Base64, and then the getBytes method to retrieve the byte array. The Image class has a static method createImage that takes a byte array, which we use to create an immutable image for the ImageItem on the main screen.
[View full width]Base64 encodedImage = new Base64(imageValue.getEncodedImage()); imageItem.setImage(Image.createImage( encodedImage.getBytes(), 0, encodedImage.getBytes().
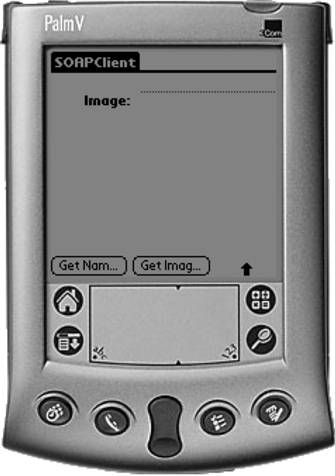
To run the application, type ant SOAPClient. The emulator will start and the screen will look like the screen in Figure 8.8.
Figure 8.8. The SOAPClient window
Pressing the "Get Names" button will result in the invocation of the ImageService Web service, and the Palm will display on the screen the names of images on the server, as shown in Figure 8.9.
Figure 8.9. Image names returned by the Web service

Pressing the "Get Image" button will cause the getImage method of the ImageService service to be invoked, and the image kangaroo1.png is displayed on the screen, similar to Figure 8.10.
Figure 8.10. An image returned from the Web service
Using a Proxy with HTTP to Access the Web Service
Having a SOAP client on the Palm device means that there is less space for your application, and valuable processing resources are used to generate the SOAP request and parse the response. Often in constrained environments, we need to find a way to off-load processing from the device if at all possible. In this section, we look at one such alternative. Off-loading processing from the device means that we need to do some more processing on the server side. The server side is relatively unconstrained in processing resources, so it makes sense to do more there than on the constrained mobile device. We need some processing to be done on the server on behalf of the Palm device. The processing interacts with the Web service, and the Web service is unchanged. The results of this processing are sent to the device in a form that it can process with a minimum of effort. The logic to perform this processing is called a proxy.
One approach to building a proxy to interact with the ImageService on the Palm's behalf is to use a servlet. A servlet provides classes that make it very easy to create server-side logic accessed with HTTP as shown in Figure 8.11.
Figure 8.11. Accessing the Web service via a server-side proxy
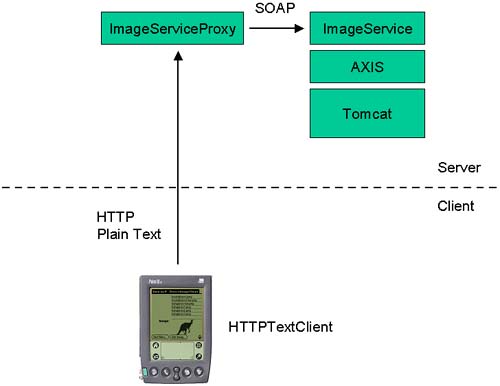
The Palm will invoke the servlet using HTTP GET and a URL, and retrieve the information as text in a Web page. The URL will embed some parameters that form the protocol between the Palm and the proxy. The first parameter is the service endpoint (the name is "service-end-point"), the value of which is a URL that tells the proxy where to find the ImageService Web service. The second parameter named "action" tells the proxy which ImageService method to invoke. The values will be "getNames" and "getImage." If the action is "getImage," another parameter named "name" has the value of the image to retrieve.
The first thing is to create a class that extends HttpServlet:
public class ImageServiceProxy extends HttpServlet {

}
Next we will implement the doGet method. This method gets the values of the parameters and invokes the ImageService methods accordingly. It then writes the response to the servlet's output stream.
[View full width]public void doGet(HttpServletRequest request, HttpServletResponse response) throws
The doGet method makes use of some helper methods, for accessing the ImageService Web service. The purpose of these methods is to separate the Web service access from the main servlet logic, as they are logically distinct.
[View full width]private String[] getNames(URL endPointURL) { String[] names = null; try { Service service = new Service(); Call call = (Call)service.createCall(); call.setTargetEndpointAddress(endPointURL); call.setOperationName(new QName("ImageService", "getNames")); names = (String[])call.invoke(new Object[] {}); } catch (AxisFault fault) { System.err.println("Generated fault: "); System.out.println(" Fault Code = " + fault.getFaultCode()); System.out.println(" Fault String = " + fault.getFaultString()); } catch (Exception e) { System.out.println(e.toString()); } return names; } private ImageValue getImage(URL endPointURL, String name) { ImageValue imageValue = null; try { // Set up the SOAP Service Object Service service = new Service(); Call call = (Call)service.createCall(); call.setTargetEndpointAddress(endPointURL); call.setOperationName(new QName("ImageService", "getImage")); call.addParameter("name", org.apache.axis.encoding.XMLType.XSD_STRING, ParameterMode.
To deploy the servlet to run on Tomcat, we will need to set up a new Web application. We will call the Web application "javaonpdas," and so we need to create a new directory under ${tomcat-base}\webapps called javaonpdas. In the javaonpdas directory, we need a WEB-INF directory, which in turn should contain a lib directory for the JAR files for the Web application.
In the directory ${tomcat-base}\webapps\javaonpdas\WEB-INF we need to put a web.xml file that describes the new Web application. The web.xml file describes the servlet class that implements the Web application, as well as the URL pattern to be used to access the servlet. The servlet section describes this. Normally we do not want the servlet accessed with a long-winded URL that includes the fully qualified class name?we can use a shorthand name instead. The servlet-mapping section sets this up.
<?xml version="1.0" encoding="ISO-8859-1"?>

<!DOCTYPE web-app
    PUBLIC "-//Sun Microsystems, Inc.//DTD Application 2.2//EN"
    "http://java.sun.com/j2ee/dtds/web-app_2.2.dtd">

<web-app>
  <servlet>
    <servlet-name>ImageServiceProxy</servlet-name>
    <display-name>ImageServiceProxy</display-name>
    <servlet-class>
        com.javaonpdas.proxy.ImageServiceProxy
    </servlet-class>
  </servlet>

  <servlet-mapping>
    <servlet-name>ImageServiceProxy</servlet-name>
    <url-pattern>/servlet/ImageServiceProxy</url-pattern>
  </servlet-mapping>
</web-app>
With these mappings in place, we can access the new servlet with the following URL:
http://192.168.0.1:8080/javaonpdas/servlet/ImageServiceProxy
Because our Web application is an Axis SOAP client, we will copy the Axis client JARs into the ${tomcat-base}\webapps\javaonpdas\WEB-INF\lib directory. The JARs are
axis.jar
jaxrpc.jar
axis-ant.jar
commons-discovery.jar
commons-logging.jar
log4j-1.2.4.jar
saaj.jar
wsdl4j.jar
The ImageServiceProxy class is compiled and deployed as part of the CompileDesktop target in the Ant build file. The resultant JAR javaonpdas-desktop.jar is also copied to the ${tomcat-base}\webapps\javaonpdas\WEB-INF\lib directory.
Once the set up of the new Web application is complete, we can test it. Restart Tomcat and use a browser to access the following URL:
[View full width]http://192.168.0.1:8080/javaonpdas/servlet/ImageServiceProxy?service-end-point=http://
This URL is invoking the new ImageServiceProxy servlet, telling it the Web service endpoint to use (http://localhost:8080/axis/servlet/AxisServlet), and the action to perform (action=getNames).
Because the proxy accepts a URL and writes the result in plain text, we can see the result in the Web page in Figure 8.12.
Figure 8.12. Using a browser to return image names from the Web service via the proxy
Similarly, we can use the following URL to retrieve the Base64-encoded image kookaburra.png:
[View full width]http://192.168.0.1:8080/javaonpdas/servlet/ImageServiceProxy?service-end-point=http://
The first line in Figure 8.13 is the long integer corresponding to the image's last modified date, and the second line in the Base64-encoded string of the image itself.
Figure 8.13. Using a browser to retrieve the Base64 representation of an image
To create a Palm client that accesses the proxy rather than the Web service directly, we will modify SOAPClient and create a new MIDlet called HTTPTextClient. This MIDlet is similar except for the way the getNames and getImage commands are handled.
The first step is to set up the HTTP connection by opening the input stream.
[View full width]HttpConnection connection = null; InputStream is = null; String url = "http://192.168.0.1:8080/javaonpdas/servlet/
Assuming the content length is not zero, we create a byte array to accommodate the content, and read from the input stream.
byte[] byteArray = new byte[contentLength];
is.read(byteArray);
Next we parse the byte array looking for '\n' characters, indicating the end of an image file name. For each file name, we add the string to the text field.
StringBuffer buffer = new StringBuffer();
textField.setString(null);
for (int i=0; i<byteArray.length; i++) {
   if (byteArray[i] == (byte)'\n') {
      textField.insert(buffer.toString() + "\n", textField.size());
      buffer.setLength(0);
   }
   else if (byteArray[i] == (byte)'\r') {
   }
   else {
      buffer.append((char)byteArray[i]);
   }
}
Running ant HTTPTextClient compiles the application and starts the emulator. Pressing the "Get Names" button will result in the image file names being displayed as before and as shown in Figure 8.14, except that this time the Palm is communicating with the Web service proxy, rather than the Web service itself.
Figure 8.14. Accessing the Web service via the HTTP text proxy
Using a Proxy with Data Streams to Access the Web Service
An alternative to using HTTP and plain text is to open a stream over the HTTP socket connection between the client and the proxy. A proxy that demonstrates this approach is ImageServiceStreamProxy, as shown in Figure 8.15.
Figure 8.15. Accessing the Web service using a data stream proxy
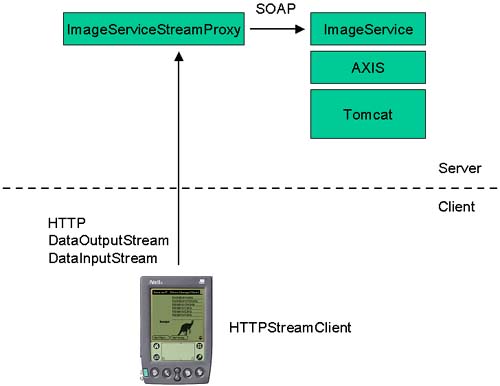
The code in ImageServiceStreamProxy differs from ImageServiceProxy mainly in the way that the information is sent back to the client; the same protocol as that used in ImageServiceProxy is used for embedding the request in the URL.
The doGet method in ImageServiceStreamProxy calls the helper methods to access the Web service as before, but instead of writing the response to a PrintWriter, it opens a DataOutputStream and writes the response to it.
if (action.equalsIgnoreCase("getNames")) {
   String[] names = getNames(endPointURL);
   DataOutputStream dos = null;
   try {
      dos = new DataOutputStream(response.getOutputStream());
      if (names != null) {
         dos.writeInt(names.length);
         for (int i=0; i<names.length; i++)
            dos.writeUTF(names[i]);
      }
      else
         dos.writeInt(0);
   }
   catch (Exception e) {
      System.out.println(e.toString());
   }
   finally {
      try { if (dos != null) dos.close(); } catch (Exception e) {}
   }
}
In the "getNames" case, the helper method getNames() is called to retrieve the file names as before. Then a DataOutputStream is opened on the response's output stream. The first thing to write to the DataOutputStream is the number of names in the list, so that the client knows how many to expect. Then we write the file names using writeUTF().
In the "getImage" case, we can decode the image from the Base64 string into an array of bytes and write the byte array to the DataOutputStream. This saves the client from decoding the string, which is consistent with our objective of doing as much work as possible on the server.
[View full width]else if (action.equalsIgnoreCase("getImage")) { String name = request.getParameter("name"); ImageValue imageValue = getImage(endPointURL, name); if (imageValue == null) { System.out.println("imageValue is null"); } else { byte[] byteArray = org.apache.axis.encoding.Base64.decode( imageValue.
To use this new proxy based on streams, we need to modify the client to use streams as well. The client is called HTTPStreamClient. The client makes the request in the same way as before but retrieves the result by opening a DataInputStream on the HTTP connection.
[View full width]if (c == getNamesCommand) { HttpConnection connection = null; DataInputStream dis = null; String url = "http://192.168.0.1:8080/javaonpdas/servlet/
The first thing to read from the DataInputStream is the number of file names sent by the proxy. Then we loop that number of times, reading the strings from the input stream and displaying them on the text field.
In the case of "Get Image," again we set up a DataInputStream on the HTTP connection, read the array of bytes from the stream, and create an image from the array. Recall that the Base64 string was decoded on the server by the proxy.
[View full width]else if (c == getImageCommand) { HttpConnection connection = null; DataInputStream dis = null; String url = "http://192.168.0.1:8080/javaonpdas/servlet/
Comparing Performance
The three access methods were tested on a Palm IIIx with a direct serial connection to a PC, and their performance is compared in Table 8.2.
In the next section, we will compare these access methods.
Summary of Web Service Access Options
The following comparison describes the advantages of each option over the other options. The disadvantages are of each option are compared to the other options. The reason for using a particular option is also given.
SOAP | HTTPText | HTTPStream | |
|---|---|---|---|
Size of PRC (bytes) | 80,800 | 12,925 | 9,509 |
Free memory at runtime (bytes) | 61,864 | 62,576 | 62,576 |
Memory used (bytes) | 288 | 2,752 | 2,444 |
Time to request and retrieve image (ms) | 28,090 | 9,010 | 7,420 |
SOAP
Advantages
No client-specific proxy is required on the server.
Disadvantages
SOAP on the client uses precious memory and processing power.
Slower and uses more memory compared to the proxy methods.
HTTP Text
Advantages
Simple protocol to exchange information with the client.
The server handles the overhead of the SOAP connection.
Disadvantages
Requires a client-specific proxy on the server.
HTTPStream
Advantages
Simple protocol to exchange information with the client.
Can decode the Base64 string on the server, thus making less work for the client.
The server handles the overhead of the SOAP connection.
Uses a binary connection, meaning there is no need to detect string boundaries.
The fastest of the three access methods compared, and uses the least memory.
Disadvantages
Requires a client-specific proxy on the server.


