5.3 Table Property Pages
Certain objects in the database's schema do not have their own designer views. For example, Visual Studio .NET cannot show you an index or a constraint in an editor window. And even though keys and relationships can be displayed in the diagram designer, you cannot see all of their properties in this view. To enable you to set the properties of such database objects, VS.NET provides the database Property Pages dialog.
Property Pages can be displayed by selecting the Property Pages item from a table's context menu, in either the diagram designer or the table designer (but not directly from the Server Explorer). This dialog is divided into either four or five tabs: Tables, Columns (only if opened in the diagram designer), Relationships, Indexes/Keys, and Check Constraints.
5.3.1 Tables Tab
The Tables tab, shown in Figure 5-12, allows you to select which table's properties will be affected by changes you make on the other tabs in the dialog. If you opened the Property Pages dialog from the diagram designer, you will be able to select any of the tables shown on the diagram from the Selected Table drop-down list. If you displayed the dialog from a table designer view, this list will contain only the table you were designing.
Figure 5-12. Tables tab
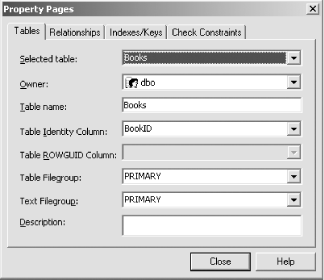
You can also edit certain table properties with this page. The table name and description may be changed. You can also choose the identity column (or ROWGUID column if you are using globally unique identities). You may change the table owner to any SQL Server user or role with the Owner list. If any user file groups are defined for the database, you may choose the file groups that this table will use for its contents and any text or ntext columns.
5.3.2 Columns Tab
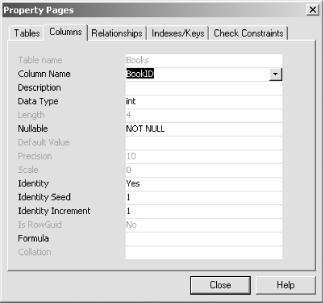
Figure 5-13 shows the Columns tab. This tab is present only if the property pages are shown in the diagram editor. This is not shown when you open the property pages from the table designer view because this tab presents information shown in the main table designer window. See Section 5.4 for details on how to edit column properties.
Figure 5-13. Columns tab
5.3.3 Relationships Tab
Figure 5-14 shows the Relationships tab. It allows relationships involving the selected table to be modified. The Selected Relationship drop-down list will allow any relationship involving this table to be selected, whether it is in the role of the primary key table or the foreign key table. Buttons are provided for adding and deleting relationships.
Figure 5-14. Relationships tab
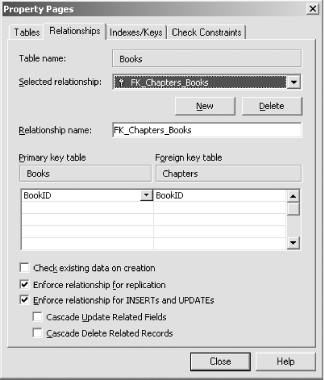
When you create a relationship, the Primary Key Table and Foreign Key Table settings will change from read-only labels into drop-down lists, enabling you to select the two tables that will participate in the relationship. You can then select which primary keys are related to which foreign keys in the listbox. Figure 5-14 shows that the Books table's primary key BookID is related to the Chapters table's foreign key BookID.
|

When you create a new relationship, the dialog will choose a default name based on the two tables involved in the relationship, such as FK_PrimaryTable_ForeignTable. You can change this name with the Relationship Name field.
You can configure the referential integrity rules for the relationship with the checkboxes toward the bottom of the dialog. When adding a new relationship, the "Check existing data on creation" checkbox allows you to verify that all the data already in the database conforms. You would not normally want to disable checks for replication, INSERTs, or UPDATEs, so these will be enabled by default. However, cascading operations (for example, when deleting a row in the primary key table causes all related rows in the foreign key table to be deleted) are disabled by default.
5.3.4 Indexes/Keys Tab
The Indexes/Keys tab is shown in Figure 5-15. This allows you to view and edit keys and indexes for the selected table. If you assigned a primary key for your table, it will appear in here by default. Nothing else will typically be indexed by default, so you should add any indexes that you require with this dialog.
Figure 5-15. Indexes/Keys tab
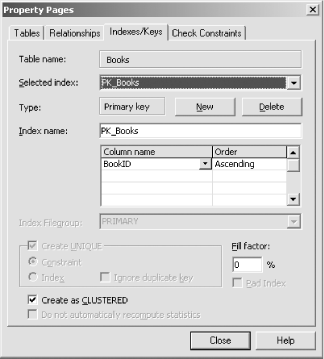
An index may contain as many columns as you like. You may create as many individual indexes as you require. Note however that only one index can be CLUSTERED for any single table. (By default, the primary key index will be CLUSTERED. If your primary key is a GUID, you will want to turn this offCLUSTERED indexes do not perform well with GUID primary keys.)
5.3.5 Check Constraints Tab
The Check Constraints tab, shown in Figure 5-16, allows you to add constraints on the selected table that the database will enforce when data is added or modified. (You do not need to add foreign key constraints herethose are dealt with in the Relationships tab.)
Figure 5-16. Check Constraints tab
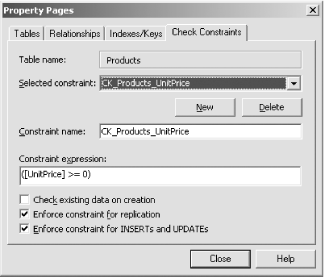
The "Check existing data on creation" option will check that any data already in the database conforms to the specified constraint. This check will occur when you save the table to which it applies back to the database.


