5.5 Query and View Designer
The query and view designer provides a user interface for building SQL statements. You can open the query and view designer from several places. It is used to design views in the database, and you can open the designer on a view by double-clicking on that view in the Server Explorer. (New views are created with the New View item in the context menu for the database's Views item in the Server Explorer.) It is also used in the Query Builder for data adapters in .NET projects and to build ad hoc queries in Database projects. See Section 5.9.1" and Section 5.7.4" later in this chapter for more information.
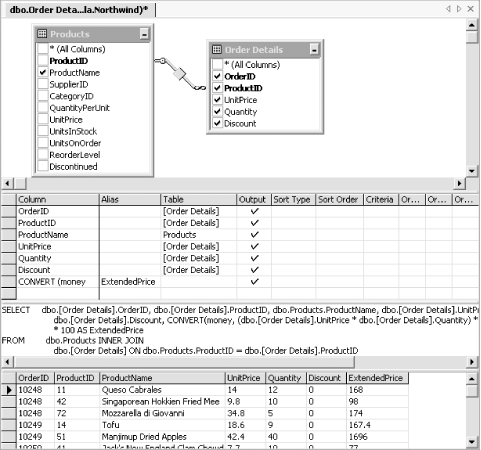
Figure 5-19 shows the Northwind sample database's Order Details extended view, as presented in the query and view designer. The view is divided into four panes. The diagram pane shows the sources that the query uses and their relations and indicates which columns will be returned by the query. (Sources for a query can be tables, views, table-valued functions, or derived tables.) The grid beneath this allows filtering and sorting criteria to be specified. The third pane shows the SQL for the query, and the fourth pane shows the results of the query.
Figure 5-19. Query and view designer
|

5.5.1 Diagram Pane
The query and view designer's diagram pane is very similar to the database diagram designerit can show many tables, along with their columns and relationships. However, while the database diagram designer allows you to edit tables, the query and view diagram pane does not. It simply allows you to choose which table sources and columns will be included in a query and to control the way in which tables are joined.
The diagram pane shows a checkbox next to each column. For each one you check, the query will include that column in the query. If you want to retrieve all of the columns, simply check the All Columns box at the top of the table.
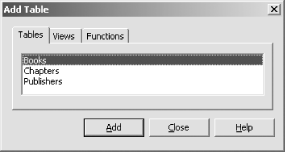
You are given the chance to decide which tables will appear in the diagram when you create a new view or query. You will be shown the Add Table dialog, as in Figure 5-20. This allows you to add views and table-valued functions as well as tables to the diagram. You can always reopen the Add Table dialog to add more tables to the diagram at any time by selecting the Add Table... item from the pane's context menu or from the database view toolbar.
Figure 5-20. Add Table dialog
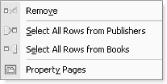
The diagram pane detects relations between tables and shows them with connectors such as the one between the Products and Order Details tables in Figure 5-19. The context menu for these connectors, shown in Figure 5-21, allows you to configure the type of JOIN that will be generated.
Figure 5-21. Query relations context menu
By default, an INNER JOIN will be created. Choosing one of the two Select All Rows menu items will turn this into either a RIGHT OUTER JOIN or a LEFT OUTER JOIN. Selecting both will perform a FULL OUTER JOIN. (If you add two tables that are unrelated to each other, a CROSS JOIN will be generated.) Each of the JOIN types is represented with a different graphic on the connector, as Figure 5-22 shows.
Figure 5-22. INNER, LEFT OUTER, RIGHT OUTER and FULL joins

|
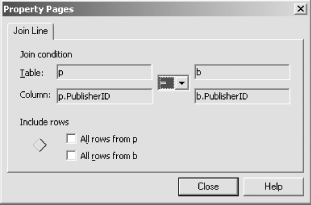
If you select Property Pages from the context menu for either a relation or a table, Visual Studio .NET does not show the normal database property pages described earlier. Instead, it shows property pages unique to the query and view designer. The table property page contains only one interesting field. It allows an alias to be assigned for the table, so if the table must be referred to elsewhere in the query, it can be referred to by its alias. If your tables have long names, this can make the generated SQL slightly easier to read.
The property page for a relation is a little more interesting and is shown in Figure 5-23. As well as showing the JOIN type information (the two checkboxes correspond to the All Rows from... items on the context menu), it also allows the JOIN condition type to be specified. By default, the ON part of the JOIN will use = as the condition. But you can change this to be any of <, >, <=, >=, or <> (not equal).
Figure 5-23. Join property page
If you are editing a database view and select the Property Pages item from the background of the diagram pane (i.e., with no particular object selected), you will be shown the view property page, illustrated in Figure 5-24. This allows you to control certain aspects of the view that are not handled by the main panes in the designer. You can elect to show all columns from all tables (the Output All Columns checkbox is equivalent to checking the All Columns item on all of the tables). You may add DISTINCT or TOP specifiers to the generated SQL.
Figure 5-24. View properties
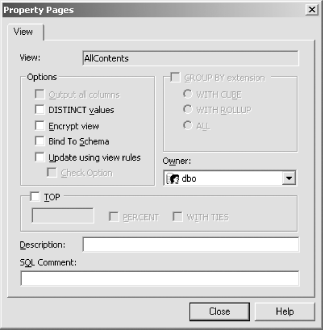
The Encrypt View option stores the view's underlying SQL in such a way that it cannot later be examined. (If you choose this option, you will not be able to edit the view in the designer later onif you need to change it, you will have to recreate it from scratch.)
The Bind to Schema option will prevent any database schema modifications that would cause the view to break. (For example, if the view uses a particular column from a table, any attempt to remove that column from the table will be rejected by the database.)
The Update Using View Rules checkbox ensures that any updates performed on the view by MDAC (Microsoft Data Access Components) will be applied to the view. (Under some circumstances, MDAC may translate an update request on a view into an update request on the underlying table.) The Check Option checkbox ensures that if data in a view is changed interactively in Visual Studio .NET, the changes conform to any WHERE clause specified in the view.
5.5.2 Grid Pane
The grid pane is the second pane in the query and view designer. It is beneath the diagram pane in Figure 5-19. The grid pane allows you to control detailed column-specific aspects of the query.
In a multitable query two columns from different tables may have the same name. For example, in a database describing the contents of books, you might expect to find a Title column in both the Books and the Chapters tables. In a query that joins two tables, it is helpful to rename these columns to remove the ambiguity. Figure 5-25 shows grid pane settings that rename two Title columns to the unambiguous BookTitle and ChapterTitle columns and change the Name column of the Publishers table to Publisher.
Figure 5-25. Grid pane

The grid pane has two columns to control the order in which the database will return the rows. These are also shown in Figure 5-25. Each column can participate in controlling the order of the output. To enable this, set the Sort Type column to be either ascending or descending. The Sort Order column defines the order in which the columns will be used to perform the sort. So the example in Figure 5-25 will add the ORDER BY clause shown in Example 5-1.
Example 5-1. Generated ORDER BY clause
ORDER BY dbo.Publishers.Name, dbo.Books.Title,

 dbo.Chapters.ChapterNumber
You can also use the grid pane to make the query selective. The columns labeled Criteria and Or... allow a WHERE clause to be added to the SELECT statement. Each column (whether it is the criteria column or one of the Or... columns) can contain entries for one or more rows. If a column contains entries for more than one row, these conditions are combined with each other using the AND operator. If you use more than one column, the results of each column's tests will be combined with the OR operator. This means that any given row in the database will be returned if it meets all of the criteria in one or more of the columns. For example, the grid shown in Figure 5-25 is using two criteria columns. The corresponding WHERE clause is shown in Example 5-2.
Example 5-2. Generated WHERE clause
WHERE (dbo.Books.BookID > 5) OR

      (dbo.Publishers.PublisherID = 1) AND

             (dbo.Chapters.ChapterNumber > N"1")
You may sometimes add columns to a query only to specify criteria for themyou might not want them to appear in the output. In this case, you can uncheck these rows in the Output column. In Figure 5-25, the BookID and PublisherID columns are specified only in order to specify search criteria. The Output column is therefore unchecked for them.
You can change the order of the lines in the grid pane, although that is slightly fiddly. You must first select the row representing the column whose position you wish to change. Once the row is selected, you can drag it into the position you require. If you try to drag it without first selecting it, the pane simply enters a mode in which you can select a range of lines by dragging. You have to select a row and release the mouse button before clicking again to start the drag.
5.5.3 SQL Pane
The third pane in the query and view designer shows the SQL statement corresponding to the current settings in the designer. This is useful because it allows you to see exactly the effect of changes in the other designer panes. You can also modify the query directly by editing the text in this panefor example, you can change the order in which the columns will be returned.
In addition to populating the SQL pane from the settings in the other panes, the query and view designer is able to perform the reverse transformation: when you type SQL directly into the SQL pane, Visual Studio .NET will attempt to interpret it and populate the other panes. (It also goes through this process when you edit a viewthe database just stores the SELECT statement for a view, so Visual Studio .NET must reconstruct the remaining panes.) There are limits to what it can readif you specify a WHERE clause sufficiently complex that it could not have been constructed by filling in fields in the grid pane, the conversion will not be performed, and the diagram and grid panes will not be populated. But for straightforward queries, it will successfully populate the diagram and grid panes.
If you type in invalid SQL, Visual Studio .NET will reject the
change. You can check the SQL for validity with Query
 Verify SQL Syntax.
5.5.4 Results Pane
The
final pane is the results pane, shown at the bottom of Figure 5-19. This is where Visual Studio .NET will show
the results of the query or view as currently configured. This pane
will initially be blank. To populate it, you must run the query using
Query Run (Ctrl-R).
The values in this panel can normally be modified. Any changes you make will be written back to the database. (Certain types of queries will prevent thise.g., any query that specifies DISTINCT. It will show the row contents in gray rather than black to indicate that the values are read-only.)


