5.9 Databases and .NET Projects
Visual Studio .NET has special support for using databases in .NET projects. It can generate data adapters and type-safe datasets from database server metadata.
5.9.1 Data Adapters
A data adapter is an object that is able to retrieve data from and push updates back to a database. You can generate a data adapter by dragging a table, view, or stored procedure in the Server Explorer onto any design surface in a Visual Studio .NET project. A design surface is any design view that allows components to be dropped onto it. Windows Forms, Web Forms, and Web Services are all examples of design surfaces.
When you drag either a table or a view onto a design surface, Visual Studio .NET will add two items to its component tray: a database connection and a data adapter. If the data source is a SQL Server, these will be of type SqlConnection and SqlDataAdapter, otherwise they will be OledbConnection and OledbDataAdapter.
Adapters contain four SQL statements: a SELECT for retrieving data, an UPDATE for changing data, an INSERT for adding data, and a DELETE for removing data. You can examine the command strings for these by selecting the data adapter in the component tray, expanding the relevant property in the Properties window. (The properties are called SelectCommand, UpdateCommand, InsertCommand, and DeleteCommand). Figure 5-32 shows the CommandText for the SelectCommand of a typical data adapter.
Figure 5-32. Data adapter properties
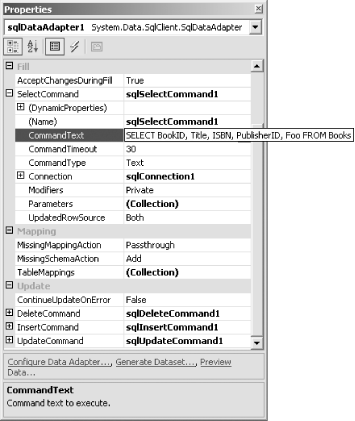
By default, a data adapter's SQL commands will use all of the columns in a table or view. However, you can change this by clicking on the Configure Data Adapter... verb in the adapter's properties (as shown at the bottom of Figure 5-32) or in its context menu. This displays the Data Adapter Configuration Wizard, which allows you to modify various aspects of the adapter. First, it will ask you which connection to use, which will default to the connection you used to create the adapter in the first place.
|

The next page of the wizard gives you the choice of using SQL statements (the default) or stored procedures to access the database. If you elect to use stored procedures, you have the choice of selecting from existing ones or creating new ones. If you choose to use SQL or to create new stored procedures, the next page will show the SELECT statement that the data adapter will use to retrieve the data, as Figure 5-33 shows.
Figure 5-33. Specifying SQL for a data adapter
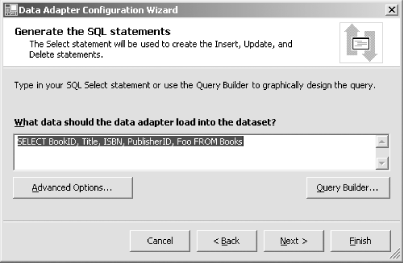
You can supply your own SQL in this dialog. Alternatively, you can click the Query Builder... button. This will show a dialog containing a query and view designer (as described earlier). You can edit the diagram and grid panes just as you would for any other query, and the SQL pane will show you what SQL will be generated.
Whether you use the default SQL, enter your own SQL, or use the query builder to construct a SELECT statement, by default, Visual Studio .NET will build matching INSERT, UPDATE, and DELETE statements. You can disable this or modify the way they are generated by clicking on the Advanced Options... button. This displays the Advanced SQL Generation Options dialog, which is shown in Figure 5-34.
Figure 5-34. SQL generation options
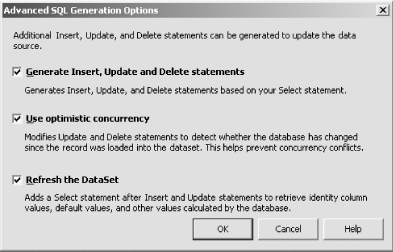
You can disable the generation of INSERT, UPDATE, and DELETE statements by clearing the first checkbox. If you leave it checked, you can choose whether to use the optimistic concurrency option (see sidebar). If you have your own method of dealing with multiple users trying to update the same rows, such as a pessimistic locking strategy or an automatic merging policy, you would typically disable this default behavior.
Datasets, Adapters, and Optimistic ConcurrencyData adapters are designed to be used in conjunction with a dataset. Typically, some rows are read into a dataset using a data adapter's SELECT statement. (This is done with the adapter's Fill method.) These rows may then be modified by user input. (For example, input fields in a Windows Forms application might modify the dataset using data binding.) At some point, the program may attempt to push changes back to the database, using the data adapter's Update method. The adapter will obtain a list of changed rows from the dataset and will also retrieve the original values for these rows. (The dataset stores both the new values and the original values.) By default, the data adapter will use the original values as parameters to the generated UPDATE and DELETE statementsthese include a WHERE clause allowing all of the current column values to be checked, making sure they have not changed. If a row has been modified in the database in between being read into the dataset and the modified version being written back out (i.e., some other database client has changed the row since it was read into the dataset), the UPDATE or DELETE will do nothing. The data adapter checks the row update count and will notify the program of any rows that were not correctly updated because they have changed. The program should then notify the user that her changes could not be applied and provide some kind of remedial action. Pragmatic ADO.NET (Addison-Wesley) and ADO.NET in a Nutshell (O'Reilly) discuss these techniques in more detail. |
|
The dialog's final checkbox allows you to disable the standard refresh behaviorby default, every time a data adapter writes the changes that a dataset has made to the database, it will run a SELECT statement to retrieve any autogenerated values for the row. This is useful for tables that have an identity column generated by the database. Autoincrement identity columns can pose a problem for a disconnected data model such as that used by the dataset if you allow end users to add new rows, because a new row"s primary key won"t be known until the new rows are applied to the underlying database. This can be particularly tricky if your dataset contains multiple related tables and you want to create multiple related rowsin order for the relationship between two newly created rows to be established, the foreign key in one row must match the primary key in the other row. The problem is that, if the primary key is to be autogenerated by the database, the client software cannot know what its value will be until after it executes an INSERT. While this could be solved by adding the two rows in two separate steps, there is an alternative solution. The dataset can be configured to allocate numbers in a range that will be different from what the database will use. (Using a seed and increment of -1 is the usual trick for ensuring this.) When the data adapter performs the updates, it will then retrieve the real identity allocated for the primary key and will then apply that change to the dataset. Since the dataset supports cascading updates, this will change the foreign key in the other table so that, when that row is written out, it will be correctly associated with the newly added row in the other table. (Of course, this still requires two round-trips to the database, but it means that most of the details are dealt with for you.)
|
If you elected to use existing stored procedures instead of building new SQL statements or new stored procedures, you will be shown a different dialog from the one in Figure 5-33. Instead, you will see the one in Figure 5-35.
Figure 5-35. Choosing stored procedures for a dataset
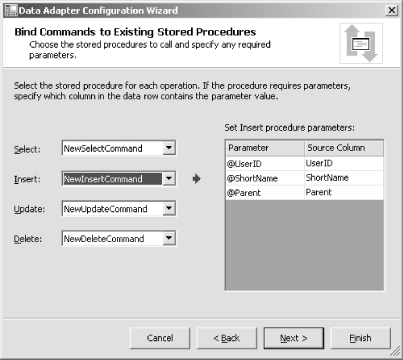
The stored procedures can be selected from the drop-down listboxes. Stored procedures typically take parameters. For example, you will need to pass at least one parameter to the DELETE procedure to identify the row to be removed. The UPDATE operation will also require parameters for the values being changed as well as for row identification. Likewise, the INSERT operation will need the column values for the row to be created (although it doesn't need a row identifier). The appropriate values for all of these values will typically be columns in the dataset. Visual Studio .NET can populate such parameters for youif the INSERT, UPDATE, or DELETE procedures require one or more parameters and those parameters correspond to columns returned by the SELECT procedure, you can set up the association in the table on the right of the dialog.
The code for the stored procedure that performs the INSERT is shown in Example 5-3. This procedure is also selected in Figure 5-35. As you can see, the dialog shows the parameters that the procedure requires as well as which columns in the dataset will be passed for each of those parameters.
Example 5-3. INSERT stored procedure
CREATE PROCEDURE dbo.NewInsertCommand

(

@UserID nvarchar(50),

@ShortName nvarchar(100),

@Parent int

)

AS

SET NOCOUNT OFF;

INSERT INTO Mailboxes(UserID, ShortName, Parent) VALUES (@UserID, @ShortName, @Parent);
The final page of the wizard simply tells you that it has successfully generated all the necessary SQL. You simply need to click the Finish button to write the settings into the data adapter.
5.9.2 Datasets and the XSD Designer
You can use a data adapter with a generic dataset. However, Visual Studio .NET is able to generate type-safe datasetsthese are classes derived from the standard DataSet class that add properties specific to particular tables. They also define classes derived from DataTable for each table in the dataset, providing strongly typed properties for each column in the table. This means that instead of retrieving data with generic properties using code such as that in Example 5-4, you can use strongly typed access like Example 5-5 shows.
Example 5-4. Generic dataset access
int eID = int.Parse(ds.Tables["Orders"].Rows[0]["EmployeeID"]);
Example 5-5. Strongly typed dataset access
int eID = ds.Orders[0].EmployeeID;
As well as being simpler, the code in Example 5-5 offers the added advantage of detecting certain programming errors at compile time. If you get the name of a table or column wrong, the compiler will complain. With Example 5-4, you would not discover such an error until runtime. Furthermore, with strongly typed datasets, the table and column names will be available through IntelliSense in the code editor. (Of course, strongly typed datasets are less likely to be of use when you need to be able to adapt to a variety of different schemas, such as automated reporting software.)
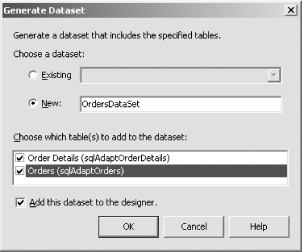
You can generate a strongly typed dataset by selecting Generate Dataset... from a data adapter's context menu or Properties window. This will show the Generate Dataset dialog, Figure 5-36. This lets you choose between modifying an existing strongly typed dataset (with the Existing radio button) or creating a new one. In either case, you can choose which tables will be represented in the dataset from the list in the middle of the dialog. There will be one table shown for each data adapter that you have created. The "Add this dataset to the designer" option will add a new item to your component tray using the newly created dataset type.
Figure 5-36. Generating a strongly typed dataset
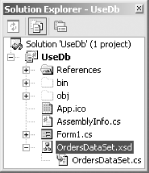
When you click on OK, two new files will be added to your project. (Or two existing ones will be modified if you chose to change a dataset you created earlier.) Figure 5-37 shows a typical pair of filesOrdersDataSet.xsd and OrdersDataSet.cs.
Figure 5-37. A strongly typed dataset in the Solution Explorer
|
The .xsd file is an XML Schema Definition. It contains type definitions for the tables in the dataset. The .cs file contains the generated strongly typed dataset class. You can edit the .xsd file either as raw XML or using Visual Studio .NET's XML Schema editor. Figure 5-38 shows the editor. You can switch between schema and XML mode using the buttons at the bottom of the view.
Figure 5-38. An XML Schema Definition
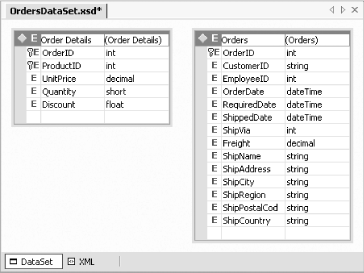
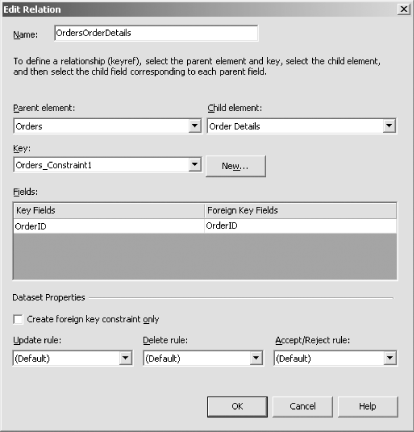
This particular schema shows the Order Details and Orders tables from the Northwind sample database. These two tables are related on their OrderID columns. Unfortunately, the dataset generator does not detect this. (It retrieves the type information from the data adapters, not from the database, and the adapters do not preserve relational information.) You must add relations by hand if you need the dataset to be aware of them. To do this, bring up the context menu on the primary key for which you wish to add a relation (for example, the OrderID column in the Orders table). From the menu's Add submenu, select the New Relation... item. This will show the Edit Relation dialog, Figure 5-39.
Figure 5-39. Editing a relation in an XML Schema
|
You should set the parent element to be the table containing the primary key, and the child element to be the table containing the foreign key. (The dialog talks of elements instead of tables because it has an XML-centric view of the world.) Having selected the tables for which you wish to add a relation you must select the related keys in the Fields list. When you click OK, the schema view will now show a connector between the two tables, representing the relation. You will now be able to use this dataset in data binding scenarios that exploit relational datasets, such as master/details views.


