6.8 File Types View
If your application is able to edit or open certain kinds of documents, it is usually desirable to register the types of files it edits. This means that such files will integrate properly with Windows Explorerit will use the icon of your choice, double-clicking will launch your application, and the context menu will show actions appropriate to the file type.
Registering a file type with Windows involves adding various entries in the appropriate places in the registry. Fortunately, with a Setup project, all this work is done for us. The File Types view provides a simple user interface for defining new file types to be registered at installation time.
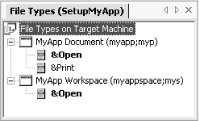
Figure 6-16 shows a typical File Types view displaying two file types. Each file type is represented as a node underneath the "File types on target machine" tree. Each type shows its full name, as it will appear in the Windows Explorer details view and File Types list, followed by a semicolon-separated list of file extensions for this type. Underneath each type is a list of supported actions. These will appear on the context menu for files of this type in Windows Explorer, and the first action is the one that will be invoked if a user double-clicks on the file.
Figure 6-16. File Types view

To add a new file type, open the context menu for the "File types on target machine" item and select Add File Type.
6.8.1 File Type Properties
You are required to supply a certain amount of information for each file type. First, you must supply a full name for the type, either by editing the type's label in the view window or editing its (Name) property in the Properties window. You must also supply one or more file extensions with the Extensions property. If you specify multiple extensions for a single type, put a semicolon between the entries.
|
All file types are required to have an associated executablethis will be launched whenever any of the type's actions are invoked. This is set with the Command property and must refer to a file in one of the folders in the File System view. (When you edit this property, the dialog shown earlier in Figure 6-11 will be shown.) You would usually set this to be the primary output of one of the projects in the solution.
You will normally want to supply an icon for your file type. This is set with the Icon property, which lets you choose an icon from any .ico, .dll, or .exe file in the File System view.
You can also specify a MIME type for your file. This does not affect the way the file behaves in Windows ExplorerWindows uses file extensions to determine the type of a file, because the MIME type is not currently stored in the filesystem. However, when Internet Explorer retrieves a file from the web, it usually knows what its MIME type is, because the HTTP protocol provides this information. It will use this information in preference to the extension when deciding what the file's type is. So, if there is a MIME type defined for a file type that your application manages, you should register this with the type's MIME property.
6.8.2 File Type Actions
All file types must have at least one actionthe one that will be invoked when the user double-clicks the file in Windows Explorer. Many have more, which will appear on the file's context menu. For each action your file types support, you must supply certain information.
All actions must have a name, specified either in the view window itself or with the (Name) property. This is the text that will appear in the file's context menu. You can support shortcut keys by placing an ampersand in front of the shortcut letter, as Figure 6-16 shows.
You must also supply a verb, using the Verb property. You should use one of the standard shell verbs whenever appropriate. The most common are open, edit, play, print, preview, and (to support drag-and-drop printing) printto.
You can specify which parameters will be passed to your executable when the verb is invoked. At a minimum, you will want to make sure that the full path of the file in question is passedthis will be substituted wherever you place the text %1. You should enclose this text in double quotes, so that your application can deal correctly with filenames with spaces. By default, the Arguments property for any action is "%1" which passes the quoted filename and nothing else.


