Creating the spyLib Library Module
Creating the spyLib Library Module
Although I have described several PHP programs in this chapter, most of them are extremely simple. Most of the heavy lifting is done by the spyLib library code. Having a library like spyLib makes data programming pretty easy, because you don't have to know all the details of spyLib in order to make it work. All you need to have is a basic understanding of the functions in the library, what each function expects as input, and what it will produce as output. Although there is a good amount of code in this library (over 500 lines, in fact), there is almost nothing in the code you haven't seen before. It's worth it to look carefully at this code because it can give you a good idea of how to create your own libraries. You'll also find there's no better way to understand the library than to dig around under the hood.
Setting a CSS style
Some of the simplest elements can have profound effects. One example of this maxim is the storage of a CSS style in the library code. Each program in the system will operate using the style specified in the library. This means you can easily change the look and feel of the entire system by manipulating one <style></style> block.
<style type = "text/css">
body{
  background-color: black;
  color: white;
  text-align:center
}

</style>
| HINT? |
Remember, when you include a file, it is interpreted as HTML, not PHP. This means you can place any HTML code you wish in an include file and it will be automatically inserted in your output wherever the include function occurred. I took advantage of this fact to include a CSS block in the library. If you want PHP code in your library file, you'll need to surround your code with PHP tags (<? ?>) in the library file. |
Setting System-Wide Variables
Another huge advantage of a library file is the ability to set and use variables that will have meaning throughout the entire system. Since each PHP program in the system includes the library, all will have access to any variables declared in the main section of the library file. Of course, you will still need to use the global keyword to access a global variable from within a function.
<?
//spyLib.php
//holds utilities for spy database

//variables
$userName = "";
$password = "";
$serverName = "localhost";
$dbName = "chapter10";
$dbConn = "";
$adminPassword = "absolute";
$mainProgram = "spyMaster.php";
I stored a few key data points in the system-wide variables. The $userName, $password, and $serverName variables are used to set up the data connection. I did this because I expect people to re-use my library for their own databases. They will definitely need to change this information to connect to their own copy of MySQL. It's much safer for them to change this data in variables than in actual program code. If you're writing code for re-use, you might consider moving anything the code adopter might change into variables as I have done here.
The $adminPassword variable will hold the password used to edit data in the system. Again, I want anybody re-using this library (including me) to change this value without having to dig through the code.
The $mainProgram variable holds the URL of the "control pad" program of the system. In the spy system, I want to provide access back to spyMaster.php in every screen. The mainButton() function uses the value of $mainProgram to build a link back to the primary screen in every other document produced by the system.
Connecting to the Database
The connectToSpy() function is fundamental to the spy system. It uses system-level variables to generate a connection to the database. It returns an error message if it is unable to connect to the database. The mysql_error() function prints an SQL error message if the data connection was unsuccessful. This information may not be helpful to the end user, but it might give you some insight as you are debugging the system.
function connectToSpy(){
  //connects to the spy DB
  global $serverName, $userName, $password;
  $dbConn = mysql_connect($serverName, $userName, $password);
  if (!$dbConn){
   print "<h3>problem connecting to database...</h3>\n";
  } // end if

  $select = mysql_select_db("chapter10");
  if (!$select){
    print mysql_error() . "<br>\n";
  } // end if
  return $dbConn;
} // end connectToSpy
The connectToSpy() function returns a connection to the database that will be subsequently used in the many queries passed to the database throughout the life span of the system.
Creating a Quick List from a Query
I created a few functions in the spyMaster library that didn't get used in the final version of the project. The qToList() function is a good example. This program takes any SQL query and returns a simply formatted HTML segment describing the data. I find this format useful when debugging because no complex formatting gets in the way.
function qToList($query){
  //given a query, makes a quick list of data
  global $dbConn;
  $output = "";
  $result = mysql_query($query, $dbConn);

  //print "dbConn is $dbConn<br>";
  //print "result is $result<br>";

  while ($row = mysql_fetch_assoc($result)){
    foreach ($row as $col=>$val){
      $output .= "$col: $val<br>\n";
    } // end foreach
    $output .= "<hr>\n" ;
  } // end while
  return $output;
} // end qToList
Building an HTML Table from a Query
The qToTable() function is a little more powerful than qToList(). It can take any valid SQL SELECT statement and build an HTML table from it. The code uses the mysql_fetch_field() function to determine field names from the query result. It also steps through each row of the result printing out an HTML row corresponding to the record.
function qToTable($query){
  //given a query, automatically creates an HTML table output
  global $dbConn;
  $output = "";
  $result = mysql_query($query, $dbConn);

  $output .= "<table border = 1>\n";
  //get column headings

  //get field names
  $output .= "<tr>\n";
  while ($field = mysql_fetch_field($result)){
    $output .= " <th>$field->name</th>\n";
  } // end while
  $output .= "</tr>\n\n";

  //get row data as an associative array
  while ($row = mysql_fetch_assoc($result)){
    $output .= "<tr>\n";
    //look at each field
    foreach ($row as $col=>$val){
      $output .= " <td>$val</td>\n";
    } // end foreach
    $output .= "</tr>\n\n";
  }// end while

  $output .= "</table>\n";
  return $output;
} // end qToTable
The qToTable() function is called by the viewQuery.php program, but it could be used any time you want an SQL query formatted as an HTML table (which turns out to be quite often).
Building an HTML Table for Editing an SQL Table
If the user has appropriate access, he or she should be allowed to add, edit, or delete records in any table of the database. While qToTable() is suitable for viewing the results of any SQL query, it does not provide any of these features. The tToEdit() function is based on qToTable() with a few differences. First, tToEdit() does not accept a query, but the name of a table. You cannot edit joined queries directly, only tables, so this limitation is sensible. tToEdit() creates a query that will return all records in the specified table. In addition to printing the table data, tToEdit() adds two forms to each record. One form contains all the data needed by the editRecord.php program to begin the record-editing process. The other form added to each record sends all data necessary for deleting a record and calls the deleteRecord.php program. One more form at the bottom of the HTML table allows the user to add a record to this table. This form contains information needed by the addRecord.php program.
function tToEdit($tableName){
  //given a table name, generates HTML table including
  //add, delete and edit buttons

  global $dbConn;
  $output = "";
  $query = "SELECT * FROM $tableName";

  $result = mysql_query($query, $dbConn);

  $output .= "<table border = 1>\n";
  //get column headings

  //get field names
  $output .= "<tr>\n";
  while ($field = mysql_fetch_field($result)){
    $output .= " <th>$field->name</th>\n";
  } // end while

  //get name of index field (presuming it's first field)
  $keyField = mysql_fetch_field($result, 0);
  $keyName = $keyField->name;

  //add empty columns for add, edit, and delete
  $output .= "<th></th><th></th>\n";
  $output .= "</tr>\n\n";

  //get row data as an associative array
  while ($row = mysql_fetch_assoc($result)){
    $output .= "<tr>\n";
    //look at each field
    foreach ($row as $col=>$val){
      $output .= " <td>$val</td>\n";
    } // end foreach
    //build little forms for add, delete and edit

    //delete = DELETE FROM <table> WHERE <key> = <keyval>
    $keyVal = $row["$keyName"];
    $output .= <<< HERE

  <td>
    <form action = "deleteRecord.php">
    <input type = "hidden"
           name = "tableName"
           value = "$tableName">
    <input type= "hidden"
           name = "keyName"
           value = "$keyName">
    <input type = "hidden"
           name = "keyVal"
           value = "$keyVal">
    <input type = "submit"
           value = "delete"></form>
  </td>

HERE;
    //update: won't update yet, but set up edit form
    $output .= <<< HERE
  <td>
    <form action = "editRecord.php"
          method = "post">
    <input type = "hidden"
           name = "tableName"
           value = "$tableName">
    <input type= "hidden"
           name = "keyName"
           value = "$keyName">
    <input type = "hidden"
           name = "keyVal"
           value = "$keyVal">
    <input type = "submit"
             value = "edit"></form>
  </td>

HERE;

    $output .= "</tr>\n\n";

  }// end while

    //add = INSERT INTO <table> {values}
    //set up insert form send table name
    $keyVal = $row["$keyName"];
    $output .= <<< HERE

  <td colspan = "5">
    <center>
    <form action = "addRecord.php">
    <input type = "hidden"
           name = "tableName"
           value = "$tableName">
    <input type = "submit"
           value = "add a record"></form>
    </center>
  </td>

HERE;

  $output .= "</table>\n";
  return $output;
} // end tToEdit
Look carefully at the forms for editing and deleting records. These forms contain hidden fields with the table name, key field name, and record number. This information will be used by subsequent functions to build a query specific to the record associated with that particular table row.
Creating a Generic Form to Edit a Record
The table created in tToEdit() calls a program called editRecord.php. This program accepts a one-record query. It prints out an HTML table based on the results of that query. The output of rToEdit() is shown in Figure 10.12.
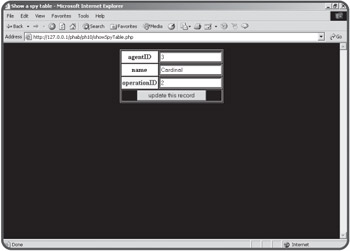
Figure 10.12: The rToEdit function is simple, but produces dangerous output.
The rToEdit function produces a very simple HTML table. Every field has a corresponding text box. The advantage of this approach is it works with any table. However, the use of this form is quite risky. First, the user should not be allowed to change the primary key, because that would in effect edit some other record, which could have disastrous results. Second, the operationID field is a foreign key reference. The only valid entries to this field are integers corresponding to records in the operation table. There's no way for the user to know what operation a particular integer is related to. Worse, he or she could enter any number (or for that matter any text) into the field. The results would be unpredictable, but almost certainly bad. I'll fix these defects in the smartRToEdit() function coming up next, but begin by studying this simpler function, because smartRToEdit() is build on rToEdit().
function rToEdit ($query){
  //given a one-record query, creates a form to edit that record
  //works on any table, but allows direct editing of keys
  //use smartRToEdit instead if you can

  global $dbConn;
  $output = "";
  $result = mysql_query($query, $dbConn);
  $row = mysql_fetch_assoc($result);

  //get table name from field object
  $fieldObj = mysql_fetch_field($result, 0);
  $tableName = $fieldObj->table;

  $output .= <<< HERE
<form action = "updateRecord.php"
      method = "post">

<input type = "hidden"
       name = "tableName"
       value = "$tableName">

<table border = 1>

HERE;

  foreach ($row as $col=>$val){
    $output .= <<<HERE
  <tr>
    <th>$col</th>
    <td>
      <input type = "text"
             name = "$col"
             value = "$val">
    </td>
  </tr>

HERE;
  } // end foreach
  $output .= <<< HERE
  <tr>
    <td colspan = 2>
      <center>
      <input type = "submit"
             value = "update this record">
      </center>
    </td>
  </tr>
</table>

HERE;
  return $output;
} // end rToEdit
Building a Smarter Edit Form
The smartRToEdit() function builds on the basic design of rToEdit() but compensates for a couple of major flaws in the rToEdit() design. Take a look at the smarter code below and I'll explain why it's better.
function smartRToEdit ($query){
  //given a one-record query, creates a form to edit that record
  //Doesn't let user edit first (primary key) field
  //generates dropdown list for foreign keys
  //MUCH safer than ordinary rToEdit function

  // --restrictions on table design--
  //foreign keys MUST be named tableID where 'table' is table name
  //  (because mySQL doesn't recognize foreign key indicators)
  // I also expect a 'name' field in any table used as a foreign key
  //   (for same reason)

  global $dbConn;
  $output = "";
  $result = mysql_query($query, $dbConn);
  $row = mysql_fetch_assoc($result);

  //get table name from field object
  $fieldObj = mysql_fetch_field($result, 0);
  $tableName = $fieldObj->table;

  $output .= <<< HERE
<form action = "updateRecord.php"
      method = "post">

<input type = "hidden"
       name = "tableName"
       value = "$tableName">

<table border = 1>

HERE;
  $fieldNum = 0;
  foreach ($row as $col=>$val){
  if ($fieldNum == 0){
    //it's primary key. don't make textbox,
    //but store value in hidden field instead
    //user shouldn't be able to edit primary keys
    $output .= <<<HERE
  <tr>
    <th>$col</th>
    <td>$val
      <input type = "hidden"
             name = "$col"
             value = "$val">
    </td>
  </tr>

HERE;
    } else if (preg_match("/(.*)ID$/", $col, $match)) {
      //it's a foreign key reference
      // get table name (match[1])
      //create a listbox based on table name and its name field
      $valList = fieldToList($match[1],$col, $fieldNum, "name");

      $output .= <<<HERE
  <tr>
    <th>$col</th>
    <td>$valList</td>
  </tr>

HERE;

    } else {
      $output .= <<<HERE
  <tr>
    <th>$col</th>
    <td>
      <input type = "text"
             name = "$col"
             value = "$val">
    </td>
  </tr>

HERE;
    } // end if
    $fieldNum++;
  } // end foreach
  $output .= <<< HERE
  <tr>
    <td colspan = 2>
      <center>
      <input type = "submit"
             value = "update this record">
      </center>
    </td>
  </tr>
</table>
</form>

HERE;
  return $output;
} // end smartRToEdit
What makes this function "smart" is the ability to examine each field in the record and make a guess about what sort of field it is. Figure 10.13 shows the result of the smartRToEdit() program so you can compare it to the "not so clever" function in Figure 10.12.
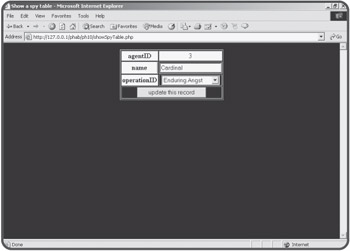
Figure 10.13: The smarter function doesn't let the user edit the primary key and provides a drop-down list for all foreign key references.
Determining the Field Type
As far as this function is concerned, there are three types of fields in a record that need to be handled differently.
First is the primary key. If a field is the primary key, its value needs to be passed on to the next program, but the user should not be able to edit it.
If a field is a foreign key reference to another table, the user should only be able to edit the value indirectly. The best approach is to have a drop-down list box that shows values the user will recognize. Each of these values corresponds to a key in that secondary record. For example, in Figure 10.13 there is a list box for the operationID field. The operationID field is a foreign key reference in the agent table. The ordinary rToEdit() function allowed the user to type any index number into the textbox without any real indication what data correlates to that index. This version builds a drop-down list showing operation names. The key value associated with those names is stored in the value attribute of each option (details to follow in the fieldToList() function). The user doesn't have to know anything about foreign key references or relational structures. He or she simply chooses an operation from a list. That list is dynamically generated each time the user chooses to add a record, so it always reflects all the operations in the agency.
The last possibility is a field is neither a primary or secondary key. In this case, I will print a simple text box so the user can input the value of the field. In all cases, the output will reflect the current value of the field.
Working with the Primary Key
The primary key value is much more important to the program than it is to the user. I decided to display it, but not to make it editable in any way. Primary keys should not be edited. They should only be changed by adding or deleting records.
I decided to rely upon some conventions to determine whether a field is a primary key or not. I assumed that the first field of the record (field number 0) is the primary key. This is a very common convention, but it is not universal. Since I created the data design in this case, I can be sure that the number 0 field in every table is the primary key. For that field, I simply printed the field name and value in an ordinary HTML table row. I added the key's value in a hidden field so the next program will have access to it.
Recognizing Foreign Keys
Unfortunately, there is no way (at least in MySQL) to determine if a field is a foreign key reference. I had to rely on a naming convention to make sure my program recognizes a field as a foreign key reference. I decided that all foreign key fields in my database will have the foreign table's name followed by the value ID. For example, a foreign key reference to the operation table will always be called operationID in my database. This is a smart convention to follow anyway, as it makes your field names easy to remember. It becomes critical in smartRToEdit() because it's the only way to tell whether a field is a foreign key reference. I used an else if clause to check the name of any field that is not the primary key (which was checked in the if clause). The preg_match() function lets me use a powerful regular expression match to determine the field's name.
| TRICK? |
Examining the Regular Expression: The statement I used to determine whether a field is a foreign key looks like this:
} else if (preg_match("/(.*)ID$/", $col, $match)) {
It uses a simple but powerful regular expression: /(.*)ID$/. This expression looks for any line that ends with ID. (recall that the $ indicates the end of a string.) The.*indicates any number of characters. The parentheses around .* tell PHP to store all the characters before ID into a special array, called $match. Since there's only one pattern to match in this expression, all the characters before ID will contain the name of the table. So, this regular expression takes the name of a field and determines if it ends with ID. If so, the beginning part of the field name (everything but ID) is stored to $match[1]. If $col contains operationID, this line will return TRUE (because operationID ends with ID) - and the table name (operation) will be stored in $match[1]. |
Building the Foreign Key List Box
If a field is a foreign key reference, it is necessary to build a list box containing some sort of meaningful value the user can read. Since I'll need this capability in a couple of places (and smartRToEdit() is already pretty complex), I build a new function called fieldToList(). This function (explained in detail later in this chapter) builds a drop-down HTML list based on a table and field name. Rather than worrying about the details of the fieldToList() function here, I simply figured out what parameters it would need and printed out the results of that function.
Working with Regular Fields
Any field that is not a primary or foreign key is handled by the else clause, which prints out an rToEdit()-style text box for user input. This will handle all fields that allow ordinary user input, but it will not trap for certain errors such as string data being placed in numeric fields or data longer than the underlying field will accept. These would be good improvements to the code. If the data designer did not name foreign key references according to my convention, those fields will still be editable with a text box, but the errors that could happen with rToEdit() are still concerns.
Committing a Record Update
The end result of either rToEdit() or smartRToEdit() is an HTML form containing a table name, and a bunch of field names and values. The updateRecord.php takes these values and converts them into arrays before calling the updateRec() function. It's much easier to work with the fields and values as arrays than in the somewhat amorphous context they embody after smartRToEdit() or rToEdit().
function updateRec($tableName, $fields, $vals){
  //expects name of a record, fields array values array
  //updates database with new values

  global $dbConn;

  $output = "";
  $keyName = $fields[0];
  $keyVal = $vals[0];
  $query = "";

  $query .= "UPDATE $tableName SET \n";
  for ($i = 1; $i < count($fields); $i++){
    $query .= $fields[$i];
    $query .= " = '";
    $query .= $vals[$i];
    $query .= "',\n";
  } // end for loop

  //remove last comma from output
  $query = substr($query, 0, strlen($query) - 2);

  $query .= "\nWHERE $keyName = '$keyVal'";

  $result = mysql_query($query, $dbConn);
  if ($result){
    $query = "SELECT * FROM $tableName WHERE $keyName = '$keyVal'";
    $output .= "<h3>update successful</h3>\n";
    $output .= "new value of record:<br>";
    $output .= qToTable($query);
  } else {
    $output .= "<h3>there was a problem...</h3><pre>$query</pre>\n";
  } // end if
  return $output;
} // end updateRec
The primary job of updateRec() is to build an SQL UPDATE statement based on the parameters passed to it. It is expecting a table name, an array containing field names, and another array containing field values. The UPDATE statement is primarily a list of field names and values, which can be easily obtained with a for loop stepping through the $fields and $vals arrays.
Once the query has been created, it is submitted to the database. The success or failure of the update is reported back to the user.
Deleting a Record
Deleting a record is actually pretty easy compared to adding or updating. All that's necessary is the table name, key field name, and key field value. The deleteRec() function accepts these parameters and uses them to build an SQL DELETE statement. As usual, the success or failure of the operation is returned as part of the output string.
function delRec ($table, $keyName, $keyVal){
  //deletes $keyVal record from $table
  global $dbConn;
  $output = "";
  $query = "DELETE from $table WHERE $keyName = '$keyVal'";
  print "query is $query<br>\n";
  $result = mysql_query($query, $dbConn);
  if ($result){
    $output = "<h3>Record successfully deleted</h3>\n";
  } else {
    $output = "<h3>Error deleting record</h3>\n";
  } //end if
  return $output;
} // end delRec
Adding a Record
Adding a new record is much like editing a record. It is a two-step process. The first screen builds a page to add a record much like the edit record screen. I used techniques from the smartRToEdit() function to ensure the primary and foreign key references are edited appropriately.
function tToAdd($tableName){
  //given table name, generates HTML form to add an entry to the
  //table. Works like smartRToEdit in recognizing foreign keys

  global $dbConn;
  $output = "";

  //process a query just to get field names
  $query = "SELECT * FROM $tableName";
  $result = mysql_query($query, $dbConn);

  $output .= <<<HERE
  <form action = "processAdd.php"
        method = "post">
  <table border = "1">
    <tr>
      <th>Field</th>
      <th>Value</th>
    </tr>

HERE;

  $fieldNum = 0;
  while ($theField = mysql_fetch_field($result)){
    $fieldName = $theField->name;
    if ($fieldNum == 0){
      //it's the primary key field. It'll be autoNumber
      $output .= <<<HERE
      <tr>
        <td>$fieldName</td>
        <td>AUTONUMBER
          <input type = "hidden"
                 name = "$fieldName"
                 value = "null">
        </td>
      </tr>

HERE;
    } else if (preg_match("/(.*)ID$/", $fieldName, $match)) {
      //it's a foreign key reference. Use fieldToList to get
      //a select object for this field

      $valList = fieldToList($match[1],$fieldName, 0, "name");
      $output .= <<<HERE
      <tr>
        <td>$fieldName</td>
        <td>$valList</td>
      </tr>

HERE;
    } else {
    //it's an ordinary field. Print a text box
    $output .= <<<HERE
      <tr>
        <td>$fieldName</td>
        <td><input type = "text"
                   name = "$fieldName"
                   value = "">
        </td>
      </tr>

HERE;
    } // end if
    $fieldNum++;
  } // end while
  $output .= <<<HERE
    <tr>
      <td colspan = 2>
        <input type = "hidden"
               name = "tableName"
               value = "$tableName">
        <input type = "submit"
               value = "add record">
      </td>
    </tr>
  </table>
  </form>

HERE;

  return $output;

} // end tToAdd
The INSERT statement created by this function will use NULL as the primary key value, because all tables in the system are set to AUTO_INCREMENT. I used the same regular expression trick as in smartRToEdit() to recognize foreign key references. If they exist, I built a drop-down list with fieldToList() to display all possible values for that field and send an appropriate key. Any field not recognized as a primary or foreign key will have an ordinary text box.
Processing an Added Record
The tToAdd() function sends its results to processAdd.php, which reorganizes the data much like updateRecord.php. The field names and values are converted to arrays, which are passed to the procAdd() function.
function procAdd($tableName, $fields, $vals){
  //generates INSERT query, applies to database
  global $dbConn;

  $output = "";
  $query = "INSERT into $tableName VALUES (";
  foreach ($vals as $theValue){
    $query .= "'$theValue', ";
  } // end foreach

  //trim off trailing space and comma
  $query = substr($query, 0, strlen($query) - 2);

  $query .= ")";
  $output = "query is $query<br>\n";

  $result = mysql_query($query, $dbConn);
  if ($result){
    $output .= "<h3>Record added</h3>\n";
  } else {
    $output .= "<h3>There was an error</h3>\n";
  } // end if
  return $output;
} // end procAdd
The main job of procAdd() is to build an SQL INSERT statement using the results of tToAdd(). This insert is passed to the database, and the outcome off the insertion attempt is reported to the user.
Building a List Box from a Field
Both smartRToEdit() and tToAdd() need drop-down HTML lists following a specific pattern. In both cases, I needed to build a list that allows the user to select a key value based on some other field in the record. This list should be set so any value in the list can be set as selected. The fieldToList() function takes four parameters and uses them to build exactly such a list.
function fieldToList($tableName, $keyName, $keyVal, $fieldName){
  //given table and field, generates an HTML select structure
  //named $keyName. values will be key field of table, but
  //text will come from the $fieldName value.
  //keyVal indicates which element is currently selected

  global $dbConn;
  $output = "";
  $query = "SELECT $keyName, $fieldName FROM $tableName";
  $result = mysql_query($query, $dbConn);
  $output .= "<select name = $keyName>\n";
  $recNum = 1;
  while ($row = mysql_fetch_assoc($result)){
    $theIndex = $row["$keyName"];
    $theValue = $row["$fieldName"];
    $output .= <<<HERE
    right now, theIndex is $theIndex and keyVal is $keyVal
  <option value = "$theIndex"
HERE;

    //make it currently selected item
    if ($theIndex == $keyVal){
      $output .= " selected";
    } // end if
    $output .= ">$theValue</option>\n";
    $recNum++;
  } // end while
  $output .= "</select>\n";
  return $output;
} // end fieldToList
The fieldToList() function begins by generating a query that will return all records in the foreign table. I build an HTML SELECT object based on the results of this query. As I step through all records, I check to see if the current record corresponds to the $keyVal parameter. If so, that element is selected in the HTML.
Creating a Button That Returns to the Main Page
To simplify navigation, I added a button at the end of each PHP program that returns the user to the program's primary page. The mainButton() program creates a very simple form calling whatever program is named in the $mainProgram variable indicated at the top of the library.
function mainButton(){
  // creates a button to return to the main program

  global $mainProgram;

  $output .= <<<HERE
<form action = "$mainProgram"
      method = "get">
<input type = "submit"
       value = "return to main screen">
</form>

HERE;
  return $output;
} // end mainButton


