Creating the Quiz Machine Program
Creating the Quiz Machine Program
The quiz tool from the beginning of this chapter is actually an entire system of programs designed to work together, in this case, five different programs Each quiz is stored in two separate files, which are automatically generated by the programs. Figure 6.11 is a flow diagram that illustrates how the various programs fit together.
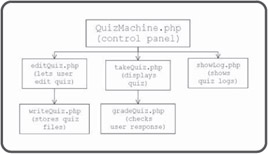
Figure 6.11: This diagram illustrates a user's movement through the quiz machine system.
The QuizMachine.php program is the entry point into the system for both the test administrator and the person who will be taking the quiz. It essentially consists of three forms that allow access to the other parts of the program. To ensure a minimal level of security, all other programs in the system require some sort of password access. The QuizMachine program primarily serves as a gateway to the other parts of the system. If the user has administrative access (determined by a password), he or she can select an exam and call the editQuiz.php page. This page loads up the actual master file of the quiz (if it already exists) or sets up a prototype quiz, and places the quiz data in a Web page as a simple editor. The editQuiz program calls the writeQuiz.php program, which takes the results of the editQuiz form, and writes it to a master test file as well as an HTML page.
If the user wants to take a quiz, the system moves to the takeQuiz.php page, which checks the user's password and presents the quiz if authorized. When the user indicates he or she is finished, the gradeQuiz.php program grades the quiz and stores the result in a text file.
Finally, the administrator can examine the log files resulting from any of the quizzes by indicating a quiz from the QuizMachine page. The showLog.php program will display the appropriate log file.
Building the QuizMachine.php Control Page
The heart of the quiz system is the quizMachine.php page. This is the only page that the user will enter directly. All the other parts of the system will be called from this page or from one of the pages it calls. The purpose of this page is to act as a control panel. It consists of three parts, corresponding to the three primary jobs that can be done with this system: Writing or editing quizzes, taking quizzes, and analyzing the results of quizzes. In each of these cases, the user will have a particular quiz in mind, so the control panel automatically provides a list of appropriate files in each segment. Also, each of these tasks requires a password, to provide at least some level of security.
The main part of the QuizMachine.php program simply sets up the opening HTML and calls a series of functions, which will actually do all the real work.
<html>
<head>
<title>Quiz Machine</title>
</head>
<body>
<center>
<h1>Quiz Machine</h1>

<?

getFiles();
showTest();
showEdit();
showLog();
The program will call getFiles() first. This function will examine a directory and get a list of the files in that directory. This list of filenames will be used in the other functions. The next three functions all generate HTML forms. Each of these forms contains a select list that is dynamically generated from the file list. The button corresponding to each form submits the form to the appropriate PHP page in the system.
| TRICK? |
You might want to make another version of this main page for the people who will take your test. On that page, you wouldn't even show the administrative options. It's very easy to make such a page. Simply copy the QuizBuilder.php program to another file, and comment out the calls to the showEdit() and showLog() functions. |
Getting the File List
Since most of the code in the QuizBuilder program works with a list of files, the getFiles() function is charged with that important task.
function getFiles(){
  //get list of all files for use in other routines

  global $dirPtr, $theFiles;

  chdir(".");
  $dirPtr = openDir(".");
  $currentFile = readDir($dirPtr);
  while ($currentFile !== false){
    $theFiles[] = $currentFile;
    $currentFile = readDir($dirPtr);
  } // end while

} // end getFiles
The first thing this function does is to change the file system so it is pointing at the current directory, and set up a pointer variable to that directory.
| TRAP? |
The directory that holds the PHP programs is open for anybody to see. You might want to have your test files not so conspicuous. To simplify this example, I kept all the test files in the same directory as the program itself, but you can keep all the data files in a different directory if you wish. For security reasons, you might choose to store all the data files in a part of your directory that is not available to the Web (away from your public_html structure, for instance) so that people can't see the answer key by browsing to it. If you choose to do this, you'll need to change each directory reference throughout the system. |
I then created an array called theFiles, which holds the name of every file in the directory. The theFiles variable is global, so it will be shared with the program and other functions that declare a reference to it.
Showing the "Take a Test" List
Most of your users will not be creating or editing quizzes. Instead, they will be taking them. In order to take a test, the user must choose a test and have the password associated with that test. To simplify choosing a test, the showTest() function grabs all the HTML files in the quiz directory and places them in a select list. The password goes in an ordinary password field. The code in showTest() creates a form that calls the takeQuiz.php program when it is submitted.
function showTest(){
  //print a list of tests for user to take

  global $theFiles;
  print <<<HERE
<form action = "takeQuiz.php"
      method = "post">

<table border = 1
       width = 400>
<tr>
  <td colspan = 2><center>
    <h3>Take a quiz</h3>
  </td>
</tr>

<tr>
  <td>Quiz Password</td>
  <td>
    <input type = "password"
           name = "password">
  </td>
</tr>

<tr>
  <td>Quiz</td>
  <td>
    <select name = "takeFile">

HERE;

  //select only quiz html files
  $testFiles = preg_grep("/html$/", $theFiles);

  foreach ($testFiles as $myFile){
    $fileBase = substr($myFile, 0, strlen($myFile) - 5);
    print "    <option value = $fileBase>$fileBase</option>\n";
  } // end foreach

  print <<<HERE
    </select>
  </td>
</tr>

<tr>
  <td colspan = 2><center>
    <input type = "submit"
           value = "go">
  </center></td>
</tr>
</table>

</form>

HERE;

} // end showTest
Although the code is long, almost all of it is pure HTML. The only part that's really PHP code is the part that selects HTML files and places them in the select group.
This code fragment uses the preg_grep() to select filenames ending in "HTML" and creates an option tag for that file. Note that I stripped out the .html part of the filename, because I won't really need it, and it would complicate some of the code coming up in the takeQuiz program.
Showing the Edit List
The showEdit() function works a lot like showTest(). This function is used to display a list of the master files on the system. Although it will often be exactly the same as the list of tests, it won't always be the same, because there can be master files that haven't yet been made into HTML files.
function showEdit(){
  // let user select a master file to edit

  global $theFiles;
  //get only quiz master files
  $testFiles = preg_grep("/mas$/", $theFiles);

  //edit a quiz
  print <<<HERE
<form action = "editQuiz.php"
      method = "post">
<table border = 1
       width = 400>
<tr>
  <td colspan = 2><center>
    <h3>Edit a quiz</h3>
  </center></td>
</tr>

<tr>
  <td>Administrative Password</td>
  <td>
    <input type = "password"
           name = "password"
           value = "">
  </td>
</tr>

<tr>
  <td>Quiz</td>
  <td>
    <select name = "editFile">
      <option value = "new">new quiz</option>

HERE;
  foreach ($testFiles as $myFile){
    $fileBase = substr($myFile, 0, strlen($myFile) - 4);
    print " <option value = $myFile>$fileBase</option>\n";
  } // end foreach

  print <<<HERE
    </select>
  </td>
</tr>

<tr>
  <td colspan = 2><center>
    <input type = "submit"
           value = "go">
  </center></td>
</tr>
</table>
</form>

HERE;

} // end showEdit
The showEdit() function is just like showQuiz() but the form points to the editQuiz.php program, and the file list is based on those files ending in "mas."
There's one other subtle but important difference. Look at the code for the select element and you'll see I added a "new quiz" option. If the user chooses this option, the editQuiz() function won't try to load a quiz file into memory, but will set up for a new quiz instead.
Showing the Log List
The last segment is meant for the quiz administrator. It allows the user with admin access to view the log of any quiz on the system. This will show who has taken the test, where and when they took it, and the score. When the user clicks on the Submit button associated with this part of the page, the showLog.php program will take over.
function showLog(){

  //let user choose from a list of log files
  global $theFiles;

  print <<<HERE

<form action = "showLog.php"
      method = "post">
<table border = 1
       width = 400>
<tr>
  <td colspan = 2><center>
    <h3>Show a log file</h3>
  </td>
</tr>

<tr>
  <td>Administrative Password</td>
  <td>
    <input type = "password"
           name = "password"
           value = "">
  </td>
</tr>

<tr>
  <td>Quiz</td>
  <td>
    <select name = "logFile">

HERE;

  //select only log files
  $logFiles = preg_grep("/log$/", $theFiles);
  foreach ($logFiles as $myFile){
    $fileBase = substr($myFile, 0, strlen($myFile) - 4);
    print "      <option value = $myFile>$fileBase</option>\n";
  } // end foreach

  print <<<HERE
    </select>
  </td>
</tr>

<tr>
  <td colspan = 2><center>
    <input type = "submit"
           value = "go">
  </td>
</tr>
</table>
</form>

HERE;
} // end showLog

?>

</center>
</body>
</html>
I decided that all log files would end with .log, so the program can easily get a list of log files to place in the select group.
Editing a Test
For simplicity's sake I decided on a very simple test format. The first three lines of the test file will contain the test's name, the instructor's e-mail address, and a password for the test. The test data itself will follow. Each problem will take up one line (although it can wrap freely— a line is defined by a carriage return character). The problem will have a question followed by four possible answers and the correct answer. Each of these elements will be separated by the colon (:) character.
If you think there are too many rules for how the questions are formatted, I agree. This is a limitation of the sequential file access technique you are using to store the data in this chapter. In later chapters, you'll learn some other ways to work with data that aren't quite so picky. However, this is a relatively easy way to store your data, so I wrote the program to assist the process as much as practical. In general, you'll want to write your program so the user never has to know the underlying data structure.
The editQuiz.php program is designed to assist the user in creating and editing quizzes. It's actually a very simple program, because the real work will happen after the user is finished editing and presses the Submit button.
Getting Existing Test Data
The first chore is to determine which quiz the user is requesting. Remember that the value "new" indicates that the user wants to build a new test, so that value is treated specially. Any other value will be the foundation of a test filename, so I open the appropriate master file and load its values into the appropriate elements on the form.
<html>
<head>
<title>Quiz Builder</title>
</head>
<body>
<?

if ($password != "absolute"){
  print <<<HERE

<font color = "red" size = +3>
Invalid Password!
</font>

HERE;
} else {
  //check to see if user has chosen a form to edit
  if ($editFile == "new"){
    //if it's a new file, put in some dummy values
    $quizName = "sample test";
    $quizEmail = "root@localhost";
    $quizData = "q:a:b:c:d:correct";
    $quizPwd = "php";
  } else {
    //open up the file and get the data from it
    $fp = fopen($editFile, "r");
    $quizName = fgets($fp);
    $quizEmail = fgets($fp);
    $quizPwd = fgets($fp);
    while (!feof($fp)){
      $quizData .= fgets($fp);
    } // end while
    fclose($fp);
} // end 'new form' if
I decided to code the value "absolute" (from the name of this book series) as an administrative password. Each test will have its own password, and the administrative functions (like editing a quiz) have their own password. If the password field has any other value besides my chosen password, the program will indicate a problem and refuse to move forward.
| TRAP? |
This use of an administrative password will keep casual snoops out of your system, but it's nowhere near bullet-proof security. This system is not appropriate for situations where you must be absolutely certain that the tests are secure. |
Once you know the user is authorized to edit tests, you need to determine if it's a new test or an existing quiz. If the quiz is new, I simply add some sample data to variables, which will be used for the upcoming form. If the user wants to see an existing test, I open the file for read access, and grab the first three lines, which will correspond to the $quizName, $quizEmail, and $quizPwd fields.
I then use a foreach loop to load up the rest of the file into the $quizData variable.
| TRICK? |
You might wonder why the quiz needs a password field if it already took a password to get to this form. The quiz system has multiple levels of security. Anybody can get to the quizBuilder.php page. However, in order to move to one of the other pages, the user has to have the right kind of password. Only an administrator should go to the editPage and showLog programs, so these programs require special administrative password access. Each quiz also has a password associated with it. The password is stored in the quiz master file so that you can associate a different password for each quiz. In this way, the users authorized to take one test won't be taking other tests (and adding confusion to your log files). |
Printing Out the Form
Once the variables are loaded with appropriate values, it's a simple matter to print up an HTML form to let the user edit the quiz. The form is almost all pure HTML with the quiz variables interpolated into the appropriate places.
print <<<HERE

<form action = "writeQuiz.php"
      method = "post">

<table border = 1>
<tr>
  <th>Quiz Name</th>
  <td>
    <input type = "text"
           name = "quizName"
           value = "$quizName">
  </td>
</tr>

<tr>
  <th>Instructor email</th>
  <td>
    <input type = "text"
           name = "quizEmail"
           value = "$quizEmail">
  </td>
</tr>

<tr>
  <th>Password</th>
  <td>
    <input type = "text"
           name = "quizPwd"
           value = "$quizPwd">

<tr>
  <td rowspan = 1
      colspan = 2>
    <textarea name = "quizData"
              rows = 20
              cols = 60>
$quizData</textarea>
  </td>
</tr>

<tr>
  <td colspan = 2><center>
    <input type = "submit"
           value = "make the quiz">
  </center></td>
</tr>

</table>
</form>
HERE;
} // end if

?>
</body>
</html>
Writing the Test
Once the administrator has finished editing a quiz file, that quiz file must be stored to the file system, and an HTML page for the quiz needs to be generated. The writeQuiz.php program performs these duties.
Setting up the Main Logic
The first job is to create two files. The quiz name can be the foundation of the filename, but many file systems choke at spaces within filenames, so I use the str_replace() function to replace all spaces in $quizName to underscore characters (_). Then I create a filename for the master file ending in .mas and another filename for the actual quiz ending in .html. To create the HTML file, I open it up for write output. Then I use the buildHTML() function (which will be described shortly) to build the HTML code, and I write that code out to the html file and close the file.
The master file is built in pretty much the same way, except it calls the buildMas() function in order to create the appropriate text for the file.
<html>
<head>
<title>Write Quiz</title>
</head>
<body>
<?
//given a quiz file from editQuiz,
//generates a master file and an HTML file for the quiz

//open the output file
$fileBase = str_replace(" ", "_", $quizName);
$htmlFile = $fileBase . ".html";
$masFile = $fileBase . ".mas";

$htfp = fopen($htmlFile, "w");
$htData = buildHTML();
fputs($htfp, $htData);
fclose($htfp);

$msfp = fopen($masFile, "w");
$msData = buildMas();
fputs($msfp, $msData);
fclose($msfp);

//preview the actual master file
print <<<HERE
<pre>
$msData
</pre>

HERE;
To make sure things were going well, I added a check to the end of the page that prints out the actual contents of the master file. The output of this program lets the administrator check to see that the test is working correctly. The administrator can actually take the test and submit it to the grading program from this page. If there is a problem with the test, it's convenient to have the actual contents of the .mas file visible on the page. Of course, the final HTML page will not contain this data, because it holds the answers.
Building the Master File
The master file routine is very straightforward.
function buildMas(){
  //builds the master file
  global $quizName, $quizEmail, $quizPwd, $quizData;
  $msData = $quizName . "\n";
  $msData .= $quizEmail . "\n";
  $msData .= $quizPwd . "\n";
  $msData .= $quizData;
  return $msData;
} // end buildMas
The critical part of this file is remembering the file structure rules, so any program that reads this file doesn't get confused. The quiz name should go on the first line, followed by a newline character. The $quizEmail and $quizPwd variables follow on their own lines, and finally all the $quizData (which will usually be several lines) should go to the end of the file. Note that the function doesn't actually store the data to the file, but returns it to the main program. This allows a little more flexibility, so I can write the data to both the file and the page.
Building The HTML File
The function that creates the HTML is a little more involved, but it still isn't too hard. The basic strategy is this: Build an HTML form containing all the questions. For each line of the master file, build a radio group. Place the question and all the possible answers in a set of nested <ol> elements. At the end of the page, there should be one Submit button. When the user clicks on the Submit button, the system will call the gradeQuiz.php page, which will evaluate the user's responses.
function buildHTML(){
  global $quizName, $quizData;
  $htData = <<<HERE
<html>
<head>
<title>$quizName</title>
</head>
<body>

HERE;

  //get the quiz data
  $problems = split("\n", $quizData);
  $htData .= <<<HERE
<center>
<h1>$quizName</h1>
</center>

<form action = "gradeQuiz.php"
      method = "post">

Name
<input type = "text"
       name = "student">

<ol>

HERE;
  $questionNumber = 1;

  foreach ($problems as $currentProblem){
      list($question, $answerA, $answerB, $answerC, $answerD, $correct) =
      split (":", $currentProblem);
      $htData .= <<<HERE
<li>
  $question
  <ol type = "A">
    <li>
      <input type = "radio"
             name = "quest[$questionNumber]"
             value = "A">
      $answerA
    </li>

    <li>
      <input type = "radio"
             name = "quest[$questionNumber]"
             value = "B">
      $answerB
    </li>

    <li>
      <input type = "radio"
             name = "quest[$questionNumber]"
             value = "C">
      $answerC
    </li>

    <li>
      <input type = "radio"
             name = "quest[$questionNumber]"
             value = "D">
      $answerD
    </li>

  </ol>

</li>

HERE;
    $questionNumber++;

  } // end foreach
  $htData .= <<<HERE
</ol>

<input type = "hidden"
       name = "quizName"
       value = "$quizName">

<input type = "submit"
       value = "submit quiz">

</form>

HERE;

  print $htData;
  return $htData;
} // end buildHTML

?>
</body>
</html>
Most of the critical information this function needs is stored in $quizData. Each line of $quizData stores one question, so I use a split() function to break $quizData into an array called $problems. I use a foreach loop to step through each problem. Each problem contains a list of values, which is separated into a series of scalar variables with the combination of split() and list().
Within the foreach loop, I also added the HTML code necessary to print out the current question's information. Take a careful look at the code for the radio buttons. Recall that radio buttons that will operate as a group should all have the same name. I did this by calling them all quest[$questionNumber]. The $questionNumber variable will contain the current question number, and this value will be interpolated before the HTML code is written. Question number 1 will have four different radio buttons called quest[1]. The gradeQuiz program will see this as an array called $quest.
At the end of the HTML, I added the quiz name as a hidden field, and the Submit button.
Taking a Quiz
The point of all this work is to have a set of quizzes your users can take, so it's good to have a program to present the quizzes. Actually, since the quizzes are saved as HTML pages, you could simply provide a link to a quiz and be done with it, but I wanted a little more security. I wanted the ability to store my quiz files outside the normal public_html file space, and I wanted to have basic password protection so people won't take a quiz until I know it's ready. (I won't release the password until I'm ready for people to take the quiz.) Also, I can easily turn a quiz "off" by simply changing the password.
The only real job of the takeQuiz page is to check the user's password against the password of the indicated test, and allow access to the quiz if appropriate.
<?
//takeQuiz.php
//given a quiz file, prints out that quiz

//get the password from the file
$masterFile = $takeFile . ".mas";
$fp = fopen($masterFile, "r");
//the password is the third line, so get the first two lines, but ignore them
$dummy = fgets($fp);
$dummy = fgets($fp);
$magicWord = fgets($fp);
$magicWord = rtrim($magicWord);
fclose($fp);

if ($password == $magicWord){
  $htmlFile = $takeFile . ".html";
  //print out the page if the user got the password right
  readFile($htmlFile);
} else {
  print <<<HERE
  <font color = "red"
        size = +3>
Incorrect Password.<br>
You must have a password in order to take this quiz
</font>

HERE;
} // end if
?>
The password associated with a test is stored in the test file, so once I know which test the user wants to take, I can open that file and extract the password from it. The password is stored in the third line of the file, and the only way to get to it with a sequential access file like this is to load the first two lines into a dummy variable and then load the password into a variable called $magicWord. If the user indicated a password that matches $magicWord, I use the readFile() function to send the contents of the quiz HTML page to the browser. If not, I send a message indicating the password was not correct.
| TRICK? |
This would also be a dandy place to set up a little more security. In a production version of this system, I keep a log file of every access, so I'll know if somebody has been trying to get at my system 1,000 times from the same machine within a second (sure sign of some kind of automated attack) or other mischief. I can also check to see that later on when a page has been submitted, it comes from the same computer that requested the file in the first place. If I want, I can also check the times of request and submission in order to reject quizzes that have been out longer than some time limit. |
Grading the Quiz
One advantage of this kind of system is the potential for instantaneous feedback for the user. As soon as the user clicks the Submit button, the quiz will be automatically graded by the gradeQuiz.php program, which also stores a log of the student's results for the administrator.
Opening the Files
The gradeQuiz program, like all the programs in this system, relies on files to do all its important work. In this case, the program will use the master file to get the answer key for the quiz, and will write to a log file.
<?
print <<<HERE
<html>
<head>
<title>Grade for $quizName, $student</title>
</head>
<body>

</body>
<h1>Grade for $quizName, $student</h1>
HERE;

//open up the correct master file for reading
$fileBase = str_replace(" ", "_", $quizName);
$masFile = $fileBase . ".mas";
$msfp = fopen($masFile, "r");

$logFile = $fileBase . ".log";

//the first three lines are name, instructor's email, and password
$quizName = fgets($msfp);
$quizEmail = fgets($msfp);
$quizPwd = fgets($msfp);
The master file is opened with read access. The first three lines are unimportant, but I must still read them in to get to the quiz data.
Creating an Answer Key
I start by generating an answer key from the master file. I'll step through each question in the file, and extract all the normal variables from it (although all I'm really interested in is the $correct variable). I then store the value of $correct into an array called $key. At the end of this loop, the $key array will hold the correct answer for each question in the quiz.
//step through the questions building an answer key
$numCorrect = 0;
$questionNumber = 1;
while (!feof($msfp)){
  $currentProblem = fgets($msfp);

  list($question, $answerA, $answerB, $answerC, $answerD, $correct) =
  split (":", $currentProblem);
  $key[$questionNumber] = $correct;
  $questionNumber++;
} // end while
fclose($msfp);
Checking the User's Response
The user's responses will come from the HTML form as an array called $quest. The correct answers are in an array called $key. To grade the test, I can simply step through both arrays at the same time, comparing the user's response with the correct response. Each time these values are the same, the user has gotten an answer correct. When the values are not the same, the user was incorrect (or there was a problem with the test itself-don't discount that as a possibility).
//Check each answer from user
for ($questionNumber = 1; $questionNumber <= count($quest); $questionNumber++){
  $guess = $quest[$questionNumber];
  $correct = $key[$questionNumber];
  $correct = rtrim($correct);
  if ($guess == $correct){
    //user got it right
    $numCorrect++;
    print "problem # $questionNumber was correct<br>\n";
  } else {
    print "<font color = red>problem # $questionNumber was incorrect</font><br>\n";
  } // end if
} // end for
I chose to give a certain amount of feedback telling whether the question was correct or not, but I decided not to display the right answer. You might wish to give the user more or less information, depending on how you're using the quiz program.
Reporting the Results to Screen and Log File
After checking each answer, the program reports the results to the user as a raw score and a percentage. The program also opens up a log file for append access and adds the current data to it. Append access is just like write access, but rather than overwriting an existing file, it adds any new data to the end of it.
print "you got $numCorrect right<br>\n";
$percentage = ($numCorrect /count($quest)) * 100;
print "for $percentage percent<br>\n";

$today = date ("F j, Y, g:i a");
//print "Date: $today<br>\n";
$location = getenv("REMOTE_ADDR");
//print "Location: $location<br>\n";

//add results to log file
$lgfp = fopen($logFile, "a");
$logLine = $student . "\t";
$logLine .= $today . "\t";
$logLine .= $location . "\t";
$logLine .= $numCorrect . "\t";
$logLine .= $percentage . "\n";

fputs($lgfp, $logLine);
fclose($lgfp);

?>

</html>
I added a few more elements to the log file that might be useful to a test administrator. Of course, I added the student's name and the current date. You might want to look at the online help for the date() function to see all the various ways you can display the current date. I also added a location variable, which uses the $REMOTE_ADDR environment variable to indicate which machine the user was on when he or she submitted the exam. This can be useful information, because it can alert you to certain kinds of hacking. (A person taking the same quiz several times on the same machine but with a different name, for example.) The gradeQuiz program adds the number correct and the percentage to the log file as well, then closes the file. Notice that the data in the log file is delimited with tab characters. This is done so an analysis program could easily work with the file using the split command. Also, most spreadsheet programs can readily read a tab-delimited file, so the log file can be easily imported into a spreadsheet for further analysis.
| TRICK? |
You could really improve the logging functionality if you wanted to do some in-depth test analysis. For example, you could easily store each user's response to each question in the quiz. This would give you a database of performance on every question, so you could easily determine which questions are causing difficulty. |
Viewing the Log
The showLog.php program is actually very similar to the takeQuiz program. It checks the password to ensure the user has admin access, then opens up the log using the file() function. It prints out the results of the file inside a <pre></pre> pair, so the tab characters will be preserved.
<?
//showLog.php
//shows a log file
//requires admin password

if ($password == "absolute"){
  $lines = file($logFile);
  print "<pre>\n";
  foreach ($lines as $theLine){
    print $theLine;
  } // end foreach
  print "</pre>\n";

} else {
  print <<<HERE
<font color = "red"
      size = +2>
You must have the appropriate password to view this log
</font>

HERE;
} // end if

?>
You could improve this program by writing the data into an HTML table. However, not all spreadsheets can easily work with HTML table data, so I prefer the tab format. It wouldn't be difficult to add some data analysis to the log viewer, including mean scores, standard deviation, and suggested curve values.


