Connecting to the Hero Database
Connecting to the Hero Database
To show how this works, I'll build a simple PHP program that returns all the values in the hero database you created in Chapter 7. Figure 8.1 illustrates the Show Hero PHP program.
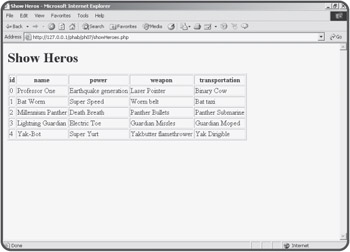
Figure 8.1: This HTML table is generated by a PHP program reading the database.
| HINT? |
I decided to go back to this simpler database rather than the more complex adventure game. When you're learning new concepts, it's best to work with the simplest environment you can at first, and then move to more complex situations. The adventure database has a lot of information in it, and the way the records point to each other is a little complicated. I wanted to start with a simpler database to be sure I understood the basics of data connection before working with a production database that is bound to have complexities of its own. |
The code that generates this page is shown below:
<body>
<h1>Show Heros</h1>
<?
//make the database connection
$conn = mysql_connect("localhost", "", "");
mysql_select_db("chapter7", $conn);

//create a query
$sql = "SELECT * FROM hero";
$result = mysql_query($sql, $conn);

print "<table border = 1>\n";

//get field names
print "<tr>\n";
while ($field = mysql_fetch_field($result)){
  print " <th>$field->name</th>\n";
} // end while
print "</tr>\n\n";

//get row data as an associative array
while ($row = mysql_fetch_assoc($result)){
  print "<tr>\n";
  //look at each field
  foreach ($row as $col=>$val){
    print " <td>$val</td>\n";
  } // end foreach
  print "</tr>\n\n";
}// end while

print "</table>\n";
?>
</body>
</html>
Glance over the code, and you'll see it's mostly familiar except for a few new functions that begin with "mysql_" These functions are designed to allow access to MySQL databases. If you look through the PHP documentation, you'll see very similar functions for several other types of databases, including Oracle, Informix, mSQL, and ODBC. You'll find the process for connecting to and using other databases are pretty much the same no matter which database you're using.
Getting a Connection
The first job is to get a connection between your PHP program and your MySQL server. You can connect to any server you have permission to use. The mysql_connect function arranges the communication link between MySQL and PHP. Here's the connect statement from the showHero program:
$conn = mysql_connect("localhost", "", "");
The mysql_connect() function requires three parameters: server name, username, and password. The server name is the name or URL of the MySQL server you wish to connect to (this will be localhost if your PHP and MySQL servers reside on the same machine, which is frequently the case). The username refers to the username in MySQL. Most database packages have user accounts.
| TRAP? |
You will probably have to change the userName and password fields if you are running this code on a server somewhere. I used default values that work fine on an isolated test server, but you'll need to change to your username and password if you try this code on a production server. |
You can use the same username and password you use to log into MySQL, and your program will have all the same access you do. Of course, you may want more restricted access for your programs, so you may want to create a special account, which has only the appropriate permissions, for users of your program.
Database security is an important and challenging issue.
There are a few easy things you can do to protect your data from most hackers. The first thing is to obscure your username and password information whenever you publish your code. I removed my username and password from the code shown here. In a practice environment, you can leave these values blank, but you should ensure you don't have wide open code that allows access to your data. If you need to post your code (for example in a class situation) be sure to change the password to something besides your real password.
The mysql_connect() function returns an integer referring to the database connection. You can think of this identifier much like the file pointers you learned in Chapter 6 "Working with Files." The data connection should be stored in a variable (I usually use something like $conn) because many of the other database functions will need to access the connection.
Choosing a Database
A data connection can have a number of databases connected to it. The mysql_set_db() function lets you choose a database. It works just like the USE command inside SQL. The mysql_set_db() function requires the name of a database and a data connection. This function returns the value FALSE if it was unable to connect to the specified database.
Creating a Query
Creating a query is very easy. The relevant code from showHero.php is reproduced here:
//create a query
$sql = "SELECT * FROM hero";
$result = mysql_query($sql, $conn);
You begin by placing SQL code inside a variable.
| TRAP? |
When you entered SQL commands into the SQL console or SQLyog, the commands required a semicolon. When your PHP program sends a command to the DBMS, the semicolon will automatically be added, so you should notend your SQL commands with semicolons. Of course, you'll be assigning these commands within a line of PHP code, which still has its own semicolon. (Sheesh!) |
The mysql_query() function allows you to pass an SQL command through a connection to a database. You can send any SQL command to the database with mysql_query(), including table creation statements, updates, and queries. It returns a special element called a result set. If the SQL command was a query, the result variable will hold a pointer to the data, which we'll take apart in the next step. If it's a data definition command (the commands used to create, and modify tables) the result object will usually contain the string related to the success or failure of the operation.
Getting the Field Names
I'll be printing the data out in an HTML table. I could create the table headings by hand, because I know what all the fields are, but it's better to get the field information directly from the query, because you won't always know which fields are being returned by a particular query. The next chunk of code manages this task.
print "<table border = 1>\n";

//get field names
print "<tr>\n";
while ($field = mysql_fetch_field($result)){
  print " <th>$field->name</th>\n";
} // end while
print "</tr>\n\n";
The mysql_fetch_field() function expects a query result as its one parameter. It then fetches the next field and stores it in the $field variable. If there are no fields left in the result, the function returns the value FALSE. This allows the field function to also be used as a conditional statement.
The $field variable is actually an object. You haven't used PHP objects yet, but they're really not too difficult. The $field object in this case is much like an associative array. It has a number of properties (which can be thought of as the attributes of the field). The field object has a number of attributes, listed in Table 8.1.
|
Property |
Attribute |
|---|---|
|
max_length |
How long the field is (Especially important in VARCHAR fields) |
|
name |
The name of the field |
|
primary_key |
TRUE if the field is a primary key |
|
table |
Name of table this field belongs to |
|
type |
Data type of this field |
By far the most common use of the field object is to determine the names of all the fields in a query. The other attributes can be useful in certain situations. You can see the complete list of attributes in the MySQL online help.
You use a slightly new syntax to refer to the properties of an object. Notice that I printed $field->name to the HTML table. This syntax simply refers to the name property of the field object. For now if you want to think of it as a fancy associative array, that would be reasonably accurate.
Parsing the Result Set
The rest of the code examines the result set. I'll reproduce it here so you can refresh your memory.
//get row data as an associative array
while ($row = mysql_fetch_assoc($result)){
  print "<tr>\n";
  //look at each field
  foreach ($row as $col=>$val){
    print " <td>$val</td>\n";
  } // end foreach
  print "</tr>\n\n";
}// end while
The mysql_fetch_assoc() function fetches the next row from a result set. It requires a result pointer as its parameter, and it returns an associative array.
| TRICK? |
There are a number of other related functions for pulling a row from a result set. mysql_fetch_object() stores a row as an object much like the mysql_fetch_fields() function does. The mysql_fetch_array() function fetches an array that can be treated as a normal array, an associative array, or both. I tend to use mysql_fetch_assoc() because I think it's the most straightforward approach for those unfamiliar with object-oriented syntax. Of course, you should feel free to investigate these other functions and use them if they make more sense to you. |
If there are no rows left in the result set, mysql_fetch_assoc() will return the value FALSE. It is often used as a condition in a while loop as I did here to fetch each row in a result set. Each row will represent a row of the eventual HTML table, so I print the HTML code to start a new row inside the while loop.
Once you've gotten a row, it's stored as an associative array. You can parse this array using a standard foreach loop. I chose to assign each element to $col and $val variables. I actually don't need $col in this case, but it can be handy to have. Inside the foreach loop I placed code to print out the current field in a table cell.


