Returning to the Adventure Game Program
Returning to the Adventure Game Program
Recall at the end of Chapter 7 you created a database for the adventure game. Now that you know how to connect a PHP program to a MySQL database, you're ready to begin writing the game itself.
Connecting to the Adventure Database
Once I had built the database, the first PHP program I wrote tried to do the simplest possible connection to the database. I wanted to ensure I got all the data correctly. Here's the code for that program:
<html>
<head>
<title>Show Adventure</title>
</head>
<body>

<?
$conn = mysql_connect("localhost", "", "");
mysql_select_db("chapter7", $conn);
$sql = "SELECT * FROM adventure";
$result = mysql_query($sql);
while ($row = mysql_fetch_assoc($result)){

  foreach($row as $key=>$value){
    print "$key: $value<br>\n";
  } // end foreach
  print "<hr>\n";

} // end while

?>
</body>
</html>
This simple program was used to establish the connection and to ensure that everything was stored as I expected. Whenever I write a data program, I usually write something like this that quickly steps through my data to ensure everything is working correctly. There's no point in moving on until you know you have the basic connection.
I did not give you a screenshot of this program because it isn't very pretty, but I did include it on the CD-ROM so you can run it yourself. The point here is to start small and then turn your basic program into something more sophisticated one step at a time.
Displaying One Segment
The actual gameplay consists of repeated calls to the showSegment.php program. This program takes a segment id as its one input and then uses that data to build a page based on that record of the database. The only surprise is how simple the code is for this program.
<html>
<head>
<title>Show Segment</title>
<style type = "text/css">
body {
  color:red
}
td {
  color: white;
  background-color: blue;
  width: 20%;
  height: 3em;
  font-size: 20pt
}
</style>
</head>
<body>
<?
if (empty($room)){
  $room = 1;
} // end if

//connect to database
$conn = mysql_connect("localhost", "", "");
$select = mysql_select_db("chapter7", $conn);
$sql = "SELECT * FROM adventure WHERE id = '$room'";
$result = mysql_query($sql);
$mainRow = mysql_fetch_assoc($result);

$theText = $mainRow["description"];
$northButton = buildButton("north");
$eastButton = buildButton("east");
$westButton = buildButton("west");
$southButton = buildButton("south");
$roomName = $mainRow["name"];

print <<<HERE
<center><h1>$roomName</h1></center>
<form method = "post">
<table border = 1>
<tr>
  <td></td>
  <td>$northButton</td>
  <td></td>
</tr>

<tr>
  <td>$eastButton</td>
  <td>$theText</td>
  <td>$westButton</td>
</tr>

<tr>
  <td></td>
  <td>$southButton</td>
  <td></td>
</tr>

</table>
<center>
<input type = "submit"
       value = "go">
</center>
</form>

HERE;

function buildButton($dir){
  //builds a button for the specified direction
  global $mainRow, $conn;
  $newID = $mainRow[$dir];
  //print "newID is $newID";
  $query = "SELECT name FROM adventure WHERE id = $newID";
  $result = mysql_query($query, $conn);
  $row = mysql_fetch_assoc($result);
  $roomName = $row["name"];

  $buttonText = <<< HERE
  <input type = "radio"
         name = "room"
         value = "$newID">$roomName

HERE;

  return $buttonText;

} // end build button
?>
</body>
</html>
Creating a CSS Style
I began the HTML with a CSS style. My program is visually unappealing, but placing a CSS style here is the answer to my visual design disability. All I need to do is get somebody with an actual sense of style to clean up my CSS and I have a good-looking page.
Making the Data Connection
As usual, the program begins with some housekeeping. If the user hasn't specifically chosen a segment number, I'll start them out in room number 1, which will be the starting room.
if (empty($room)){
  $room = 1;
} // end if

//connect to database
$conn = mysql_connect("localhost", "", "");
$select = mysql_select_db("chapter7", $conn);
$sql = "SELECT * FROM adventure WHERE id = '$room'";
$result = mysql_query($sql);
$mainRow = mysql_fetch_assoc($result);
$theText = $mainRow["description"];
I then make an ordinary connection to the database and choose the record pertaining to the current room number. That query is stored in the $mainRow variable as an associative array.
Generating Variables for the Code
Most of the program writes the HTML for the current record to the screen. To make things simple, I decided to create some variables for anything that might be tricky.
$theText = $mainRow["description"];
$roomName = $mainRow["name"];
$northButton = buildButton("north");
$eastButton = buildButton("east");
$westButton = buildButton("west");
$southButton = buildButton("south");
I stored the description field of the current row into a variable named $theText. I made a similar variable for the room name.
It isn't strictly necessary to store the description field in a variable, but I'll be interpolating this value into HTML code, and I've found that interpolating associative array values can be a little tricky. In general, I like to copy an associative value to some temporary variable if I'm going to interpolate it. It's just a lot easier that way.
The button variables are a little different. I decided to create an HTML option button to represent each of the places the user could go. I'll use a custom function called buildButton() to make each button.
Writing the buildButton() Function
The procedure for building the buttons was repetitive enough to warrant a function. Each button is a radio button corresponding to a direction. The radio button will have a value that comes from the corresponding direction value from the current record. If the north field of the current record is 12 (meaning if the user goes North load up the data in record 12), the radio button's value should be 12. The trickier thing is getting the appropriate label. All that's stored in the current record is the id of the next room. If you want to display the room's name, you have to make another query to the database. That's exactly what the buildButton() function does.
function buildButton($dir){
  //builds a button for the specified direction
  global $mainRow, $conn;
  $newID = $mainRow[$dir];
  //print "newID is $newID";
  $query = "SELECT name FROM adventure WHERE id = $newID";
  $result = mysql_query($query, $conn);
  $row = mysql_fetch_assoc($result);
  $roomName = $row["name"];

  $buttonText = <<< HERE
  <input type = "radio"
         name = "room"
         value = "$newID">$roomName

HERE;

  return $buttonText;

} // end build button
The function borrows the $mainRow array (which holds the value of the main record this page is about) and the data connection in $conn. I pull the ID for this button from the $mainRow array and store it in a local variable. The buildButton() function requires a direction name sent as a parameter. This direction should be the field name for one of the direction fields.
I repeat the query creation process, building a query that requests only the row associated with the new ID. I then pull the room name from that array. Once that's done, it's easy to build the radio button text. The radio button is called room, so the next time this program is called, the $room variable will correspond to whichever radio button the user selected.
Finishing the HTML
All that's left is to add a Submit button to the form and close up the form and HTML. The amazing thing is, that's all you need. This code alone is enough to let the user play this game. It takes some effort to set up the data structure, but then all you have to do is provide a link to the first record (by calling showSegment.php without any parameters) and the program will keep calling itself.
Viewing and Selecting Records
I suppose you could stop there, because the game is working, but the really great thing about this structure is how flexible it is. It won't take much more work to create an editor that allows you to add and modify records however you wish.
This actually requires a couple of PHP programs. The first (shown in Figure 8.2) prints out a summary of the entire game, and allows the user to edit any node.
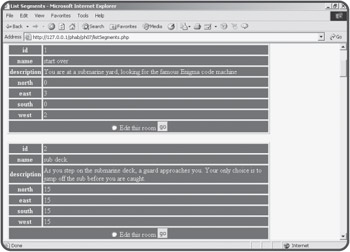
Figure 8.2: The listSegments program lists all the data and allows the user to choose a record for editing.
The code for the listSegments.php program is actually quite similar to the showAdventure.php program you saw before. It's simply cleaned up a bit to put the data in tables, and has a form to call an editor when the user selects a record to modify.
<html>
<head>
<title>List Segments</title>
<style type = "text/css">
body {
  color:red
}
td, th {
  color: white;
  background-color: blue;
}
</style>
</head>
<body>

<?
$conn = mysql_connect("localhost", "", "");
$select = mysql_select_db("chapter7", $conn);
$sql = "SELECT * FROM adventure";
$result = mysql_query($sql);
print <<<HERE
<form action = "editSegment.php"
      method = "post">

HERE;

while ($row = mysql_fetch_assoc($result)){
  print "<table border = 1 width = 80%>\n";

  foreach($row as $key=>$value){
    //print "$key: $value<br>\n";
    $roomNum = $row["id"];
    print <<<HERE
  <tr>
    <th width = 10%>$key</th>
    <td>$value</td>
  </tr>

HERE;

  } // end foreach
  print <<<HERE
  <tr>
    <td colspan = 2><center>
      <input type = "radio"
             name = "room"
             value = "$roomNum">
      Edit this room
      <input type = "submit"
             value = "go">
    </center></td>
  </tr>
</table><br>

HERE;

} // end while

?>
<center>
<input type = "submit"
       value = "edit indicated room">
</center>
</form>
</body>
</html>
The entire program is contained in a form, which will call editSegment.php when activated. The program opens a data connection and pulls all elements from the database. It builds an HTML table for each record. Each table contains a radio button called "room" with the value of the current room number. Each table also has a copy of the Submit button so the user doesn't have to scroll all the way to the bottom of the page to submit the form.
Editing the Record
When the user has chosen a record from listSegments.php, the editSegment.php program (shown in Figure 8.3) will swing into action.
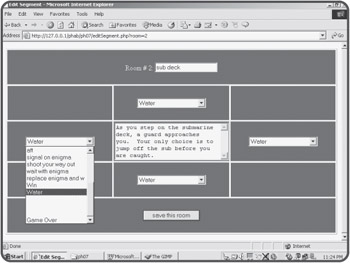
Figure 8.3: The edit record program displays data from a requested record and lets the user manipulate that data.
It's important to understand that the editSegment program doesn't actually change the record in the database. Instead, it pulls up a form containing the requested record's current values and allows the user to determine what the new values should be. The editSegment page is another form. When the user submits this form, control is passed to one more program which actually modifies the database. The code for editSegment is actually very similar to the code used to display a segment in play mode. The primary difference is that all the record data goes into editable fields.
Take a careful look at how the game developer can select a room to go into for each position. A drop-down list box shows all the existing room names. This device allows the game developer to work directly with room names even though the database will be much more concerned with room numbers.
<html>
<head>
<title>Edit Segment</title>
<style type = "text/css">
body {
  color:red
}
td {
  color: white;
  background-color: blue;
  width: 20%;
  height: 5em;
  text-align: center;
}
</style>
</head>
<body>
<?
if (empty($room)){
  $room = 0;
} // end if

//connect to database
$conn = mysql_connect("localhost", "", "");
$select = mysql_select_db("chapter7", $conn);

$sql = "SELECT * FROM adventure WHERE id = '$room'";
$result = mysql_query($sql);
$mainRow = mysql_fetch_assoc($result);
$theText = $mainRow["description"];
$roomName = $mainRow["name"];
$northList = makeList("north", $mainRow["north"]);
$westList = makeList("west", $mainRow["west"]);
$eastList = makeList("east", $mainRow["east"]);
$southList = makeList("south", $mainRow["south"]);
$roomNum = $mainRow["id"];

print <<<HERE

<form action = "saveRoom.php"
      method = "post">
<table border = 1>
<tr>
  <td colspan = 3>
    Room # $roomNum:
    <input type = "text"
           name = "name"
           value = "$roomName">
    <input type = "hidden"
           name = "id"
           value = "$roomNum">
   </td>
</tr>

<tr>
  <td></td>
  <td>$northList</td>
  <td></td>
</tr>

<tr>
  <td>$westList</td>
  <td>
    <textarea rows = 5 cols = 30 name = "description">$theText</textarea>
  </td>
  <td>$eastList</td>
</tr>

<tr>
  <td></td>
  <td>$southList</td>
  <td></td>
</tr>

<tr>
  <td colspan = 3>
    <input type = "submit"
           value = "save this room">
  </td>

</table>


</form>

HERE;

function makeList($dir, $current){
  //make a list of all the places in the system

  global $conn;
  $listCode = "<select name = $dir>\n";
  $sql = "SELECT id, name FROM adventure";
  $result = mysql_query($sql);
  $rowNum = 0;
  while ($row = mysql_fetch_assoc($result)){
    $id = $row["id"];
    $placeName = $row["name"];
    $listCode .= " <option value = $id\n";

    //select this option if it's the one indicated
    if ($rowNum == $current){
      $listCode .= "          selected\n";
    } // end if

    $listCode .= ">$placeName</option>\n";
    $rowNum++;
  } // end while
  return $listCode;
} // end makeList

?>

</body>
</html>
Generating Variables
After the standard database connection, the code creates a number of variables. Some of these variables ($theText, $roomName, and $roomNum) are simplifications of the associative array. Another set of variables are results of the makeList() function. The job of this function is to return an HTML list box containing the room names of every segment in the database. The list box will be set up so that whatever room number is associated with the indicated field will be selected as the default.
Printing the HTML Code
The central part of the program consists of a large print statement that develops the HTML code. The code in this case is a large table enclosed in a form. Every field in the record has a form element associated with it. When the user submits this form, it should have all the data necessary to update a record in the database. The one element the user should not be able to directly edit is the room number. This is stored in a hidden field. The directional room numbers are encoded in the list boxes. All other data is in appropriately named text boxes.
Creating the List Boxes
The list boxes require a little bit of thought to construct.
The makeList() function expects two parameters. The $dir parameter holds the direction field name of the current list box. The $current parameter holds information about which room is currently selected for this particular field of the current record. The data connection handler $conn is the only global variable. The variable $listCode will hold the actual HTML code of the listbox that will be returned to the main program.
The function makes a query to the database to request all the room names. Each name is added to the list box code at the appropriate time with the corresponding numeric value. Whenever the record number corresponds to the current value of the record, HTML code specifies that this should be the selected item in the list box.
Committing Changes to the Database
One more program is necessary. The editSegment.php program allows the user to edit the data, but when the user is finished with this task, he or she will submit the form, which will call the saveRoom.php program. I won't repeat the screen shot for this program, because the visuals are unimportant. However, this is the program that actually updates the database with whatever values the user has chosen.
<head>
<title>SaveRoom.php</title>
</head>
<body>

<?
//Once a room has been edited by editSegment, this program
//updates the database accordingly.

//connect to database
$conn = mysql_connect("localhost", "", "");
$select = mysql_select_db("chapter7", $conn);

$sql = <<<HERE
UPDATE adventure
SET
  name = '$name',
  description = '$description',
  north = $north,
  east = $east,
  south = $south,
  west = $west
WHERE
  id = $id

HERE;

//print $sql;
$result = mysql_query($sql);
if ($result){
  print "<h3>$name room updated successfully</h3>\n";
  print "<a href = \"listSegments.php\">view the rooms</a>\n";
} else {
  print "<h3>There was a problem with the database</h3>\n";
} // end if

?>
</body>
</html>
This program begins with standard data connections. It then constructs an UPDATE SQL statement. The statement is quite simple, because all the work is done in the previous program. I then simply applied the query to the database and checked the result. An UPDATE statement won't return a recordset like a SELECT statement. Instead, it will return the value FALSE if it was unable to process the command. If the update request was successful, I let the user know and provide a link back to the listSegments program. If there was a problem, I provide some (not very helpful) feedback to the user.


