Code Snippets
Code Snippets
Developers are connoisseurs of code and tend to collect useful code in a variety of places. While other people collect coins, books, or PEZ dispensers, developers collect code snippets. Why? Developers do not like typing. There is some irony considering how much typing is involved in programming. If you want to improve developer productivity, reduce the amount of typing. This also reduces the number of typos and resulting compiler errors, which require an inordinate amount of developer attention. Code reuse is another reason why developers collect code. Even unique applications are largely composed of small but common code snippets. These are the same code elements enlisted in almost every program: loops, classes, exception handling, and so on. Developers traditionally cut and paste code to prevent repetitive typing. However, this has considerable limitations, including limited persistence. There should be a more viable solution.
That solution is code snippets, introduced in Visual Studio 2005, which are capsules of reusable source code. A code snippet is an alias for code. Insert a code snippet to insert the aliased code into the source file at the cursor or selection. Code snippets improve developer efficiency and accuracy.
There are multiple sources for snippets. Visual Studio 2005 has a set of default snippets for common tasks, such as the for, try, and while snippets. Snippets are available online to be downloaded, and developers can create custom snippets.
There are three kinds of snippets, described as follows:
-
Expansion An Expansion snippet inserts code at the cursor.
-
Surround With A Surround With snippet envelops selected code.
-
Refactoring A Refactoring snippet is used with refactoring.
Snippet types are not mutually exclusive. For example, the while snippet is both an Expansion and Surround With template.
Copy and Paste
Of course, copying and pasting code remains available. The main disadvantages are that the Clipboard is a shared resource—the contents of the Clipboard can be altered by another application. Clipboard data is not retained across logon sessions. Visual Studio lets developers copy source code directly to the toolbox. The code is then preserved on the toolbox for future placement. This is not as elegant as a snippet but sometimes quicker and more convenient—especially when a custom snippet is required. Code placed on the toolbox is preserved between Visual Studio and logon sessions. Unlike the Clipboard, the toolbox is not a shared resource and is available only to Visual Studio.
There are two methodologies for placing code on the toolbox. Select the code and copy to the Clipboard. Next click on the toolbox and paste the code. You can also drag the code onto the toolbox. A button is then created on the toolbox for the code. Multiple passages of code can be added to the toolbox. Moving the mouse over a code button in the toolbox displays the saved code. Click a code button to insert the code at the cursor. As a best practice, create a separate tab on the toolbox to group code. Intermingling code with nonrelated buttons can be confusing. A toolbox populated with source code is shown in Figure 4-30. A tab called Code was added to the toolbox to group the source code.
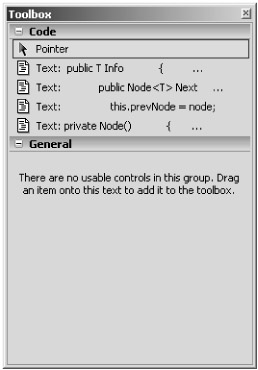
Figure 4-30: Toolbox with code
Insert a Code Snippet
There are several ways to insert code snippets into source code. IntelliSense is probably the simplest method. Code snippets appear in the completion list as a torn page. Use a complete word to select the code snippet and then press Tab to insert. Alternatively, double-click the snippet in the completion list.
Use the following techniques to select and insert code snippets. Inserting a snippet is called code expansion.
-
Insert a code snippet using IntelliSense. The completion list includes snippets.
-
Insert a code snippet from a menu using the Insert Snippet menu command. Insert Snippet is also available from the shortcut menu in the Code Editor. You will be prompted to insert the name of the snippet. Find the Insert Snippet menu command on the Edit menu and the IntelliSense submenu. The resulting completion list includes only code snippets. This is called the snippet picker.
-
Ctrl+K and then Ctrl+X is the keyboard shortcut for the Insert Snippet menu command.
-
Insert a code snippet using Auto IntelliSense. Position the cursor where the snippet should be inserted, type the name of snippet, and then press Tab twice.
Some code snippets are templates and contain editable fields. After inserting the code snippet, a developer customizes the template by assigning values to each field. The first field is selected automatically when the code snippet is inserted. Other fields in the code template are color-highlighted. There can be multiple instances of a field in the same code snippet. For example, there are several instances of the i field in the code snippet of the for keyword. The first instance of a field is color-highlighted and editable. Remaining instances are notated with a dotted border. Tab moves to the next field, whereas Shift-Tab moves to the previous file. You can double-click to select a field. Fields with tooltips display the tip when the field is selected. Figure 4-31 shows the code snippet of the for keyword. It has the ‘i' and length fields. Figure 4-32 presents the snippet with the fields customized.
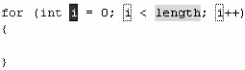
Figure 4-31: Code snippet of the for keyword
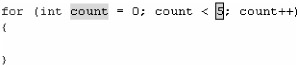
Figure 4-32: Customized code snippet
When using a Surround With template, select the target code first and then insert the snippet. The snippet will surround the code. For example, the following code increments a counter:
int count = 0;
Console.WriteLine(++count);
if (count == 10)
{
    break;
}
This is the result of selecting the code and inserting the code snippet for the while keyword:
while (true)
{
    int count = 0;
    Console.WriteLine(++count);
    if (count == 10)
    {
        break;
    }
}
Default Snippets
Visual Studio 2005 has default snippets for tasks that are routine for developers. The default is a mixture of expansion and surround with code snippets. Default snippets appear in the IntelliSense completion list and the code snippet picker. Table 4-4 lists some of the default code snippets.
|
Code Snippet Name |
Description |
|---|---|
|
#if |
This code snippet surrounds code with #if and #endif directive. |
|
#region |
This code snippet surrounds code with a #region and #endregion directive. |
|
~ |
This code snippet inserts a destructor. |
|
attribute |
This code snippet inserts a declaration for a customized attribute, which is a class derived from System.Attribute. |
|
checked |
This code snippet surrounds code with a checked block. |
|
class |
This code snippet inserts a class declaration. |
|
ctor |
This code snippet inserts a constructor. |
|
cw |
This code snippet inserts a Console.WriteLine statement. |
|
do |
This code snippet surrounds code with a do while block. |
|
else |
This code snippet inserts an else block. |
|
enum |
This code snippet inserts an enum declaration. |
|
equals |
This code snippet overrides the Equals method inherited from the System.Object type. |
|
exception |
This code snippet inserts the declaration of an application exception, which is derived from System.Exception. |
|
for |
This code snippet surrounds code with a for loop. |
|
foreach |
This code snippet surrounds code with a foreach loop. |
|
forr |
This code snippet surrounds code with a decrementing for loop. |
|
if |
This code snippet surrounds code with an if block. |
|
indexer |
This code snippet inserts an indexer function. |
|
interface |
This code snippet inserts an interface declaration. |
|
iterator |
This code snippet inserts an iterator. |
|
interindex |
This code snippet inserts a named iterator and indexer. |
|
invoke |
This code snippet inserts and invokes an event. |
|
lock |
This code snippet surrounds code with a lock block. |
|
mbox |
This code snippet inserts the MessageBox.Show statement. |
|
namespace |
This code snippet surrounds code with a namespace. |
|
prop |
This code snippet inserts a property and backing field. |
|
propg |
This code snippet inserts a read-only property. Read-only properties have only a get method. |
|
sim |
This code snippet inserts an entry point method that is static and returns an integer. |
|
struct |
This code snippet inserts a struct declaration. |
|
svm |
This code snippet inserts an entry point method that is static and returns void. |
|
switch |
This code snippet inserts a switch statement. |
|
try |
This code snippet inserts a try-catch block. |
|
tryf |
This code snippet inserts a try-finally block. |
|
unchecked |
This code snippet surrounds code with an unchecked block. |
|
unsafe |
This code snippet inserts an unsafe block. |
|
using |
This code snippet surrounds code with a using block. |
|
while |
This code snippet surrounds code with a while loop. |
Code Snippets Manager
Use the Code Snippets Manager to manage snippets, including adding, removing, importing, and searching for snippets.
The Code Snippets Manager is available on the Tools menu. (See Figure 4-33.) The folders shown in the Code Snippets Manager are snippet directories. Open a folder to view individual snippets. For each snippet, the follow information is provided:
-
Description of the code snippet
-
Alias or shortcut of the code snippet
-
Snippet type
-
Author of the snippet

Figure 4-33: Code Snippets Manager
The Add button in the dialog box adds another directory to the list of code snippet directories. A code snippets directory contains code snippet files, which are XML files with the .snippet suffix. For C#, the default snippets directories are My Code Snippets, Refactoring, and Visual C#. The Remove button removes a snippet directory from the list. The Import button imports a code snippet file. Use the Search Online button to browse for code snippets. This button opens a general search window, in which developers can search for the code snippets. When you find the code snippet you're searching for, you can download it to the local machine.
Downloading snippets found online can pose security problems. A snippet is not guaranteed to have innocuous XML. In addition, the snippet might hide malicious scripts. The Help URL element defined in the snippet might stealthily launch a script. Also, code snippets can silently add references. Malicious calls are then possible to functions in the reference. Long snippets can hide potentially harmful code. Be careful when downloading code snippets with database access, code-access security, role-base security, or validation code. As a best practice, carefully review the source code of code snippets that are downloaded before using in an application.
Creating Snippets
You can create custom code snippets to encapsulate reusable code not found in a default snippet, which allows you to maintain private libraries of reusable code. Different industries might benefit from specialized code snippets. For example, a developer of medical software may have a need for medical code snippets. Developers of legal software could benefit from legal code snippets. I am confident that vendors will publish industry-specific code snippets in the future.
Custom code snippets are created in XML files. Microsoft publishes an XML schema for code snippets. Code snippet files should have the .snippet extension. When the schema is set, Visual Studio 2005 offers IntelliSense on the XML elements and attributes, which helps considerably in creating properly formed code snippet files. You can group custom snippets in directories. Add these directories to the Code Snippets Manager to make using the custom snippets more convenient.
The XML schema for code snippets defines the structure of a code snippets file. For a complete explanation of the schema, visit the Code Snippet Schema Reference at http://msdn2.microsoft.com/en-us/library/ms171418(en-us,vs.80).aspx. Some parts of the schema are discussed in the next few pages.
CodeSnippets and CodeSnippet Elements
The CodeSnippets element is the root element of the code snippet file. The xlmns attribute names the code snippet schema:
<CodeSnippets xmlns="http://schemas.microsoft.com/VisualStudio/2005/CodeSnippet">
  <CodeSnippet Format="1.0.0">
An individual code snippet is described inside CodeSnippet elements:
<CodeSnippet>
  <!-Insert code snippet here. -->
</CodeSnippet>
Header Element
The Header element has child elements, which together provide the basic information about the code snippet. The title, author, description, shortcut, and snippet type are some of the details that can be provided. The title is the name of the code snippet as it appears in the Code Snippet Picker, whereas the shortcut name appears in the IntelliSense completion list. The description of the snippet found in the Code Snippets Manager is read from this element.
This is the Header element for an example snippet for StringBuilder types:
<Header>
  <Title>StringBuilder</Title>
  <Shortcut>sb</Shortcut>
  <Description>Creates a new String Builder</Description>
  <Author>Donis Marshall</Author>
</Header>
Snippet, References, and Imports Elements
The Snippet element encapsulates the actual code of the code snippet. References and Imports are child elements of the Snippet element. The References element identifies references required for the code snippet. Within the References element, there are Reference child elements for each individual reference. The Imports element names implicit namespaces. Within the Imports element, there are Import child elements that identify each namespace to import. Importing a namespace allows implicit access of members in a namespace without explicitly mentioning that namespace. An Import element is identical to the using namespace statement of C#.
This is an example of the References and Import elements. The System.Text namespace contains the StringBuilder type:
<Snippet>
  <References>
    <Reference>
      <Assembly>System.Text.Dll</Assembly>
    </Reference>
  </References>
  <Imports>
    <Import>
      <Namespace>System.Text</Namespace>
    </Import>
  </Imports>
Declarations, Literal, and Object Elements
The Declarations element describes the fields used in the code snippet. It is also a child element of the Snippet element. There are literal and object fields. The Literal element declares a literal field, which is a field that is fully contained in the code snippet. This would include string and numeric literals. The Object element also declares a field, which is a field defined outside the snippet. This usually describes a type.
The Literal and Object elements can contain ID, Default, Tooltip, Type, and Function child elements:
-
The ID element is the name of the field.
-
The Default element is the default value of the field.
-
The Tooltip element is the tooltip of the field.
-
The Type element sets the type of the field.
-
The Function element names a function. This is a function to call whenever the field is selected.
This is the Declarations element of the StringBuilder code snippet:
<Declarations>
  <Literal>
    <ID>Name</ID>
    <Default>mytext</Default>
    <ToolTip>Name of new StringBuilder</ToolTip>
  </Literal>
  <Literal>
    <ID>Size</ID>
    <ToolTip>Capacity of String</ToolTip>
  </Literal>
</Declarations>
Code and <![CDATA ]> Elements
The Code element contains individual lines of code. It also selects the language of the code snippet. Code is a child element of the Snippet element. The target language is set in the Language attribute. Valid languages are CSharp, VB, VJSHARP, and XML.
Each line of code is placed in a <![CDATA]> element. The code must be written in the syntax of the chosen language.
CDATA syntax:
<![CDATA[snippetcode]]>
In snippet code, fields are bounded with dollar signs ($field$). This is the snippet code for the StringBuilder snippet:
<Code Language="CSharp">
  <![CDATA[StringBuilder $Name$=]]>
  <![CDATA[    new StringBuilder($Size$);]]>
</Code>
String Builder Code Snippet
The following code is the complete listing of the sample code snippet, which creates a new StringBuilder type. The StringBuilder type is found in the System.Text.Dll library and the System.Text namespace. Fields are defined for the name and size of the StringBuilder type.
<?xml version="1.0" encoding="utf-8"?>
<CodeSnippets xmlns="http://schemas.microsoft.com/VisualStudio/2005/CodeSnippet">
  <CodeSnippet Format="1.0.0">
    <Header>
      <Title>StringBuilder</Title>
      <Shortcut>sb</Shortcut>
      <Description>Creates a new String Builder</Description>
      <Author>Donis Marshall</Author>

    </Header>
    <Snippet>
      <References>
        <Reference>
          <Assembly>System.Text.Dll</Assembly>
        </Reference>
      </References>
      <Imports>
        <Import>
          <Namespace>System.Text</Namespace>
        </Import>
      </Imports>
      <Declarations>
        <Literal>
          <ID>Name</ID>
          <Default>mytext</Default>
          <ToolTip>Name of new StringBuilder</ToolTip>
        </Literal>
        <Literal>
          <ID>Size</ID>
          <ToolTip>Capacity of String</ToolTip>
        </Literal>
      </Declarations>
      <Code Language="CSharp">
        <![CDATA[StringBuilder $Name$=]]>
        <![CDATA[new StringBuilder($Size$);]]>
      </Code>
    </Snippet>
  </CodeSnippet>
</CodeSnippets>
Create a Code Snippet Walkthrough
The section provides a walkthrough for creating a code snippet. Before creating a snippet, it is best to write and test the code. Convert the code into a code snippet only after a successful code compilation. Custom code snippets should be placed in dedicated directories reserved for custom snippets. Make sure that the directory is eventually added as a code snippet directory using the Code Snippets Manager.
This walkthrough creates a code snippet that reflects the methods of a type. This code tests the proposed snippet:
// Snippet starts
Type t = typeof(Object);
string typename = t.Name;
string typenamespace = t.Namespace;
MethodInfo [] methods = t.GetMethods();
// Snippet ends
Console.WriteLine("Type Name:"+typename);
Console.WriteLine("Namespace Name:"+typenamespace);
foreach (MethodInfo method in methods)
{
    Console.WriteLine(method.Name);
}
These are the steps for creating the preceding snippet:
-
Create an XML file in Visual Studio. The filename of the code snippet is reflectmethod.snippet.
-
All snippet files begin with the CodeSnippets, CodeSnippet, and Header elements, which name the file schema and describe the basic attributes of the code snippet:
<?xml version="1.0" encoding="utf-8"?> <CodeSnippets xmlns="http://schemas.microsoft.com/VisualStudio/2005/CodeSnippet"> <CodeSnippet Format="1.0.0"> <Header> <Title>ReflectMethod</Title> <Shortcut>rm</Shortcut> <Description>Reflects methods of a type.</Description> <Author>Donis Marshall</Author> </Header> </CodeSnippet> </CodeSnippets> -
Reflection requires the Reflection namespace. Import the System.Reflection namespace with an Import element, which is defined within the Imports element. The System.Reflection namespace is declared in the System.DLL, which is automatically referenced from managed code. For that reason, a Reference element is not needed.
<Snippet> <Imports> <Import> <Namespace>System.Text</Namespace> </Import> </Imports> </Snippet> -
The code snippet has four fields, which name the type, type instance, namespace, and MethodInfo array. The type instance is an object field. The other fields are literals and contained within the code snippet. Defaults for the fields are gleaned from the code used to test the code snippet. Fields are defined within the Declarations element with literal and object elements:
<Declarations> <Literal> <ID>Instance</ID> <Default>t</Default> <ToolTip>Name of instance.</ToolTip> </Literal> <Literal> <ID>TypeName</ID> <Default>typename</Default> <ToolTip>Name of type.</ToolTip> </Literal> <Literal> <ID>TypeNamespace</ID> <Default>typenamespace</Default> <ToolTip>Namespace of type.</ToolTip> </Literal> <Literal> <ID>Methods</ID> <Default>Methods</Default> <ToolTip>Type methods</ToolTip> </Literal> <Object> <ID>Type</ID> <Default>Object</Default> <ToolTip>object type</ToolTip> <Type>System.Object</Type> </Object> </Declarations> -
Paste the code for the snippet into <![CDATA]> elements, which are placed within the Code element. Add extra line feeds to separate lines of source code. After pasting the code, substitute the field names into the code:
<Code Language="CSharp">
  <![CDATA[Type $Instance$ = typeof($Type$);
  ]]>
  <![CDATA[string $TypeName$ = $Instance$.Name;
  ]]>
  <![CDATA[string $TypeNamespace$ = $Instance$.Namespace;
  ]]>
  <![CDATA[MethodInfo [] $Methods$ = $Instance$.GetMethods();
  ]]>
</Code>
-
Save the file for the code snippet in the directory reserved for custom code snippets.
-
Test the snippet in Visual Studio 2005. Open a source file and insert the code snippet using the code snippet picker. Figure 4-34 shows the snippet.
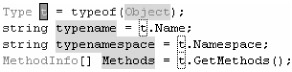
Figure 4-34: Reflect Method snippet


