Overview of Visual Studio .NET
Microsoft Visual C# is just one of the languages that uses Visual Studio .NET as its development environment. Other programming languages supplied by Microsoft that use Visual Studio .NET include Visual Basic .NET and Visual C++ .NET. In addition, companies other than Microsoft are supplying compilers for Visual Studio .NET, which will enable you to develop solutions that include Eiffel, COBOL, and other languages. All programming using these languages can take advantage of the same set of tools and features offered by Visual Studio .NET, including all of the designers and tool windows that are part of the integrated development environment (IDE) as well as the integrated help system. Although this chapter focuses on how you can use and customize Visual Studio .NET with the Visual C# programming language, most of this information will apply to all Visual Studio .NET languages.
The Visual Studio .NET Start Page, shown in Figure 1-2, provides a home base for obtaining information and services that extend beyond your machine. Many of the tabs available to you on the Start Page require an Internet connection. These tabs provide late-breaking information about Visual Studio .NET, provide links to new downloads, and enable you to host Web services with just a couple of mouse clicks.
 Figure 1-2.
Specifically, the Visual Studio .NET Start Page contains the following tabs:
-
Get Started The Get Started tab is displayed initially and includes a list of solutions that you’ve worked with recently. (See the section “Creating Visual C# Solutions” later in this chapter for a description of a solution.) When you first launch Visual C# .NET, the list of solutions will be empty. Later the list will contain links to your most recent projects. This tab also includes a link for reporting Visual Studio .NET bugs. If you have a connection to the Internet, Visual Studio .NET will check for service packs and add a link to the update page when a service pack is available.
-
What’s New The What’s New tab is a Web page that has the latest updates and information about Visual Studio .NET. This tab includes additional up-to-date content that’s downloaded from the Microsoft Web site if you have an Internet connection.
-
Online Community The Online Community tab has a selection of newsgroups and Web sites for Visual Studio .NET developers.
-
Headlines The Headlines tab contains information from the Microsoft Developer Network (MSDN) Web site, including the latest features, technical information, news, and links to relevant knowledge base articles. To use this tab, you must have a connection to the Internet.
-
Search Online The Search Online tab provides access to online searching of the MSDN database. To use this tab, you must have a connection to the Internet.
-
Downloads The Downloads tab provides links to downloads and code samples that are related to developing with Visual C# .NET and Visual Studio .NET. To use this tab, you must have a connection to the Internet.
-
XML Web Services The XML Web Services tab allows you to search for XML Web services you want to use in your current project. To use this tab, you must have a connection to the Internet.
-
Web Hosting The Web Hosting tab provides information about Web hosting options that are available to you as a .NET developer using Visual C# .NET. Visual Studio .NET includes one-click hosting, a simplified way to host your applications. (One-click hosting is described in the next section.) To use this tab, you must have a connection to the Internet.
-
My Profile The My Profile tab is used to configure the Visual Studio .NET user interface according to predefined profile elements. This tab is discussed in the section “Changing Your User Profile.”
One-click hosting enables you to upload Web applications and services to a service provider with a single mouse click, which allows you to easily upload a Web application or a Web service to a central location that can easily be used by others. One-click hosting is useful for demonstration or testing purposes, as well as for deploying small applications. The Web Hosting tab on the Visual Studio .NET Start Page includes a current list of companies that are participating in one-click hosting and offering free trial periods.
The Visual Studio .NET user interface can be adjusted to suit your preferences by modifying settings on the My Profile tab on the Visual Studio .NET Start Page. By selecting a user profile, you can identify yourself as a developer experienced with Visual C++, Visual Basic, or other tools. Visual Studio .NET will use this information to orient toolbars and other windows in a way that’s more familiar to you. You also can set the keyboard and windows schemes separately to match earlier versions of Microsoft programming tools. For example, you can set your keyboard mapping to match Visual C++ 2 and your window layout to match Visual C++ 6.
The My Profile tab also enables you to define a default help filter so that help results are returned for a specific programming language or technology that you use (or ask questions about) most often. You also can choose to have help shown in an external window instead of in the default internal window.
Visual Studio .NET has a large number of windows, toolbars, and Toolbox windows that you’ll use when developing your Visual C# applications. The environment is completely customizable, and the location and appearance of most windows can be easily modified to suit your needs. The default Visual Studio .NET layout is shown in Figure 1-3.
 Figure 1-3.
Visual Studio .NET has two modes for managing its child windows, as follows:
-
By default, child windows are tabbed and are stacked to conserve screen real estate. (Figure 1-3 shows Visual Studio .NET in tabbed-document mode.) Open files are selected by clicking on tabs that identify each open file.
-
Optionally, you can display child windows using the Multiple Document Interface (MDI), which manages child windows as overlapped windows that are contained within the main Visual Studio .NET window. In this mode, child windows are allowed to overlap, as shown in Figure 1-4.
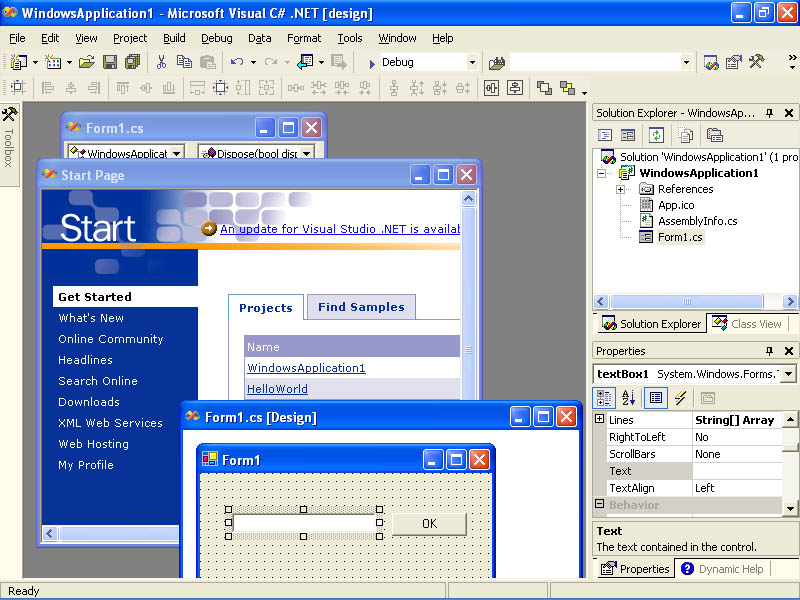 Figure 1-4.
The Visual Studio .NET development environment in MDI mode.
Figure 1-4.
The Visual Studio .NET development environment in MDI mode.
In addition to the child windows used for editing text and forms, Visual Studio .NET has a number of windows that are located around the edges of its main window. The following sections discuss those windows.
Solution Explorer displays a tree of the current Visual Studio .NET solution. Using Solution Explorer, you can browse through all the projects that make up the current solution, as well as the files that belong to each project.
Double-clicking a project file will open the file for editing. Opening a file will change the menu and toolbar items that are available. For example, if you open an XML file, a top-level menu item for XML operations will be added to the main menu. Right-clicking on any element in Solution Explorer will display a shortcut menu with actions that you can perform on that element. For example, the shortcut menu for the solution icon allows you to perform tasks such as adding a new project to the solution, whereas the shortcut menu for a project enables you to add new items to the project and perform other project-related activities.
The Class View window displays the class and type hierarchy for the current project and is used to traverse the project’s type hierarchy. Clicking an element that’s declared in your project will open the source code editor at the point of declaration. If you click on an element that’s part of the .NET Framework, the Object Browser window will open for that element.
The Resource View window is used to view resource files associated with a project. If your project contains resources such as menus, string tables, and dialog boxes, those resources can be accessed in this window. The Resource View window is normally displayed only for projects that have an associated resource (.rc) file.
The Properties window is used to declaratively set properties for different elements of your solution. The contents of this window vary depending on the type of item you’re currently working with. If you click an icon in Solution Explorer, properties for the selected item will be displayed. If you’re working with user interface controls or forms, many of the control and form properties can be set through this window. Likewise, if you’re working with an HTML or XML document, object model properties for these documents can be set in this window.
The Task List window provides a running list of tasks that must be completed. This window is hidden by default. To display the Task List window, choose Other Windows from the View menu and choose Task List, or press Ctrl+Alt+K. Each item in the task list includes a category, a description, a file name, and a line number; double-clicking a task will open the source editor at the location indicated by the file name and line number. Depending on the task’s category, the entry can also have a priority that can be used to sort the tasks or a check box that can be used to indicate whether the task has been completed.
Initially, the task list contains only build errors; however, it can be used to display a wide range of other tasks, including the following categories:
-
Comment tasks These tasks are defined inside comment marks and are useful for tagging sections of code that require further attention. Visual Studio .NET defines the tokens TODO, HACK, and UNDONE. Comments that begin with these tokens will be displayed in the task list.
-
Shortcut tasks These tasks are created by right-clicking in the source code editor and choosing Add Task List Shortcut from the shortcut menu. Shortcut tasks are easy to create and useful when you don’t need to associate a comment with the new task. You can specify a priority for a shortcut task by clicking in the leftmost column of the task and then choosing one of the displayed priorities. After the task has been completed, select the task’s check box to mark the task as finished.
-
User-defined tasks These tasks are created by defining a comment token, as described later in this chapter, in the section “The Environment Category.”
To specify the categories of items that will be shown in the task list, choose Show Tasks from the View menu. Alternatively, you can right-click in the Task List window, select Show Tasks from the shortcut menu, and then select the task category you want the task list to show. In addition to specifying a task category to be displayed, you can display all tasks or show only tasks that are checked or only tasks that are unchecked. Click on the task list header to sort the tasks based on priority, category, checked state, or any other displayed field.
Server Explorer provides access to system services that are available on your machine as well as on other machines on your network. Normally, Server Explorer is tucked away under the edge of the Visual Studio .NET window, with just a small icon visible, as shown earlier in Figure 1-3. If you position the mouse pointer over the Server Explorer icon, the window expands to display a list of servers available on your network, as shown in Figure 1-5. To lock the Server Explorer window in place, click the pin icon in the upper-right; this will prevent the window from auto-hiding until the pin icon is clicked again.
 Figure 1-5.
Server Explorer provides easy access to event logs, databases, performance counters, and other system services. Server Explorer is more than just a console for viewing information; you can drag objects from Server Explorer into your project, and Visual C# .NET will automatically generate code to make use of the new objects in your project. For example, to add a database connection to a Windows application, you can simply drag a database icon from Server Explorer to an open form in the Visual Studio .NET Windows Forms Designer. Adding database connections will be covered in detail in Chapter 18.
The Toolbox window contains items that can be easily added to your projects. Each tool category is located on a separate tab in the Toolbox window; clicking a tab displays the items in that category. For example, in Figure 1-6, the Web Forms tab is open, showing a number of controls and elements that are useful when you’re creating a Web form.
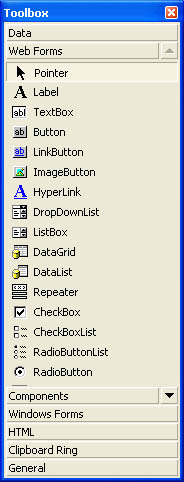 Figure 1-6.
Visual Studio .NET will populate the Toolbox window with tool categories that are relevant to your current project. For example, a Web application will have Toolbox items that provide data access and controls for Web Forms. You can control the behavior of the Toolbox window through a shortcut menu that appears when you right-click in the Toolbox window.
Visual Studio .NET includes a number of additional windows that you might find useful on occasion. You can display each of these windows by choosing Other Windows from the View menu and selecting the window you want Visual Studio .NET to show. Some of the windows available in the Other Windows menu are described here:
-
Object Browser The Object Browser window is used to explore the types that are available in your solution. All projects in the current solution are listed as top-level nodes in the Object Browser window, as are all explicitly referenced assemblies from the .NET Framework. By expanding the nodes in the Object Browser window, you can view the enclosed namespaces, classes, structures, and all other types, as well as type members. In addition to basic structural information, the Object Browser window provides documentation for the elements it displays.
-
Stack Trace The Stack Trace window is used during debugging to display the current call stack. The call stack includes information such as the method names in the stack, the current line number within each method, and parameter-related data.
-
Output The Output window contains information about the most recent build status of your solution and displays output information during debugging.
-
Command Window The Command Window is used to issue commands to the Visual Studio .NET IDE, as well as to evaluate statements while debugging your Visual C# projects. For example, to display the Find In Files dialog box, simply type the following line in the Command Window, followed by a carriage return:
>Edit.FindInFiles
Using the Command Window while debugging is discussed in Chapter 9.
-
Favorites The Visual Studio .NET Favorites window is an extension of the Internet Explorer Favorites window. Items in the Visual Studio .NET Favorites window are shared with the Internet Explorer Favorites folder. The Favorites window includes two icons that you can use to add the current item to your Favorites window and to manage items in your Favorites folder.
By default, Visual Studio .NET child windows are initially docked—that is, the windows are attached to one of the edges of the main Visual Studio .NET window. Many of the windows contain tabs and appear to be stacked on top of each other. Visual Studio .NET allows you to change the size, docking state, and tabbing for all child windows by simply dragging the windows to new locations.
To undock a window, simply drag it by its title bar away from its docked position. The window will undock and follow the mouse pointer. As you drag the window, an outline will show its new size and location. If you drag a tabbed window by its title bar, the entire set of tabbed windows will undock together. Double-clicking the title bar will restore the window to its previous location; dragging the window close to the edge of the main Visual Studio .NET window will cause it to dock in that position.
To untab a window from its current collection of windows, drag the window away from its current position by dragging its tab. The window will revert to an untabbed state and will follow the mouse pointer. As with docking operations, the outline of the dragged window is displayed to assist you in positioning the window. To force a window to be tabbed with other windows, drag the window over the window with which it will be tabbed. Position the mouse pointer over the target window’s title bar, and when the dragging outline changes to include the outline of a tab, drop the window to complete the dragging operation. If the target window already has tabs, you can target an existing tab instead of the window’s title bar.
Customization of the Visual Studio .NET environment is performed through the Options dialog box, shown in Figure 1-7, which is opened by choosing Options from the Tools menu.
 Figure 1-7.
You can use the Options dialog box to customize the behavior and appearance of Visual Studio .NET. Configuration options are grouped into categories and subcategories that appear in a tree view. To modify a particular option, you first navigate to the category and subcategory of the option, and then update the settings shown on that specific dialog box page. The Visual Studio .NET Options dialog box includes a large number of settings, many of which are outside the scope of this chapter. In this section, we’ll look at some of the more common Environment and Text Editor category options.
The Environment category includes configuration options that affect the Visual Studio .NET development environment. Options in this category are not related to a specific programming language. Some of the more commonly used configuration settings are described here:
-
General The General page includes settings to specify whether child windows should be tabbed or use MDI, as well as menu and status bar behavior.
-
Documents The Documents page is used to control how documents are handled in Visual Studio .NET. For example, you can specify how Visual Studio .NET handles open documents that are changed by external programs.
-
Dynamic Help The Dynamic Help page is used to enable or disable dynamic help for specific categories or types of help. Although Dynamic Help is a useful feature, disabling it will improve the performance of Visual Studio .NET, especially on underpowered machines.
-
Fonts And Colors The Fonts And Colors page is used to set the fonts used for various windows in Visual Studio .NET.
-
Help The Help page allows you to configure the settings for online help, such as the help collection that’s used by default, the preferred language for online help, and whether online help is displayed in an internal window or in a separate window external to Visual Studio .NET.
-
International Settings The International Settings page is used to select the default language when multiple languages are installed on your computer.
-
Keyboard The Keyboard page is used to control the keyboard bindings for Visual Studio .NET. You can choose from predetermined mapping schemes or specify new custom key mappings for commands.
-
Projects And Solutions The Projects And Solutions page sets the default location for Visual Studio .NET projects. This page also specifies build behavior, such as the treatment of open files and whether the Output or Task List windows should be displayed.
-
Task List The Task List page is used to configure how task list items are managed within Visual Studio .NET. Visual Studio .NET is initially configured to warn you before a task item is deleted or if a new task item is initially hidden. You can override that behavior on this page. You can also define new comment tokens that identify particular types of tasks. New comment tokens are case-sensitive. For example, if your new comment token is FIXME, a comment that begins with FixMe won’t be added to the task list.
-
Web Browser The Web Browser page enables you to set options for the Home and Search pages and configure Internet Explorer options.
The Text Editor category includes options for editing source files inside Visual Studio .NET. Configuration settings that apply to all types of source files are set on the General page. This page includes basic settings that relate to how the editor margins are displayed, as well as generic settings such as the setting that allows drag-and-drop editing within the Text Editor window.
Each type of source file has its own configuration page. For example, Visual C# and XML files can have different configuration settings. Language-specific settings pages enable you to configure settings such as word wrap (off by default) and line numbers (also off by default).
The online help system in Visual Studio .NET is based on the MSDN Library and is significantly better than online help systems in earlier versions of Visual Studio. Improved filtering and searching options make this version of online help much more useful. In addition, vendors of tools and components that integrate with Visual Studio .NET can now safely integrate their product documentation with the online help system, making it much easier to get help for third-party tools and components.
Dynamic help is a great new feature in Visual Studio .NET. As you work with the various tools in Visual Studio .NET, the dynamic help system searches through the MSDN Library for relevant help topics. The list of help topics is updated as you use different tools or windows in Visual Studio .NET. As you edit a Visual C# source file, the Dynamic Help window is automatically updated to include help on the keywords or classes that you’re typing.
You can display the Search window for online help by choosing Search from the Help menu. A predefined set of filters can be used to narrow your search. For example, if you’re interested in searching only through .NET Framework Software Development Kit (SDK) topics, you can easily narrow your search to include only those items. The Results window, which opens automatically when you conduct a search, displays the results of the search.
The online help keyword index is displayed by choosing Index from the Help menu. Using the index is sometimes faster than searching when you know the title of the item you’re looking for. When the index search returns multiple topics, the list of results will be displayed in the Results window.


