Writing Multithreaded Code
Visual C# .NET and the common language runtime provide built-in support for writing multithreaded code. Threads are the execution path through your code, and they’re the atoms of application scheduling and priority. Each application has at least one thread that executes code. Multiple threads can be launched and used to execute your Visual C# application. The C# language includes keywords to assist in thread safety, and classes in the .NET Framework simplify the task of writing code that has multiple threads of execution.
The common language runtime executes applications in logical processes known as application domains, or AppDomains. AppDomains provide isolation boundaries for the applications they host, in much the same way that processes provide isolation boundaries in Microsoft Windows. However, an AppDomain is much easier to manage than a Windows operating system process. Also, multiple AppDomains can execute within a single Windows operating system process. Because Visual C# programs are verifiably type-safe, the runtime can execute multiple logical processes within a single operating system process without worrying that one application will interfere with another.
One or more threads run in an AppDomain. The System.Threading.Thread class encapsulates a thread made available by the runtime. At first, each AppDomain has an initial thread. A Thread object that represents the current thread can be obtained by calling the static CurrentThread property, as shown here:
Thread currentThread = Thread.CurrentThread;
To cause the current thread to pause for a specified period of time, call the Thread class’s static Sleep method, as follows:
Thread.Sleep(5000);
To create a new thread, first create a new Thread object, as shown in the following code:
static void Main(string[] args)
{
    Thread currentThread = Thread.CurrentThread;
    Thread workThread = new Thread(new ThreadStart(Work));


}
static void Work()
{
    Console.WriteLine("Hello");
}
}
static void Work()
{
Console.WriteLine("Hello");
}
The Thread constructor accepts a ThreadStart delegate as a parameter. This delegate is invoked when the thread is started and serves as the method where the thread begins execution. If the thread exits this method, the thread is terminated.
The method associated with the ThreadStart delegate can be static, as shown in the preceding example, or nonstatic. Using a nonstatic method enables the thread procedure to have access to instance variables that can serve as input, as shown in the following Worker class:
public class Worker
{
    protected string _message;
    public string Message
    {
        set { _message = value; }
        get { return _message; }
    }
    public void PrintMessage()
    {
        Console.WriteLine("Message from worker: {0}.", _message);
    }
}
When you create a new Thread object that uses the Worker class, the Worker instance is created and initialized first, as shown here:
static void Main(string[] args)
{
    Worker w = new Worker();
    w.Message = "Hello from the worker thread";
    Thread workerThread = new Thread(new ThreadStart(w.PrintMessage));


}
After a Thread object has been created, calling the Start method causes it to begin executing, as shown here:
workerThread.Start();
The thread will be scheduled to run by the operating system and will execute until it exits its ThreadStart method or until the thread is forced to stop by other means.
To suspend execution of a thread, call its Suspend method, as shown here:
workerThread.Suspend();
If the thread hasn’t been started or has finished executing, a ThreadStateException will be generated. The current state of a thread can be determined through the ThreadState property, which returns a ThreadState enumeration member. Table 10-1 describes the members of the ThreadState enumeration.
|
Member Name |
Description |
|
Aborted |
The thread has been stopped due to an abort request. |
|
AbortRequested |
Another thread has requested that this thread be terminated. |
|
Background |
The thread is executing as a background thread. |
|
Running |
The thread is executing, or at least is eligible for execution by the operating system. |
|
Stopped |
The thread has stopped executing. |
|
StopRequested |
The thread has been requested to stop. |
|
Suspended |
The thread is suspended. |
|
SuspendRequested |
Another thread has requested that this thread be suspended. |
|
Unstarted |
The thread has been created but hasn’t yet started. |
|
WaitSleepJoin |
The thread has been blocked while waiting for another object to be signaled, has called Sleep, or is waiting to join another thread. |
The ThreadState members listed in Table 10-1 are often combined. To determine whether a thread is in a particular state, use code such as the following to ensure that the thread is not in the Unstarted or Stopped state before attempting to suspend the thread:
if(IsThreadStarted(workerThread))
{
    workerThread.Suspend();
}


static bool IsThreadStarted(Thread aThread)
{
    bool result = ((aThread.ThreadState & ThreadState.Unstarted) != 0
                && (aThread.ThreadState & ThreadState.Stopped) != 0);
    return result;
}
The ThreadState property can’t be used to absolutely determine a thread’s state in every case. Because threads run asynchronously, the thread state could easily change between the point in time when the thread state is sampled and the time when the state is tested. ThreadState can be used for testing obvious problems, however, such as an attempt to suspend a thread that has already been terminated.
The Resume method is used to restart a thread that’s currently suspended, like this:
workerThread.Resume();
The Interrupt method causes a thread to cut short any blocking behavior in which it’s currently involved, effectively waking up any threads in the WaitSleepJoin state. A ThreadInterruptedException exception is generated and must be handled if you want the thread to be able to continue execution after Interrupt has been called, as shown in the following code:
for(int loop = 0; loop < MaxIterations; ++loop)
{
    try
    {
        Thread.Sleep(SleepInterval);


    }
    catch(ThreadInterruptedException e)
    {
        Console.WriteLine("I've been interrupted");
    }


}
To terminate a thread, use the Abort method, as shown here:
workerThread.Abort();
When Abort is called for a thread, a ThreadAbortException exception is generated. Unlike the ThreadInterruptedException exception discussed earlier, you can’t stop this exception from terminating the current thread. The following code illustrates how the exception can be handled to clean up resources owned by the thread. The thread will always be terminated, however.
public void ThreadProc()
{
    try
    {
        Thread.Sleep(sleepInterval);
    }
    catch(ThreadAbortException e)
    {
        // Clean up resources.
    }
}
The Join method is used to wait until a thread has terminated. This method blocks the current thread until the referenced thread has completed its work, as shown here:
workerThread.Join();
This code will wait unconditionally until the other thread completes its work. Two other overloads of the Join method enable you to specify a time-out period. These versions of Join return a bool that indicates the success or failure of the Join attempt. If a time-out occurs before the Join method succeeds, these methods return false. The following code uses a Join method with a time-out of 5 seconds:
workerThread.Join(5000);
Every thread runs at a specific priority level, which can be retrieved or altered with the Priority property. The thread’s priority determines how the operating system will schedule the thread for execution, with higher priority threads always scheduled ahead of threads with lower priority. Values for the Priority property are taken from the ThreadPriority enumeration. The members of the ThreadPriority enumeration are listed here:
-
Lowest
-
BelowNormal
-
Normal
-
AboveNormal
-
Highest
Threads initially have Normal priority. In the majority of cases, you shouldn’t need to change a thread’s priority. The operating system will always execute the thread with the highest priority, while sharing time equally among threads with the same priority. If a thread performs background work that can be deferred until all normal threads are idle, setting the priority to BelowNormal will prevent the worker thread from regularly preempting threads performing more important work. If a thread must be able to interrupt other threads to carry out its work, set the priority to AboveNormal or Highest.
The following code demonstrates the use of the Priority property to adjust a thread’s priority:
workerThread.Priority = ThreadPriority.BelowNormal;
This example sets the thread’s priority level to BelowNormal, which means that this thread will be scheduled after the threads with Normal priority and before those with Lowest priority.
Threads that run in the runtime are designated as running in the foreground or background. A process will run as long as it includes at least one foreground thread. Background threads can perform the same work as foreground threads, but they’ll be terminated automatically when the last foreground thread terminates. The IsBackground property is used to get or set the background status for the thread, as shown here:
workerThread.IsBackground = true;


protected bool DumpThreadInfo(Thread aThread)
{
    bool background = aThread.IsBackground;


}
By using multiple threads in your applications, you can partition work into multiple asynchronous pieces, which enables you to write more efficient code. However, the ability to have multiple threads executing in a single process also adds risk and complexity. If multiple threads don’t synchronize their access of shared data, the data will become corrupted. Often, these failures are difficult to detect, especially on single-processor systems.
On a multiple-processor system, several threads can execute at exactly the same time. If these threads attempt to simultaneously change the value of a variable, the results are unpredictable. Even if your code runs only on single-processor machines, you can’t escape the problem. If a thread is preempted by the operating system while it’s updating a variable and another thread updates the variable while the first thread is interrupted, the results are, again, unpredictable.
 |
The C# language specification guarantees that some operations are uninterruptible—also known as atomic operations. Simple reads and writes of 32-bit or smaller scalar values are guaranteed to be atomic, as are reference assignments. More complex operations, such as reading and writing floating-point or 64-bit scalar values, aren’t atomic and can be interrupted. In addition, ++ and --, the innocent-looking operators used to increment and decrement scalar values, aren’t atomic, because they require a value to be read, updated, and written. |
Consider the following code, in which the Broken class includes a method that updates a field named dangerousVariable:
public class Broken
{
    const int MaxLoops = 20000;
    protected long dangerousVariable = 0;

    protected void UpdateMethod()
    {
        dangerousVariable++;
    }

    public long Result
    {
        get { return dangerousVariable; }
    }

    public void ThreadProc()
    {
        for(int n = 0; n < MaxLoops; ++n)
        {
            UpdateMethod();
            Console.Write(".");
        }
    }
}
The following code creates an instance of the Broken class and creates two threads that execute inside the Broken.ThreadProc method. On a single-processor system, the code fails occasionally. On a machine with multiple processors, the code fails every time.
Broken broken = new Broken();
Thread bw1 = new Thread(new ThreadStart(broken.ThreadProc));
Thread bw2 = new Thread(new ThreadStart(broken.ThreadProc));
bw1.Start();
bw2.Start();
bw1.Join();
bw2.Join();
Console.WriteLine("Total = {0}.", broken.Result);
In the two preceding code fragments, the UpdateMethod is used to increment dangerousVariable, a field in the Broken class. Two threads are created, and they attempt to increment the field a number of times. If the program executes correctly, the final result displayed should be 40000. On a system with multiple processors, the problem will be obvious. However, on a single-processor system, the fault might not be immediately apparent. Remember, on a single-processor machine, one thread must be preempted while it’s updating the dangerousVariable field. The problem will occur if you iterate the tests long enough. On a single-processor system, you can simply add a loop around the main test, like this:
for(int n = 0; n < 20; ++n)
{
    Broken broken = new Broken();
    Thread bw1 = new Thread(new ThreadStart(broken.ThreadProc));
    Thread bw2 = new Thread(new ThreadStart(broken.ThreadProc));
    bw1.Start();
    bw2.Start();
    bw1.Join();
    bw2.Join();
    Console.WriteLine("Total = {0}.", broken.Result);
}
 |
It’s a good idea to invest in a multiple-processor machine if you’re developing multithreaded software for commercial use. This test illustrates the expected behavior for synchronization problems in multithreaded applications. Faults seem to occur at random, especially on single-processor machines. A multiple-processor machine can save a lot of testing and debugging time by exposing synchronization issues before your software is released. |
To avoid synchronization problems, you must provide synchronization when multiple threads access shared objects. Fortunately, it’s easy to provide synchronization when developing with Visual C# .NET.
The .NET Framework includes the Monitor class, which is part of the System.Threading namespace. The Monitor class is used to guard access to a reference variable or a section of code. A section of code that’s protected by the Monitor class is known as a critical section. As shown in Figure 10-1, a critical section can be accessed by a single thread at any given time.
 Figure 10-1.
The Monitor class has only static methods. You never directly create an instance of the Monitor class, and because the class is sealed, other classes can’t inherit from it either. The Monitor class exposes the following two primary methods:
-
Enter Takes possession of a lock on an object passed as a parameter if the lock is available
-
Exit Releases possession of an object’s lock
The Monitor class is typically used as follows:
protected void UpdateMethod()
{
    Monitor.Enter(this);
    dangerousVariable++;
    Monitor.Exit(this);
}
Before entering a region of code that’s been designated as a critical section, the thread makes a call to Monitor.Enter, passing an object reference as a parameter. If another thread has already called Monitor.Enter with the same object reference and hasn’t yet called Monitor.Exit, this thread will be blocked and won’t continue until the other thread has called Monitor.Exit.
When you use Monitor.Enter to take possession of an object-wide lock, you don’t protect any static members. To protect static type members, pass a typeof reference to the Monitor.Enter method, like this:
Monitor.Enter(typeof(Broken));
It’s very easy to implement coarse-grained synchronization for a method using the Monitor class. One problem with using Monitor to guard regions of your code is that you’re required to properly manage Monitor.Enter and Monitor.Exit pairs. For example, the following code is broken:
public void TakeALock()
{
    try
    {
        Monitor.Enter(this);
        ThrowAnException();
        Monitor.Exit(this);
    }
    catch
    {
        Console.WriteLine("Caught an exception");
    }
}
private void ThrowAnException()
{
    throw new InvalidOperationException("Bypass monitor code");
}
When the exception flows through the TakeALock method, the call to Monitor.Exit is bypassed. No other thread can take possession of the object’s synchronization lock until the thread that owns the lock has called Monitor.Exit or until the thread that owns the lock has been destroyed.
To properly use the Monitor class in the presence of exceptions, you must write code such as the following:
public void ImprovedTakeALock()
{
    try
    {
        Monitor.Enter(this);
        ThrowAnException();
    }
    finally
    {
        Monitor.Exit(this);
    }
}
In this code, the Monitor.Exit method is placed in a finally block, guaranteeing that the monitor will be released, even in the presence of exceptions.
 |
If you use the Monitor class directly, you should protect calls to Monitor.Exit by placing them in a finally block. |
A simpler approach is to use the locking support that’s built into the C# language, as shown in the following code. The lock keyword is used to enact a coarse-grained lock on a reference variable, using a much simpler coding pattern than is required with the Monitor class. The most commonly used form of the lock keyword accepts a reference variable as a parameter and creates a guarded region.
public void SimpleLock()
{
    lock(this)
    {
        DoWork();
    }
}
As with the Monitor class in the preceding section, you can lock static members for a class by locking the class type, like this:
public void SimpleLock()
{
    lock(typeof(Broken))
    {
        DoWork();
    }
}
The lock keyword can be used to implement relatively coarse synchronization that relies on your ability to identify a single object that can be used for synchronization purposes. The .NET Framework also includes the following event and mutual exclusion classes that can be used to synchronize threads:
-
ManualResetEvent Provides an event object that’s signaled when a specific action occurs
-
AutoResetEvent Provides an automatically resetting event object that’s signaled when a specific action occurs
-
Mutex Provides interprocess resource synchronization
All the classes in this list are derived from the WaitHandle class, which generalizes the process of acquiring, releasing, and waiting for a synchronization object. Each class uses operating system resources to synchronize thread access. In keeping with the recommended design pattern for classes that have external references, the WaitHandle class (and the three derived classes) implements the IDisposable interface. This allows you to take advantage of the using statement when employing these classes, as shown here:
using(Mutex instanceMutex = new Mutex(false, mutexName))
{


}
Every WaitHandle object is in one of the following two states:
-
Signaled Indicates that the WaitHandle object can be acquired by any thread.
-
Not Signaled Indicates that the WaitHandle object isn’t available for acquisition. Any threads attempting to acquire the object will be blocked until the synchronization object is signaled.
The WaitHandle class has the following three methods that are commonly used for synchronization in derived classes:
-
WaitAll Static method that blocks the calling thread until all handles in an array are signaled
-
WaitAny Static method that blocks the calling thread until any handle in an array is signaled
-
WaitOne Virtual method that blocks the calling thread until the current WaitHandle object is signaled
Each of these methods includes overloaded versions that allow you to specify a time limit for the wait attempt and specify whether to exit the synchronization domain before the wait.
As mentioned, the .NET Framework includes two classes that are used to provide event-based synchronization: AutoResetEvent and ManualResetEvent. Both of these classes are used to block threads until a specific event has occurred. Instances of the AutoResetEvent class will automatically be reset to an unsignaled state after a wait request is satisfied, whereas instances of the ManualResetEvent remain signaled until explicitly reset.
Both event classes are created in much the same way, by passing the initial signaling state to the constructor, as shown here:
AutoResetEvent automaticEvent = new AutoResetEvent(true);
ManualResetEvent manualEvent = new ManualResetEvent(false);
In this code, automaticEvent is initially signaled and manualEvent isn’t signaled. In addition to the WaitOne method, the following two methods from the AutoResetEvent and ManualResetEvent classes are commonly used to control event objects:
-
Set Causes an event object to be signaled
-
Reset Causes an event object to be not signaled
Synchronization events are used to block a thread until a particular event occurs elsewhere in your code. For example, if another thread is carrying out a task, an event can be used to indicate that the task has been completed.
The AutoResetEvent is best suited to cases in which a signaled event should be automatically reset after a thread is notified of the completion, as in the preceding code. A ManualResetEvent is like an open door—once the event is signaled, it remains signaled, no matter how many threads test the event. As shown in the following code, a ManualResetEvent is well-suited for indicating that a state transition has occurred—in this case, indicating that the application has been initialized:
public class EventApp
{
    protected ManualResetEvent initializationEvent = null;
    public EventApp()
    {
        initializationEvent = new ManualResetEvent(false);
    }

    static void Main()
    {
        Thread workerThread = new Thread(ThreadStart(this.Work));
        workerThread.Start();
        // Wait for initialization.
        initializationEvent.WaitOne();
        // Initialization complete.
        DoOtherWork();


   }

    protected void Work()
    {
        // Perform initialization.


        initializationEvent.Set();
        // Perform other work.


    }
}
The Mutex class, which gets its name from mutual exclusion, is used to allow at most one thread to access a resource. A Mutex object works by allowing only one thread to acquire ownership at any given time.
Although a Mutex object can be used to protect code regions, its primary use is to guard resources that must be shared between AppDomains or processes. A Mutex object can be given a name, and multiple processes can use the name to acquire references to the Mutex in any process. To name a Mutex object, use code such as this:
Mutex instanceMutex = new Mutex(false, "MyApp.Initialization");
Here the first parameter is a Boolean value that specifies whether the creator of the Mutex object also acquires ownership of the exclusion lock. In this code, the Mutex object is initially free to be acquired by any thread. The second parameter is optional and is the name of the Mutex. Like many objects that are managed by the Windows kernel, a Mutex object can be given a name, which enables it to be shared between multiple processes.
Named Mutex objects can be used to ensure that only one copy of your application can run at any given time. In the following code, the main thread tries to acquire ownership of a named Mutex. If the attempt is successful, the main thread continues with the main execution path. If the attempt fails, another copy of the application has previously acquired the Mutex and a message is displayed to the user before the program is exited. The complete code listing is contained in the SingleInstance project on the companion CD.
static void Main(string[] args)
{
    string mutexName = "MSPress.CSharpCoreRef.SingleInstance";
    using(Mutex instanceMutex = new Mutex(false, mutexName))
    {
        if(instanceMutex.WaitOne(1, true) == false)
        {
            Console.WriteLine("Another instance is executing");
            return;
        }
        Console.Write("Enter your name: ");
        string name = Console.ReadLine();
        Console.WriteLine("Hello, {0}.", name);
    }
}
In addition to WaitOne, the Mutex class exposes the ReleaseMutex method, which releases ownership of a Mutex object, allowing another waiting thread to acquire the Mutex. The ReleaseMutex method has no parameters and is used as follows:
portMutex.ReleaseMutex();
A thread that owns the Mutex object can call WaitOne multiple times without blocking. However, the thread must call ReleaseMutex a corresponding number of times before any waiting threads can take control of the Mutex object. If a thread that owns a Mutex object is destroyed, the Mutex is released.
One of the most common places where thread safety is needed is in collection objects. When multiple threads contend for access to a collection object, you must provide some type of synchronization or the collection will become corrupted. By default, collection classes in the .NET Framework aren’t synchronized. If multiple threads attempt to change the state of a collection object simultaneously, the object’s internal data structures won’t be synchronized and the behavior of the collection object will be unpredictable.
Leaving collections unsynchronized provides the best possible performance for single-threaded use, which is the most common scenario. If you’re writing multithreaded code, however, you’re not left out in the cold. The collection classes in the .NET Framework provide an easy way to create thread-safe collection objects.
As mentioned in Chapter 8, the ICollection interface includes the following two properties that are used for synchronization:
-
IsSynchronized Returns true if the collection is thread-safe
-
SyncRoot Returns an object that can be used for synchronization
The object returned by the SyncRoot property can be used with the lock statement to synchronize access to the collection object, like this:
lock(SyncRoot)
The following code implements a thread-safe wrapper around a Stack object by locking the object returned by the SyncRoot property for each access attempt:
public class SafeStack : Stack
{
    public SafeStack() :base() {}
    public SafeStack(ICollection col) :base(col) {}
    public SafeStack(int initialCapacity) :base(initialCapacity) {}

    public override object Pop()
    {
        lock(SyncRoot)
        {
            return base.Pop();
        }
    }

    public override object Peek()
    {
        lock(SyncRoot)
        {
            return base.Peek();
        }
    }

    public override void Push(object obj)
    {
        lock(SyncRoot)
        {
            base.Push(obj);
        }
    }

    public override object[] ToArray()
    {
        lock(SyncRoot)
        {
            return base.ToArray();
        }
    }

    public override int Count
    {
        get
        {
            lock(SyncRoot)
            {
                return base.Count;
            }
        }
    }

    public override void Clear()
    {
        lock(SyncRoot)
        {
            base.Clear();
        }
    }

    public override bool Contains(object obj)
    {
        lock(SyncRoot)
        {
            return base.Contains(obj);
        }
    }
}
In addition to the properties exposed by ICollection, most collection classes expose a static method named Synchronized that returns a thread-safe wrapper such as the one outlined in the preceding code. A collection object must be passed as a parameter to Synchronized. For example, to create an instance of a thread-safe Stack object such as the one shown in Figure 10-2, you use code such as the following:
Stack safeStack = Stack.Synchronized(new Stack());
 Figure 10-2.
If you need a collection object that’s fully synchronized so that any thread can be used to access any method or property, creating a thread-safe collection with the static Synchronized method is the simplest approach. If you need to occasionally synchronize a collection, or if you need to protect just a few methods for the collection, the collection’s SyncRoot property can be used to provide fine-grained synchronization, without the overhead of synchronization each time the collection is accessed.
Threads can also be used to carry out individual tasks asynchronously. For example, instead of executing a task on the main thread, a new thread can be created to carry out the work, as shown in the following code. When the work is completed, the thread can be destroyed.
public class Calculate
{
    double _radius;
    double _result;
    public Calculate(double radius)
    {
        _radius = radius;
    }
    public void Circumference()
    {
        _result = 2 * _radius * 3.1415926535d;
    }
    public double Result
    {
        get { return _result; }
    }
}
class ThreadPoolTestApp
{


    static void SimpleThread()
    {
        Calculate calc = new Calculate(2.0d);
        Thread worker = new Thread
            (new ThreadStart(calc.Circumference));
        worker.Start();
        worker.Join();
        Console.WriteLine("{0}", calc.Result);
    }
}
In this code, the SimpleThread method creates a new thread and uses the Calculate class to calculate the circumference of a circle. After the thread has been created, the creating thread waits for the worker thread to complete its work.
The preceding approach has a few problems.
-
Thread creation isn’t free, and spinning up a thread to carry out small units of work can increase the processing costs of these smaller tasks.
-
Context switching and scheduling costs for threads add to the cost of executing your application.
-
Every thread increases resource costs for your application, including stack space and local storage. These costs are incurred for each thread you create, even threads with a short lifetime.
Multithreaded systems that require the highest possible performance often implement a pool of threads that are used to carry out short tasks. By maintaining a collection of threads that are capable of handling tasks on demand, much of the overhead associated with creating individual threads can be avoided. The construction of a thread pool from scratch is a difficult task, however, and requires an in-depth knowledge of Windows multithreading internals. Fortunately, as a Visual C# developer, you can take advantage of the thread pool provided by the runtime.
|
The thread pool has multithreaded semantics, so in some cases, a thread pool isn’t appropriate. For example, if you require thread affinity for a task, meaning that a specific thread will always perform the work, a thread pool won’t work for you. The thread pool will dispatch threads as required, and you have no control over which threads will carry out a particular task. In a similar vein, you have no control over thread priority in a thread pool, as all threads run at the default thread priority. If you require fine-grained management of threads or have tasks that will degrade the performance of the thread pool by blocking for long periods of time, you should manually create a thread to handle the task. |
Using the thread pool to queue asynchronous tasks is a great way to handle specific types of asynchronous work. For example, a work queue is perfectly suited for cases in which work must be performed but you don’t require notification when the work has been completed. Work items are added to a work queue, and the thread pool asynchronously removes items from the queue, as shown in Figure 10-3.
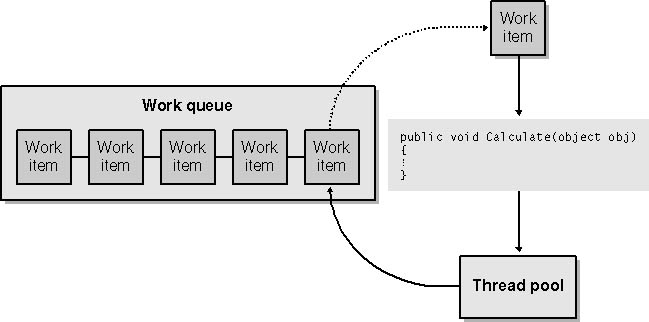 Figure 10-3.
To take advantage of the thread pool to execute work items, you must define a method that will be invoked by the thread pool to execute your work. This method, which will be bound to a WaitCallback delegate, is always declared as accepting an object parameter. Although the object parameter must be declared for every method associated with a WaitCallback delegate, it’s used only in scenarios in which arguments are provided to the method. One way to associate state information with your queued work item is to create a work object class that includes the necessary state as well as a method that’s invoked to carry out the work, as shown in the following code:
public class FibonacciWorkItem
{
    int _maxIterations;
    public FibonacciWorkItem(int maxIterations)
    {
        _maxIterations = maxIterations;
    }
    public void Calculate(object obj)
    {
        int x = 0;
        int y = 0;
        int fib = 0;
        for(int n = 0; n < _maxIterations; ++n)
        {
            Console.WriteLine(fib);
            x = y;
            if(fib == 0)
                y = 1;
            else
                y = fib;
            fib = x + y;
        }
    }
}
This code declares a FibonacciWorkItem class that includes an upper limit for a Fibonacci sequence and a Calculate method that will be invoked by the thread pool. As the Fibonacci sequence is calculated, the result is written to the console.
To queue a FibonacciWorkItem object for execution by the thread pool, the static QueueUserWorkItem method is called, as shown here:
FibonacciWorkItem fwi = new FibonacciWorkItem(25);
ThreadPool.QueueUserWorkItem(new WaitCallback(fwi.Calculate));
Another approach is to use a separate object that contains state information and pass the object as a parameter when calling QueueUserWorkItem, as shown here:
class Fibonacci
{
    public static void Calculate(object obj)
    {
        int iterations = (int)obj;


    }
}


ThreadPool.QueueUserWorkItem(new WaitCallback(Fibonacci.Calculate), 25);
In this example, the Calculate method is stateless, and each invocation requires that necessary parameters be passed to it. This approach avoids the overhead of creating a new object to house the WaitCallback delegate and parameter state.
The thread pool also comes in handy when you’re waiting for WaitHandle objects to become signaled. A common, albeit inefficient, design pattern is to create a new thread that’s used to wait for a system handle to be signaled. The thread pool enables you to designate a method that will be invoked when a WaitHandle is signaled.
The RegisterWaitForSingleObject method is used to associate a WaitHandle with a method to be invoked when the handle is signaled, as shown here:
string activePort = "2555";
int portTimeout = 5000;
RegisteredWaitHandle regHandle;
regHandle = ThreadPool.RegisterWaitForSingleObject(portOpenedEvent,
                               new WaitOrTimerCallback(PortOpened),
                               activePort,
                               portTimeout,
                               true);
The following five parameters are passed to RegisterWaitForSingleObject:
-
WaitHandle The WaitHandle object to be monitored.
-
WaitOrTimerCallback The delegate to be invoked when the WaitHandle object is signaled.
-
object An object passed as a parameter when the delegate is invoked.
-
int The length of time to wait for the WaitHandle object to be signaled before a time-out occurs. Pass a value of -1 to disable time supervision.
-
bool A Boolean value that’s set to true if the WaitHandle should be supervised only once. Pass false to enable continuous supervision.
A RegisteredWaitHandle object is returned from the call to RegisterWaitForSingleObject. To remove the association between the WaitHandle object and the callback delegate, call the RegisteredWaitHandle object’s Unregister method, like this:
regHandle.Unregister(portOpenedEvent);
The callback method associated with the WaitHandle object is declared as shown in the following code. If a time-out occurs before the WaitHandle object is signaled, the timedOut parameter will be true.
protected void PortOpened(object state, bool timedOut)
{


}
There are three additional overloaded versions of RegisterWaitForSingleObject, differing only in how the time-out period parameter is passed. Where the example discussed in this section uses an int value, these additional overloads enable the use of long, uint, or TimeSpan values.


