Creating a Web Forms Page with Control Events
To see some of the features of events in Web Forms, let’s create a Web Forms page that exercises some Web server controls. The premise of this page is that you’re choosing display attributes such as font, font size, and background for some text on the page. The page might look something like Figure 20-4.
 Figure 20-4.
All the controls will post back, so you can see the effect of your choices immediately, and the page doesn’t need a Button control.
Add a Web Forms page named Configuration to your Visual C# Web application project. Add the following controls, and set their properties as indicated in the following table.
When you’ve finished, you’ll have a page with an assortment of controls on it, most of which will cause the page to be posted to the server and therefore show an immediate effect when you change the controls’ values.
The ListBox control will contain three items that list the names of fonts. Because these are static items (and not, for example, read from a data source), you can create the items at design time in the Properties window. To create list items for the ListBox control, follow these steps:
-
Select the ListBox control, and press F4 to open the Properties window.
-
For the Items property value, click the ellipsis button to open the ListItem Collection Editor.
-
Click Add three times to add three items.
-
Select the first item in the Members list, and in the right-hand pane, set the Text property to Verdana.
-
Repeat step 4 for the other two items, setting their Text properties to Times New Roman and Comic Sans MS.
Figure 20-5 shows what the Collection Editor will look like when you’ve finished adding the three items.
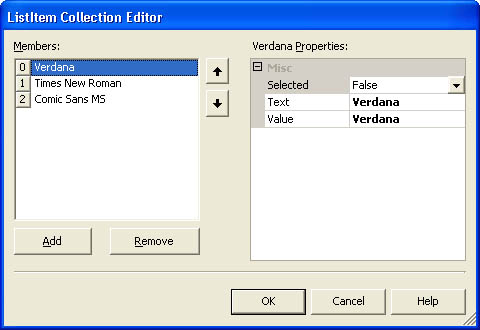 Figure 20-5.
The ListItem Collection Editor, with three items added.
Figure 20-5.
The ListItem Collection Editor, with three items added. -
Click OK to close the Collection Editor.
If you look at the page in HTML view in the designer, the control will look something like this:
<asp:ListBox id="FontsListBox"
    style="Z-INDEX: 101; LEFT: 70px; POSITION: absolute; TOP: 91px"
    runat="server" AutoPostBack="True">
    <asp:ListItem Value="Verdana">Verdana</asp:ListItem>
    <asp:ListItem Value="Times New Roman">Times New Roman</asp:ListItem>
    <asp:ListItem Value="Comic Sans MS">Comic Sans MS</asp:ListItem>
</asp:ListBox>
You need an event handler for each control so that when the control’s property value changes, the sample text in the SampleLabelText control is updated. In this section, we’ll examine the event handler for each control that causes an automatic postback.
We can start by creating a handler for the ListBox control’s SelectedIndexChanged event and setting the Font.Name property of the label to the selected text. The handler will look like this:
private void FontsListBox_SelectedIndexChanged(object sender,
                                               System.EventArgs e)
{
    SampleLabelText.Font.Name = FontsListBox.SelectedItem.Text;
}
In the handler for the CheckBox control’s CheckedChanged event, you want a handler that sets the BackColor property of the Label control if the check box is checked. The BackColor property must be set to a member of the Color structure. The code looks like this:
private void BackgroundCheckBox_CheckedChanged(object sender,
                                               System.EventArgs e)
{
    if (BackgroundCheckBox.Checked == true)
        SampleLabelText.BackColor = System.Drawing.Color.Red;
    else
        SampleLabelText.BackColor = System.Drawing.Color.White;
}
Because the page contains three grouped radio buttons, and because these buttons perform almost exactly the same task when clicked, you can create a single event handling method that will be called from all three radio buttons. To do so, follow these steps:
-
Select the first radio button (SmallRadioButton), and in the Properties window, click the Events toolbar button to display the control’s events.
-
In the CheckedChanged event box, type ResetFontSize, which will create a handler with that name.
-
Select the MediumRadioButton control, and in its CheckedChanged event box, select ResetFontSize from the drop-down list.
-
Repeat step 3 for the LargeRadioButton control.
The CheckedChanged event of all three controls is now bound to the same method. In the event handler, test to see which radio button is checked and set the SampleLabelText control’s Font.Size property accordingly. The Font.Size property is set to an instance of the FontUnit class. The code might look like this:
private void ResetFontSize(object sender, System.EventArgs e)
{
    if(SmallRadioButton.Checked)
        SampleLabelText.Font.Size = new FontUnit("Small");
    else if (MediumRadioButton.Checked)
        SampleLabelText.Font.Size = new FontUnit("Medium");
    else if (LargeRadioButton.Checked)
        SampleLabelText.Font.Size = new FontUnit("Large");
}
In Solution Explorer, right-click the Configuration.aspx file and choose Build And Browse, and then use the controls to change the sample text.


