Creating a Web Service
To create a Web service within the Visual Studio .NET IDE, start the New Project Wizard by choosing New from the File menu and then choosing Project (or by clicking the New Project button on the Start Page). In the New Project Wizard, select ASP.NET Web Service from the templates available for Visual C# projects. Then enter a location that specifies the Web server and the virtual directory where Visual Studio .NET will create the Web service. Figure 21-2 shows the New Project Wizard, with a default value for the location of the new Web service.
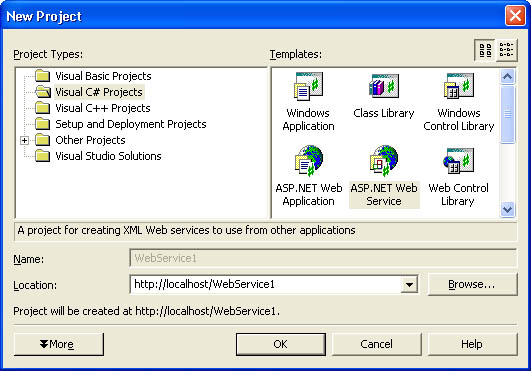 Figure 21-2.
After you’ve entered a location for your new Web service and clicked the OK button, Visual Studio will connect to the specified Web server and create the Web site, with the virtual directory you’ve provided, as shown in Figure 21-3.
 Figure 21-3.
The resulting Web service will contain the following files by default:
-
AssemblyInfo.cs Contains assembly information for the Web service
-
Global.asax Contains references to the global Web application page and code, including .cs and .resx files
-
Service1.asmx Contains references to the Web service page access point and code, including .cs and .resx files
-
Web.config Contains Web application configuration settings
-
WebService1.csproj Contains project settings and references to the Visual Studio project support files, including the .webinfo file
-
WebService1.vsdisco Contains the Web service dynamic discovery support document
The Service1.asmx file and its associated pages are created automatically and include a reference to the default Web service class. This class will make use of the System.Web.Services namespace and will inherit the System.Web.Services.WebService class. At any time, you can create a new Web service class by choosing Add Web Service from the IDE Project menu. You’ll be prompted to create the new Web service, as shown in Figure 21-4.
 Figure 21-4.
There’s very little difference between writing functionality for a Web service and writing functionality for any other application—in both cases, you create public methods that will be called from the application. These can be simple methods that return some data or the result of an action, as shown in the following examples:
[WebMethod]
public string HelloWorld()
{
    return "Hello World";
}

[WebMethod(Description="This method will return the current time",
    EnableSession=false)]
public string CurrentTime()
{
    return System.DateTime.Now.ToString();
}

[WebMethod(Description="Adds two integers and returns the result",
    EnableSession=false)]
public long Add(int x, int y)
{
    return (long)(x + y);
}
As with any other methods you write, the Web service methods could be more involved and could return more complex data. For example, you might create a method that returns an ADO.NET dataset containing data that the user requests, as shown here:
[WebMethod(Description="Retrieves a list of authors in a dataset",
    EnableSession=false)]
public System.Data.DataSet getAuthors()
{
    string connString = "data source=(local);"
        + "initial catalog=pubs;"
        + "user id=sa;password=;"
        + "persist security info=True;"
        + "packet size=4096";
    System.Data.SqlClient.SqlConnection conn =
        new System.Data.SqlClient.SqlConnection(connString);
    System.Data.SqlClient.SqlCommand cmd =
        new System.Data.SqlClient.SqlCommand();
    cmd.CommandText = "SELECT * FROM authors";
    cmd.Connection = conn;
    System.Data.SqlClient.SqlDataAdapter da =
        new System.Data.SqlClient.SqlDataAdapter();
    da.SelectCommand = cmd;
    System.Data.DataSet ds = new System.Data.DataSet();
    da.Fill(ds);
    return ds;
}


