Securing Web Services
Because Web services are hosted within Internet Information Services (IIS) as ASP.NET applications, you can use ASP.NET to provide security. This means that securing a Web service application requires the same thought and configuration as securing any other ASP.NET application. And you can take advantage of either the ASP.NET Web configuration files or the IIS configuration settings to apply some basic security to the Web service.
As calling applications attempt to access your service, you might want to authenticate them to identify the user. This will enable you to restrict access to just those users that you want to allow. The basic techniques for authenticating your Web service users include the following:
-
Standard IIS authentication (basic authentication, digest authentication, and Windows integrated security)
-
Client digital certificates
-
Internet protocol security
-
Custom authentication
We’ll look at each of these techniques in the following subsections.
You can easily configure IIS to include any of the authentication options by following these steps:
-
Open the Internet Information Services Manager.
-
Select the Web site and application that you want to secure.
-
Right-click on the application, and choose Properties from the shortcut menu.
-
In the Properties dialog box, click the Directory Security tab.
-
Click the Edit button in the Anonymous Access Authentication Control area. This will open the Authentication Methods dialog box, shown in Figure 21-11.
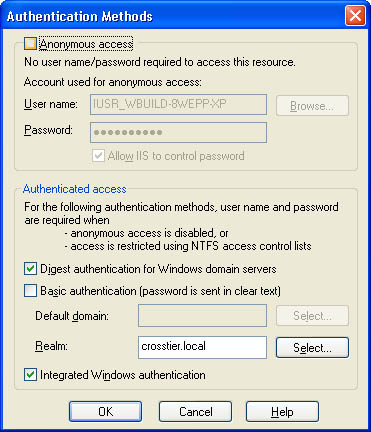 Figure 21-11.
Managing directory security with the Authentication Methods dialog box, which is accessible from the Internet Information Services Manager.
Figure 21-11.
Managing directory security with the Authentication Methods dialog box, which is accessible from the Internet Information Services Manager. -
Clear the Anonymous Access check box.
-
Select any of the other authentication methods you want to support, and click OK.
This authentication technique will require fewer programmatic changes in your Web service, but it will require some additional planning. Users should all map to users on the local server, in the local domain, or in the local active directory. This probably doesn’t lend itself easily to a site with an extremely large number of users.
The calling application will need to be responsible for passing the proper user authentication information to your service. If you’re writing the calling application, you should generate a Web service proxy class, as described earlier in this chapter, in the section “Generating a Web Service Proxy.” After the proxy class has been added to your application, you can perform the following tasks:
-
Create NetworkCredential objects to hold your credentials.
-
Add the NetworkCredential objects to a CredentialCache object.
-
Save the CredentialCache object to the Credentials property of the Web service proxy class.
From there, you can proceed to call the Web service as usual. The following code illustrates how to implement these steps:
private void btnAddNumbers_Click(object sender, System.EventArgs e)
{
    MyWebService ws = new MyWebService();
    //Establish credentials to log on to Web service.
    CredentialCache credCache = new CredentialCache();
    NetworkCredential creds = new NetworkCredential("myusername",
        "mypassword", "mydomain");
    credCache.Add(new Uri(math.Url), "Basic", credentials);
    ws.Credentials = creds;
    //Call Web service method.
    txtResult.Text = ws.Add(5, 2).ToString();
}
Another authentication technique that might work nicely if your Web service is to be used in a business-to-business scenario that requires relatively few client users is to issue each of the clients a digital client certificate. This certificate can be used by IIS to automatically authenticate the user. The user can then also be mapped to a local machine or domain user if necessary.
If you’re developing the calling application, you’ll want to ensure that you send the client certificate as part of your call to the Web service. Assuming that you have a client certificate stored in a file named Clientcert.cer, follow these steps in your application code to use the certificate:
-
Create an instance of the X509Certificate class.
-
Use the CreateFromCertFile method to load the client certificate.
-
Add the client certificate to the ClientCertificates property of the Web service proxy class.
From there, you’ll be able to call the Web service methods as usual. The following example illustrates how to implement these steps:
private void btnAddNumbers_Click(object sender, System.EventArgs e)
{
    MyWebService ws = new MyWebService();

    X509Certificate x509 =
        X509Certificate.CreateFromCertFile(@"C:\Clientcert.cer");
    ws.ClientCertificates.Add(x509);

    txtResult.Text = ws.Add(5, 2).ToString();
}
Additionally, you can restrict access to your Web services by restricting the IP addresses that can gain access to your site. This is accomplished through IIS, by configuring the Directory Security tab of the Properties dialog box. Click the Edit button in the IP Address And Domain Name Restrictions area to specify the particular IP addresses that will be allowed to access your site.
This technique lends itself to services that will be used by a small and well-defined set of calling applications. This could be useful for services you’re establishing for your corporate users or for business partners, where the IP addresses or IP address ranges are known.
Another option is to provide a custom authentication scheme. For example, you might require the calling application to pass in a user name and password to authenticate the user. Or you might simply identify the user by placing a cookie on his or her system. There are a myriad of other options, all of which will require custom coding and implementation in your Web service. Many will also require that you establish a database of users.


