6.1 Starting the Transaction
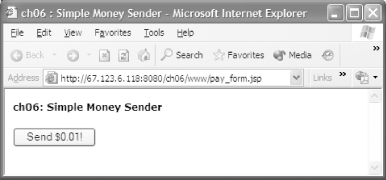
To kick off our example, let's start with a simple HTML page that will initiate our transaction, as shown in Figure 6-3.
Figure 6-3. Initial payment screen

It's not the world's most sophisticated marketing page, but it does the job and is easy to understand. The HTML for this simple page is shown in Example 6-1.
Example 6-1. Payment initialization form
<%@ page contentType="text/html; charset=iso-8859-1"

language="java" import="com.cascadetg.ch06.*" %>

<HTML>

<HEAD><title>ch06 : Simple Money Sender</title>

<link href="../../ch04/www/default.css"

rel="stylesheet" type="text/css">

</HEAD>

<BODY>

     <form action="https://www.paypal.com/cgi-bin/webscr" method="post">

       <p><strong>ch06: Simple Money Sender</strong></p>

       <p>

      <input type="hidden" name="cmd" value="_xclick">

      <input type="hidden" name="business"

      value="test_account@cascadetg.com">

      <input type="hidden" name="item_name" value="IPN Test">

      <input type="hidden" name="amount" value="0.01">

      <input type="hidden" name="return"

      value="http://67.123.6.118:8080/ch06/www/pay_form.jsp">

      <input type="hidden" name="notify_url"

      value="http://67.123.6.118:8080/ch06/www/notification.jsp">

      <!-- Note: The notify_url field is not required if the IPN

      URL was set in your account profile)-->

      <input type="submit" name="submit" value="Send $0.01!">

       </p>

     </form>

</BODY>

</HTML>
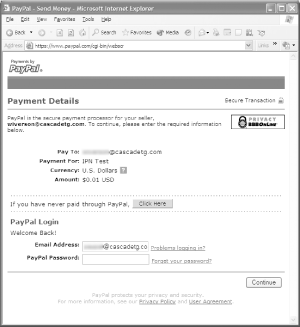
Notice that the form is posted to the PayPal server, but return and notify_url form elements are used to point back to this server. The IP address shown, 67.123.6.118:8080, is the WAN IP address and port for my server; you'll need to establish an Internet accessible address and port for your own system. Clicking the button takes the user to the PayPal server, as shown in Figure 6-4.
Figure 6-4. Initiating the PayPal transaction

Once at the PayPal server, users can walk through the rest of the transaction using the PayPal service, including entering credit card information and shipping address. When the order is complete, they are returned to the original pay_form.jsp page, ready to send another $0.01.
|


