Quality of Service Parameters
The Quality of Service (QoS) parameters are really just a collective term for all the different configurable elements of the IIS system that can be used to improve performance, particularly on a site-by-site basis.
The idea of the QoS system is to enable you to allot specific applications and Web sites with a set of service parameters. For example, if your server hosts a number of Web sites, you might want to tailor your performance parameters to give specific service levels and priorities to a given site so that you can provide a service level of quality.
This involves fine-tuning the various systems so that you can allocate the site specific amounts of CPU time (or even specific CPUs), memory, and bandwidth.
IIS 6 has collected a number of new and existing configurable elements to produce the list of QoS parameters. They are
Limiting Connections
Setting Connection Timeouts
Utilizing HTTP Compression
Throttling Bandwidth
Enabling HTTP Keep-alives
Enabling CPU Monitoring
Configuring Application Pool Queue Length Limits
Some of this isn't new?many of these items were available in past versions of IIS. What is new is how some of these items are configured (including new parameters) and how this affects processing as a whole. Information about these areas is given next?with links to additional information or chapters where appropriate.
Limiting Connections
You've been able to limit the number of simultaneous connections in IIS 4, IIS 5, and now in IIS 6. The purpose of the connection limit is to prevent your machine from being bombarded by hundreds or thousands of connections?each of which must be processed. Setting the limit to high or not enabling it can lead to your machine being swamped. Setting it too low might reject users whose requests could be processed.
In a QoS environment, we can use the connection throttling to limit connectivity to individual sites while giving higher unlimited connection limits to other more important sites.
To limit the number of connections
Open the properties for the Web Sites to set global properties or the properties for a specific Web site to limit the settings to just one site.
Change to the Performance tab.
Click the Connections Limited To option and adjust the number to the limit you desire.
You can also limit by bandwidth, which is covered later in this section.
Setting Connection Timeouts
Connection timeouts help you control your resources by freeing up connections that might otherwise have died or failed during communication. These failed connections use up slots that could be employed for genuine requests and responses.
The default setting of 120 seconds is quite long. Setting a value of 15 or 30 seconds might be more appropriate. Set the value too low, and the connection might be dropped before the request or the response has been completed, even on a perfect connection.
To set connection limits
Open the properties for the Web Sites to set global properties or the properties for a specific Web site to limit the settings to just one site.
On the Web Site tab, adjust the value of the Connection Timeout.
KEEP-ALIVES
The Keep Alive functionality is linked to the timeout value?connections are only kept alive for as long as the timeout value. So don't adjust it too low, or your server will take a performance hit through having to open and handle a larger number of connections.
The ConnectionTimeout property in the metabase can also be used to set this value and is a replacement for the previous ServerListenTimout property. The MinFileBytesPerSec property has also been added. This determines the length of time the client has to receive the entire response. The timeout value for shutting down a connection is calculated by dividing the size of the entire response (including the header information) by the MinFileBytesPerSec property to determine the maximum allowable response time period (the ConnectionTimeout property).
So, a response of 32K with a MinFileBytesPerSec value of 2048 would be given 16 seconds to accept the response. The default value is 240 bytes per second.
Utilizing HTTP Compression
Text file transfers?particularly HTML?from your server to your clients can dramatically increase the performance of your server by making more efficient use of the available bandwidth. This means that requests are completed quicker, freeing up the resources and allowing the server to process more requests.
Sure, we get a slight performance hit because of the compression, but on a text heavy Web site, the increase in request processing outweighs the decrease in processor availability.
Two different entities can be compressed?static files and script responses. Both are initially compressed on-the-fly, and then a compressed version is stored in a temporary directory to be used next time, just like a typical cache.
To enable compression
Open the properties for the Web Sites to set global properties.
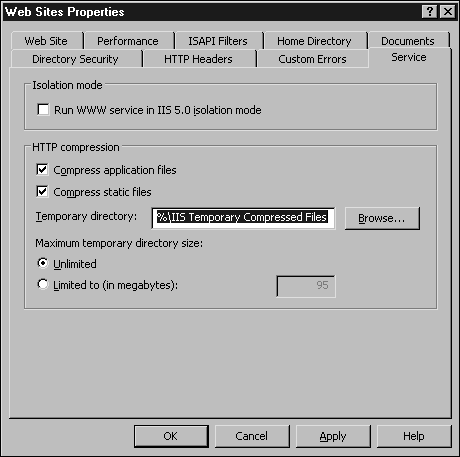
Change to the Service tab (see Figure 5.2).
Figure 5.2. Setting response compression parameters.

In the HTTP compression section, select whether to compress application files or static files.
In the Temporary Directory box, specify the location of the directory used to store compressed files. The default directory should be fine for most sites, or you can specify an alternative. However, it must be on an NTFS partition.
You can limit the amount of space allocated for the compressed file cache by selecting the Limited To (in Megabytes) option and setting the value Maximum temporary directory size.
![]() WEB RESOURCE
WEB RESOURCE
For more information on how compression works, go to the Delta Guide series Web site at www.deltaguideseries.com and enter article ID# A020502.
Throttling Bandwidth
The throttling of connections and of bandwidth are closely related. The bandwidth throttling limits the transfer rate for communication for a given Web site. This can work with connection throttling to reduce or limit the available request processing power for a site, or it can be used as an alternative method to restrict the bandwidth allocated to an entire server.
To set the bandwidth throttle for a server or Web site
Open the properties for the Web Sites to set global properties or the properties for a specific Web site to limit the settings to just one site.
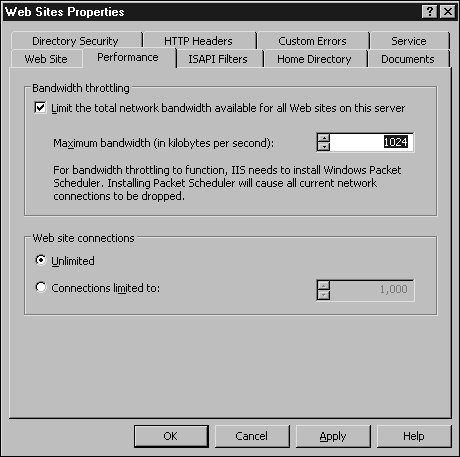
Click the Performance tab (see Figure 5.3).
Figure 5.3. Throttling the bandwidth allocated to a server.

In the Bandwidth Throttling section, select the Limit the Total Network Bandwidth Available for All Web Sites on this Server check box if you are setting preferences for the entire server, or check the Limit the Network Bandwidth Available to This Web Site box for a single site.
Specify the Maximum Bandwidth for the server or site.
Enabling HTTP Keep-Alives
A typical Web site access doesn't consist of one hit and one request. Web pages have graphics, which will also be loaded from the same site. If your visitor decides to stay, she also travels around your site looking at other pages.
Continuing to open, read, write, and close a connection for each access would be incredibly wasteful, so connections can be 'kept alive' so that in many cases a single page can be processed with a single open connection and multiple request/response exchanges.
To enable Keep-alives
Open the properties for the Web Sites to set global properties or the properties for a specific Web site to limit the settings to just one site.
On the Web Site tab, check the Enable HTTP Keep-alives to enable and uncheck to disable.
Note that Keep-alives do not affect how requests are handled. These are still placed one by one in to the request queue for the appropriate application pool; only the actual connection remains constant.
Enabling CPU Monitoring
CPU monitoring allows IIS (when working in Worker process isolation mode) to monitor the CPU usage and to kill and restart worker processes that are consuming large amounts of CPU time.

Configuring Application Pool Queue Length Limits
The queue length on application pools defines how many requests are waiting to be processed by the worker process in the application pool. Setting this value too high can leave the number of requests so large that the client times out the request before the server has a chance to respond. Setting it too low can reject requests even though there is capacity for the request to be processed.


