5.5 Using Security Templates to Deploy Secure Configurations
You've now seen several examples of how you can configure Group Policy to implement your company's specific security policies, and you've seen how you can apply different settings to large or small groups of users and computers. With such a large number of settings available, though, you may find yourself in a record-keeping nightmare trying to keep track of which settings are applied to which groups. To help solve this problem, Windows provides a number of templates that contain common security and configuration settings for a variety of purposes, from domain controllers to workstations. Of course, you may find that the built-in templates don't provide exactly what you need for your situation, and for that purpose, you can create your own templates. You'll learn about both kinds of templates in this section, and how to deploy them effectively.
5.5.1 Using Built-in Templates
Windows Server 2003 comes with several built-in security templates located in %SystemRoot%\Security\Templates, which you can use to configure specific security behaviors within your environment. For example, the Highly Secure template is designed to be applied to server computers and configures them to accept only encrypted connections from clients and from other servers. The Highly Secure template can be used to configure client computers (running Windows 2000 Professional or Windows XP) to make encrypted connections to other computers.
Here is a list of the built-in security templates:
- Setup Security (setup security.inf)
-
This template is created during installation on each Windows Server 2003 computer and contains the default security settings for that computer. This template will differ from computer to computer. It can be used to restore the default permissions on the computer, if necessary, but should not be used on domain controllers. Domain controllers do not use their default security settings; the act of promoting a server to a domain controller changes its security settings to be different than those contained in setup security.inf.
- Domain Controller Security (DC security.inf)
-
This template contains the default permissions for a domain controller.
- Compatible Workstation Security (compatws.inf)
-
This template lowers system security to help improve compatibility with older applications that expect the local Users group to have slightly more powerful capabilities.
- Secure Workstation and Secure Domain Controller Security (securews.inf and securedc.inf)
-
These templates limit the use of older NTLM authentication and prevent anonymous users from enumerating account names and shared folders. They also configure SMB packet signing for file sharing, which is disabled by default on servers. securews.inf can be applied to anything but a domain controller; securedc.inf can be applied to domain controllers.
- High Security Workstation and Domain Controller Security (hisecws.inf and hisecdc.inf)
-
These templates improve upon securews.inf and securedc.inf by requiring SMB packet signing and strong encryption and signing for interdomain communications.
- Root Directory Security (rootsec.inf)
-
This template contains directory permissions for the root directory of the system drive. While not completely useful on its own, it can be copied and used as a template, enabling you to apply desired ACLs to directories.
- Internet Explorer Security ACLs (iesacls.inf)
-
The new, stronger security settings for Internet Explorer in Windows Server 2003 are stored in iesacls.inf. This template may not prove useful unless you plan to reapply the original Internet Explorer security settings through Group Policy.
|
5.5.1.1 Example problem: the human resources department
Woodgrove Bank's human resources department handles a large number of sensitive files. The department maintains its own file server to store these files and employs a Windows administrator exclusively for the department's needs. However, the department is still connected to the same network as all other corporate users, and the department's managers have concerns that sensitive data could be intercepted and modified as it passes from the server to client computers in the department.
Don is called in to advise the department's administrator on possible solutions. After discussing the business needs of the department, they decide to configure the department's file server and client computers to require SMB packet signing, which will ensure data is not modified during transmission. The administrator manually applies the Highly Secure security template, hisecws.inf, which is located in the %SystemRoot%\Security\Templates folder of all Windows Server 2003 computers, to the server. Don sets out to apply the template to the department's client computers, which are all located in an Active Directory OU named HRDept.
5.5.1.2 Example implementation: controlling network communications security
Don needs to use Group Policy to deploy hisecws.inf to each client computer in the HRDept OU. He'll follow these steps:
Open Active Directory Users and Computers and navigate to the HRDept OU.
Right-click the OU and select Properties from the context menu.
Select the Group Policy tab and click New to create a new GPO.
Type a name for the GPO: Hisec Template, and press Enter.
Select the new GPO and click Edit. The Group Policy Object Editor window appears.
Expand the Computer Configuration portion of the GPO.
Expand the Windows Settings folder.
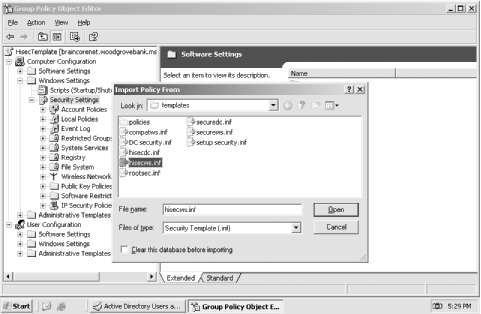
Right-click Security Settings and select Import from the context menu. You'll see the Import Policy From dialog box, shown in Figure 5-7.
Double-click hisecws.inf.
Exit the Group Policy Object Editor and click OK to close the OU's Properties dialog box.
Figure 5-7. The dialog box defaults to \Windows\Security\Templates, which is where Windows Server 2003's bundled security templates reside
The computers in the HRDept OU will receive the new GPO within an hour or so, depending upon how the domain is configured.
5.5.2 Analyzing Your Security Configuration
The security templates included with Windows Server 2003 are great for the specific behaviors that they configure, but they really just scratch the surface of what security templates are capable of doing. Fortunately, Windows Server 2003 provides the Security Configuration and Analysis (SCA) toolset, which you can use to analyze the security templates and then create new ones of your own, as you'll see in the following section.
5.5.2.1 Creating a Security Configuration and Analysis console
The main Security Configuration and Analysis console is a Microsoft Management Console ( MMC) snap-in. Typically, you won't find the SCA console preinstalled on the Administrative Tools program group on the Start menu. Instead, you'll need to configure a customized console that contains the snap-in:
From the Start menu, select Run.
Type mmc.exe and click OK or press Enter. A blank MMC console will appear.
From the File menu, select Add/Remove Snap-ins.
Click Add.
Locate Security Configuration and Analysis, as shown in Figure 5-8, and double-click it.
Click Close and then click OK.
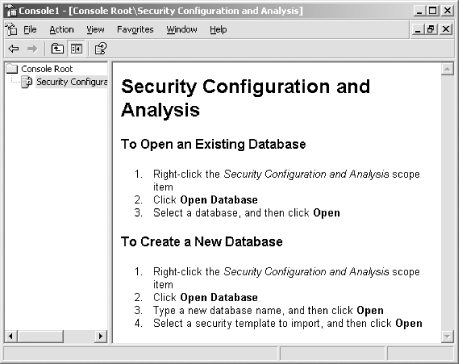
You should see a blank SCA console, as shown in Figure 5-9.
Figure 5-8. You can add other snap-ins, such as Security Templates, to create a comprehensive security management console
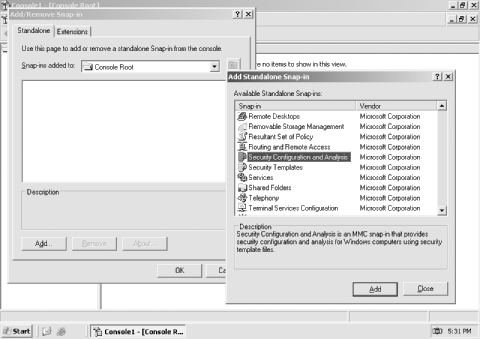
Figure 5-9. The SCA console isn't ready to use until you open a database or create a new one
5.5.2.2 Creating a new security database
The SCA snap-in is designed to work with security databases. These databases represent the active configuration of your computer and allow you to apply and analyze security templates without actually affecting your computer. The databases allow you to layer multiple security templates on top of one another and analyze the resulting final security configuration. You can then deploy the final configuration through Group Policy or simply configure your local computer to use the final configuration.
To start working with the SCA, you'll need to create a fresh security database:
In the SCA console, right-click Security Configuration and Analysis, and select Open Database from the context menu.
Type a name, such as MyDatabase, for the new database, and click Open.
Select a template to import into the new database. If there's an existing template that you want to start with, select it and click Open.
The SCA console won't do anything with your new database by default. At this point, you can continue to import templates or perform an analysis of the template you've already imported.
5.5.2.3 Importing security templates
If you already have a security template (or several templates) that you want to use as the basis for your new security database, you can import them into the SCA. Keep in mind that security templates layer on top of one another, so the order in which you import them is significant. Suppose your company is already using the Secure Workstation template, which I used in an earlier example, and that you want to deploy those security settings plus some new ones to your client computers. You start by importing the Secure Workstation template into the SCA snap-in:
Right-click Security Configuration and Analysis and select Import Template from the context menu.
Select the securews.inf template and click Open.
Repeat these steps until you've imported all the templates that you want to include in your database.
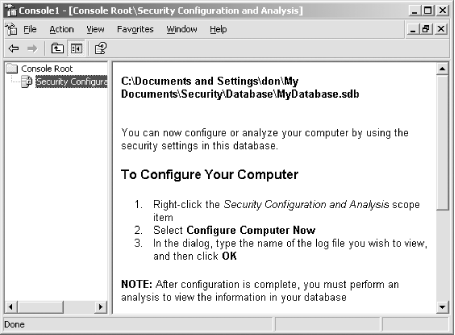
When you're finished, the SCA still won't look very exciting, as shown in Figure 5-10. It's waiting for you to perform an analysis.
Figure 5-10. You can continue to import templates while the SCA is in this mode
|
5.5.2.4 Analyzing the security settings
With your base template imported, use the SCA to perform an analysis operation. This will compare the computer's current, active configuration with the configuration specified in the security template (or templates) you've imported. Every single setting will be analyzed and reported with a status indicator. Several possible statuses may exist:
Settings may be specified in the template but not present on the computer.
Settings may be specified in the template, and present on the computer, but configured differently than in the template.
Settings may be present on the computer but not specified in the template.
You can use these status indicators to see what changes would be made if the template were applied to the computer. You can see why it would be more valuable to run the analysis against a computer that's using the default settings; if you ran the analysis against a computer that had already had the template (or templates) applied, the analysis would be empty, because applying the templates again wouldn't have any effect.
To run an analysis in the SCA console:
Right-click Security Configuration and Analysis and select Analyze Computer Now from the context menu.
Provide a path and filename for a log file, which will contain any errors that occur during the analysis.
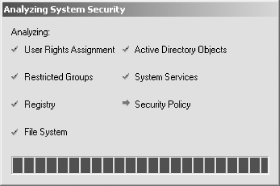
While the analysis is running, you'll see a status screen like the one in Figure 5-11.
Figure 5-11. Larger security databases will take longer to analyze, and this status screen lets you know how the analysis is proceeding
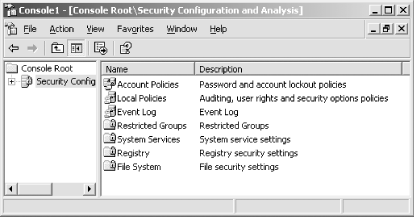
When the analysis is complete, you can browse the security database. Figure 5-12 shows the initial screen, which has categories for the various security settings that can be configured within a template.
Figure 5-12. The security analysis bears a strong resemblance to a GPO
The icons within the console provide a visual cue as to the status of the various policies. For example, look at Figure 5-13. The Maximum Security Log Size policy includes a red X, indicating that the computer isn't configured to have the same setting as the database. In this case, the database sets the log size to 19,456KB, while the local computer is configured to have a maximum log size of 131,072KB. Were you to apply this database to the computer, this setting would change. A green check mark indicates that the database and the computer configurations match.
Figure 5-13. Icons make it easy to spot the settings that don't match
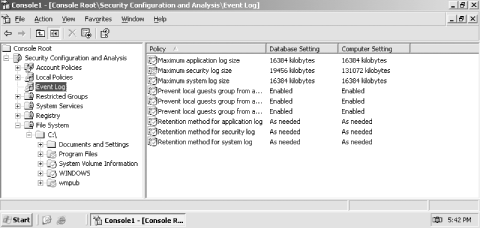
File system icons are also used in the lefthand tree view. Notice how the Program Files folder contains a red X icon. This indicates that C:\Program Files doesn't match the security settings in the database. You can expand the tree view to locate the noncompliant folder or file.
5.5.3 Creating Your Own Security Template
Once you've used the SCA to create a security analysis, you can modify the analysis to include your own security settings and then use the database to create a new template. For example, you might want to change the default file permissions on a particular folder that exists on your company's computers. To do so:
Double-click a policy or right-click one and select Properties from the context menu. For example, right-click the Program Files folder and select Properties.
You'll see a dialog box like the one shown in Figure 5-14. The dialog box will be different depending on the type of policy you opened; in this example, you can configure the folder's security settings. All policies have a "Define this policy in the database" checkbox, which effectively turns the policy "on" in the database.
Click OK to close the dialog box.
Figure 5-14. You can click the Edit Security button to perform a detailed edit of the file permissions contained in the database for this folder
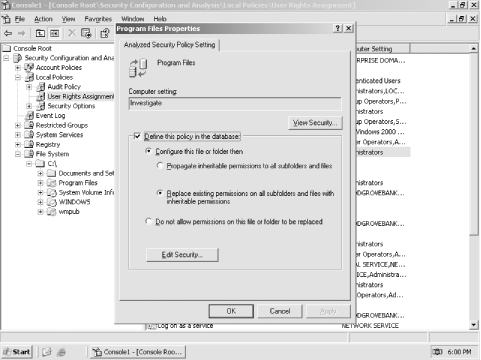
Make all the security changes you like. When you export the database to a security template, any policies that are defined in the database will be included in the template; any policies left undefined in the database (meaning the "Define this policy in the database" checkbox is cleared) will be left out of the template.
Once you've configured your security database to have the settings that you intend to deploy throughout your organization, you can create a security template. The template will contain each and every setting that is different from the computer's active configuration. Any setting that is the same in the database as on the computer won't be included in the template and so won't be applied to any computers that receive the template.
To create a template from a database:
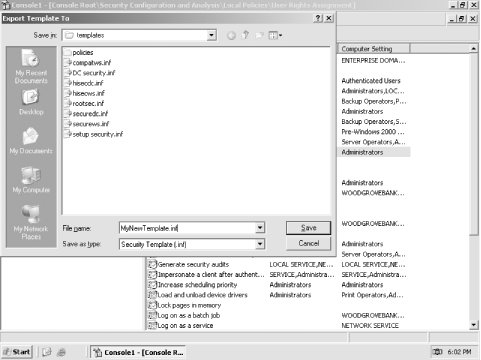
Right-click Security Configuration and Analysis and select Export Template from the context menu.
As shown in Figure 5-15, provide a filename for your new template, and click Save.
Figure 5-15. Large databases will take several minutes to export into a template
Once your database is exported to a template, you're ready to deploy it. You can use the Secedit command-line tool to apply a template to a single computer, but it's far more efficient to use Group Policy to deploy templates to multiple computers.
|
5.5.4 Deploying the Security Template with Group Policy
With a security template in hand, you can use Group Policy to deploy the template to the proper computers. Keep in mind that normal Group Policy deployment planning applies: You'll need to be aware of conflicts between GPOs at the domain, site, and various OU levels, and you'll need to be fully aware of the computers or users that will be affected by the new GPO that you create.
To deploy a security template in a GPO:
Open Active Directory Users and Computers and navigate to the OU or domain where you want to link the security template. Or, to link the template to a site, open Active Directory Sites and Services.
Right-click the OU (or domain or site) and select Properties from the context menu.
Select the Group Policy tab and click New to create a new GPO.
Type a name for the GPO and press Enter.
Select the new GPO and click Edit. The Group Policy Object Editor window appears.
Expand the Computer Configuration portion of the GPO.
Expand the Windows Settings folder.
Right-click Security Settings and select Import from the context menu. You'll see the Import Policy From dialog box, which allows you to select your template.
Double-click your template.
Exit the Group Policy Object Editor and click OK to close the OU's Properties dialog box.
5.5.5 Using Security Templates Effectively
Security templates work best, and are easiest to manage, if a single template contains just the security settings to achieve a particular goal, such as configuring file security on a particular folder or configuring user password settings. Keep in mind that you can apply as many templates as you like through one or more GPOs; keeping each template small and discrete makes it easier to apply just the right settings to the correct users and computers.
5.5.5.1 Example problem: Woodgrove server file security
While performing routine maintenance on a Windows Server 2003 server, Don discovered that the server's NTFS file permissions weren't correct. Although the default permissions provide the special Everyone group with Read and Execute permissions, this server was configured to allow the Everyone group Full Control over all files. The problem was the permissions applied to the root of the D: drive, which contained all shared files. An erroneous access control list entry was granting permission, and that permission was being inherited by all other folders on the drive.
Fixing the one server was easy enough, but Woodgrove Bank has more than 300 file servers in various offices. Don's manager couldn't give Don the time to manually investigate and repair every server. In addition, having Don fix each server couldn't guarantee that another administrator wouldn't incorrectly configure the permissions again at some point in the future.
Don decided to create a security template that contained the proper NTFS file permissions and to apply that template to all file servers in the company. Fortunately, all of the company's file servers were contained in dedicated OUs within Active Directory. Don would simply need to create the proper security template, import it into a GPO, and link that GPO to the OUs containing the file servers?after testing the GPO, of course.
5.5.5.2 Example implementation: controlling security settings
Don opens his custom SCA console on a Windows Server 2003 file server that contains the incorrect file permissions. Don isn't starting with a predefined template, but rather making his own from scratch, so he'll follow these steps:
Right-click Security Configuration and Analysis and select Open Database from the context menu.
Type DonsDatabase in the dialog box and click Open to create a new database.
Select a relatively empty security template as the first one to import. For example, Don selects rootsec.inf, which is the root security template that has already been applied to his servers.
Right-click Security Configuration and Analysis and select Analyze Computer from the context menu.
Expand the File System folder and right-click D:\. Select Properties from the context menu.
Select the "Define this policy in the database" checkbox to enable the policy in the database.
Ensure that the "Configure this file or folder then" radio button is selected, and select the "Propagate inheritable permissions to all subfolders and files" radio button.
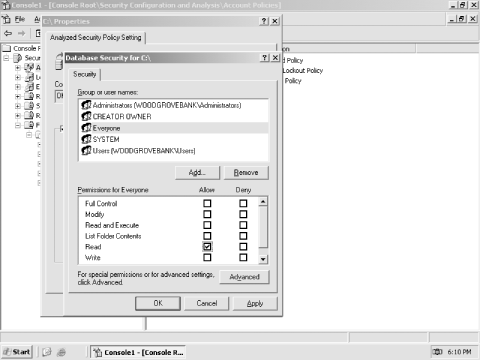
Click the Edit Security button.
As shown in Figure 5-16, modify the file system security settings as desired. Then, click OK.
Click OK to close the properties dialog for the D:\ policy.
Right-click Security Configuration and Analysis and select Export Template from the context menu.
Provide a name for the new template and click Save.
Figure 5-16. Click the Advanced button to edit advanced file permissions; otherwise, select the appropriate permissions for this folder and click OK
Once saved into a template, the security settings can be imported into a GPO and linked to the appropriate OU to apply to the servers.


